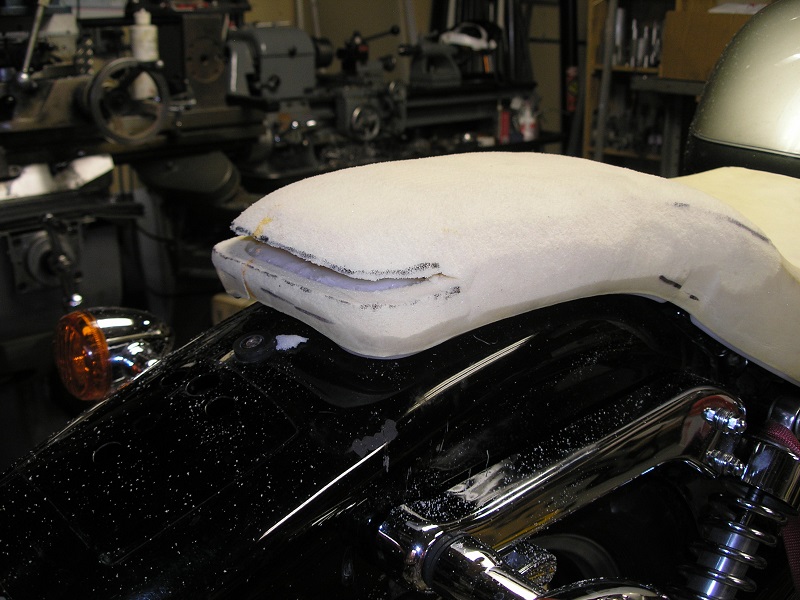
So if you notice in the picture above that has the new tank in it the seat was also modified. I wanted to take out the blocky nature of the rear pillion. My wife never takes passengers but she does run saddlebags when we are on long trips so I wanted to leave some seat there. I wanted to go with more of a fast back look.
So here is the process I used to mod the stock seat for both the gas tank change and for the making the back look more sleek.
Starting at the front. Here is the stock seat foam up against the new tank.

You can see there is about an inch or so of interference with the tank.
Here is the trim line of the seat pan as traced off the tank. It worked quite well that the seat fit just under the new tank so I could use it to lay out the new front edge.

Here is the pan trimmed. Now it was key to watch the location of that trim line and it worked out perfect that it lined up with the front edge of where the tang meets the pan on the underside. This leaves the tang in place with full strength.

After this was done I sanded and rounded all the edges so they wouldn't cut the seat cover.
From here the foam is trimmed back to match the pan and blend around the tank with a small gap. For this I prefer to steal my wife's electric knife. They work like a dream to carve seat foam.

If this is all you are doing then you can put the cover back on and pull the front down and staple it. You will need to trip the cover cutting it back to fit down close and tight around the front of the tang.
Finished the front looked like this.

Now if you want to go ahead and turn the back into a fast back style that is a bit more involved.
To do that you will be starting with a massive block of foam that looks about like this.

Note that the back of the seat is wide at the top and narrow at the bottom. That look we need to reverse along with dropping the top elevation of the pillion area.
There are three main challenges we will face in this. The first two relate to the seat pan. There are two high points in the pan that limit how low we can go. And lastly, the strap leaves a nasty impression in the side that will need to be blended out.
I start by laying out some rough trim lines to guide me.

When I was cutting across I actually angled the knife up a bit in the middle rather than flat across.

When you are making that cut you need to be very careful of the hump in the pan that goes over the voltage regulator under the seat. I trimmed it within about 1/2 inch to allow me a little for final shaping. I used a small sharp wire to push through the foam and find out what my depth was to the pan at that location. Kind of like a stick in the sand depth gauge.
When I do the shaping I will trim as much with the knife as possible but then I move to a sanding disk. I have found that random orbit sanders don't seem to work. I use a 3-5" disk on a drill and I like somewhere between 80 grit and 150 grit. You need to have fresh very sharp sandpaper when you do this. That will cut the foam smoothly. Dull or too fine just doesn't work. At this point you need to start blending and making it as smooth and professional as possible. You would be surprised what can show through a seat cover. You also need to blend out the depression from the old seat strap if you don't want that to show.
Here is where I got to.

Now at this point it was thinner but not the fast back look I was looking for. The issue is you really can't taper the back of the seat due to a stupid hump they have in the pan for what appears to be no apparent reason other than to frustrate would be modifiers!

it is the hump right where the rear steel tang attaches the secures the back of the seat to the fender.
So from here the pan was going to need more modification. I started by cutting out just enough to drop the top of that hump down to the "next level" of the pan.
Here is the layout.

Here are the cuts.

A little more trimming to bring the front of the cuts to a nice V. Then heat the bend point at the front of a T with a propane torch. I planned to use my heat gun but I couldn't find the tip I was looking for so I went old school flame to get the job done.

Now the gap is closed and that surface that was too high is taken down about as low as you can go and it meets the rear of the seat pan. From here it will be time to do some welding.
Again I should have had my heat gun but I used the propane torch. I took the section that I had cut out and slit it lengthwise to make welding filler rod out of it. I used the torch to soften the pan and the filler and slowly worked around in 1/2-3/4" long sections at a time. I allowed them to cool as I worked on another section.

The seat pan is polypropylene so it behaves a bit different from ABS if you have ever welded a fairing. ABS is amorphous so it has a softening point and not a hard melting point. It is much easier to sneak up on and work though a wide range of temperature. PolyPro is semi-crystaline material and has an actual melting point that is more pronounced. The material will soften and you can work and weld it but you must be ready when it goes clear you hit the melting point. At that point pull all heat and start to cool it. I realize it is not pretty but it is strong.
You can also see in that picture I reattached the seat tang. The holes moved forward a bit because I had to flatten the step in the tang since I lowered that surface of the seat pan. Over all it worked out well.
From here I had a hollow section between the foam and the seat pan. I did not want to just keep trimming the foam or I would eventually open a hole in the top surface. So I took the same section out of the foam that I did on the seat pan.

From here I opened that slit and sprayed in 3M foam adhesive. It is made for gluing foam and is awesome for working with seats. Very strong stuff.

I closed the split and it looked like this.

I did some final shaping so now the back of it slopes down rather than going straight back and dropping off. The seat has more of tapered look to it. Now it was ready for the cover.
I normally farm out my upholstery work but this time I wanted to see if I could re-use the stock cover. I have a lot of respect for people that can do decent upholstery. Those guys make it look so easy but it isn't! The stock seat cover is not quite cut right for the new shape. It took a lot of pulling and tugging to get it stretched right to not have any wrinkles back in the area of the old strap. That was partially because I took down the top of the seat as it transitioned from the front to the back half of the seat.
I finally got it on the way I wanted and here is the final product.

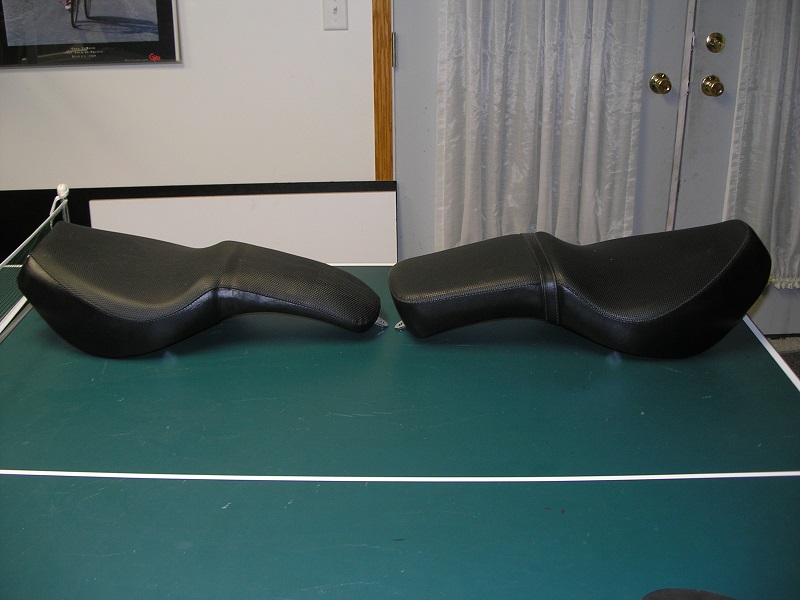
For those who want to know just how much did the seat really change here are a couple of comparison shots with a stock seat.


Up next will be the chain drive conversion with mag wheels including swingarm mods and modification of the stock belt cover for use with the chain.

