Donate!
Welcome, Guest. Please Login or Register :: View Members
Pages: 1 2 3 ... 5
Send Topic Print
Purple Passion - (**UPDATE -Final Paint!! ***) (Read 2878 times)
smokin_blue
Serious Thumper
*****
Offline

From Cafes to
Streetfighters! I
build them all!

Posts: 830
St. Paul, MN
Gender: male
Purple Passion - (**UPDATE -Final Paint!! ***)
01/20/16 at 18:04:52
 
Hey guys (and gals!) now that Cafe ala Carte is pretty much finished it is time to move on to the next project and I thought I should start a build thread on it.

I finally convinced my wife that she should let me build her a custom.  A little background, she started riding again a couple of years ago after being away from it for 15 years.  Even back then she didn't get into it that much.  Well mid life has a way of changing you.   3 years ago she wanted to get back into it and really wanted a small bike, like the Rebel 450 she had so long ago.  I couldn't convince her to get an S-40 no matter how hard I tried.  She wanted a smaller bike to learn on again.  I couldn't slight her for that so we picked up a 10 year old GZ250 that was just mint.  She rode it for 8 weeks and put 1,400 miles on it.  After a 125 mile ride  chasing my Sprint ST up big hills along the river bluffs of the WI/MN boarder she finally agreed maybe it was time to look at an S-40.  We sold the GZ for $200 more than we paid for it and  bought a 2006 S-40 in August and she put another 2300 miles on it.  The next year she logged just over 6,500 miles which is pretty respectable living in Minnesota where we have such a relatively short riding season.  Now this past year she put on 6,100 miles and she did her first long trip.  We did 700 miles in 2.5 days consisting of two 300 mile days back to back.  That doesn't seem that bad until you realize we were working hard to hold a 40 mph average because it was all curves so that was 8 hrs in the saddle each day.  The reality of this trip is that it brought out some of the challenges of the S-40 (like a tank with 2.9 gal)

So fast forward now to this fall.  I finally convinced her to let me build her a custom and build her the bike I thought the S-40 should be.  I really wanted to buy her a second bike to build but she kept saying no.  Then jokingly one night she said "You work nights right?"  Because she didn't want her bike down for anymore than 24 hrs at a time since she pretty much rode everyday the weather allowed.  Then the reality set in.  If she wanted the custom and wanted to have full access she had better let me buy a second one.  So we set out to find one.  

We ended up buying a matching Black 2006 S-40 from PBLover who used be on this forum. (Didn't know that until we got home and figured it out).  Same bike she had just less miles.

Below are pics of the new bike and the twin.


Here are the twins!  (and the proud owner)


So now the build!  My plans are to change all the little things I don't quite like about the S-40.  (No arguments, these are just my views)
The build plans are these:

1. Convert to mag rims so we can run tubeless tires.
2. Convert to chain drive and gear up 10%
3. Upgrade to a 4.2 gallon tank. Link for that mod http://suzukisavage.com/cgi-bin/YaBB.pl?num=1453431803/0#0
4. Upgrade the front brake - 320mm 4 pot here we come.
5. Dyna muffler and rejet
6. Add the Trail Tech Vapor computer she loves so much
7. Small windshield
8. Shave the rear seat profile
9. Ditch the blocky rear brake light for a under fender cat eye
10. Convert left grip to smaller diameter to help small hands on the clutch side.
11. Versy Cam chain tensioner mod
12. Fix the plug leak

Lastly it will be painted.  Hence then name.  I told my wife she had to name her bike.  She thought for a while and came back with Purple Passion because she wanted it painted a deep rich purple.  

Now the search for a deep purple started and to try to find a car to look at with that description is a challenge.  I send a gear headed coworker on the hunt and 20 minutes later I had a link to a picture.  YES!  that was it.  2016 Dodge Stryker Purple!!  It is a tricolor so it has a deep base with a tinted clear midcoat with metal flake and then a clear over that!  So it is dark and rich in the shade and explodes in the sunlight!  

Here is a picture from SEMA.


I have gotten started so stay tuned as I update the thread with build details.
Back to top
 
« Last Edit: 05/28/17 at 17:05:04 by smokin_blue »  
WWW   IP Logged
Kris01
Serious Thumper
*****
Offline

Eat, sleep, RIDE!

Posts: 3767
Tennessee
Gender: male
Re: Purple Passion - the project begins
Reply #1 - 01/20/16 at 19:05:31
 
Waiting patiently...!  Wink

The 4.2 gal. tank sounds very enticing. Are you going to mod the stock tank or build a custom one? That should give us about another 50-75 miles per tank (roughly).
Back to top


There's no problem that a full tank of gas and a sunny day can't fix!

2008 S40, Rotella T 15W-40 w/ZDDP added, Dyna, 140/90-15, Battery Tender Jr., Seat lift, #52.5/150/3 washers, Raptor
  IP Logged
smokin_blue
Serious Thumper
*****
Offline

From Cafes to
Streetfighters! I
build them all!

Posts: 830
St. Paul, MN
Gender: male
Re: Purple Passion - the project begins
Reply #2 - 01/20/16 at 19:12:10
 
Nope...Finally found another model that fits actually quite well.  I will try to get the details of that build up tomorrow.   Wink
Back to top
 
« Last Edit: 01/25/16 at 18:29:56 by smokin_blue »  
WWW   IP Logged
Kris01
Serious Thumper
*****
Offline

Eat, sleep, RIDE!

Posts: 3767
Tennessee
Gender: male
Re: Purple Passion - the project begins
Reply #3 - 01/20/16 at 19:16:33
 
Looking forward to it!  Wink
Back to top


There's no problem that a full tank of gas and a sunny day can't fix!

2008 S40, Rotella T 15W-40 w/ZDDP added, Dyna, 140/90-15, Battery Tender Jr., Seat lift, #52.5/150/3 washers, Raptor
  IP Logged
justin_o_guy2
Serious Thumper
*****
Offline

What happened?

Posts: 55279
East Texas, 1/2 dallas/la.
Re: Purple Passion - the project begins
Reply #4 - 01/20/16 at 19:18:19
 
Convert to mag rims so we can run tubeless tires.
2. Convert to chain drive and gear up 10%
3. Upgrade to a 4.2 gallon tank. (I will post a link here for a separate thread on that one since I think it will be of interest to others).
4. Upgrade the front brake - 320mm 4 pot here we come.
5. Dyna muffler and rejet
6. Add the Trail Tech Vapor computer she loves so much
7. Small windshield
8. Shave the rear seat profile
9. Ditch the blocky rear brake light for a under fender cat eye
10. Convert left grip to smaller diameter to help small hands on the clutch side.
11. Versy Cam chain tensioner mod
12. Fix the plug leak

You're gonna do ALL that and Not slap a cam in it?
Back to top


The people never give up their liberties but under some delusion.- Edmund Burke.
  IP Logged
smokin_blue
Serious Thumper
*****
Offline

From Cafes to
Streetfighters! I
build them all!

Posts: 830
St. Paul, MN
Gender: male
Re: Purple Passion - the project begins
Reply #5 - 01/20/16 at 19:21:10
 
Well if I do a cam...... then I had better put the VM on it .....oh and port the exhaust.....maybe a big bore kit and a high comp piston....  Sounds like a kitchen project now   Grin

That is a good point though. I will have to think about it.   I do have a cam, carb and porting on the Cafe bike.
Back to top
 
 
WWW   IP Logged
justin_o_guy2
Serious Thumper
*****
Offline

What happened?

Posts: 55279
East Texas, 1/2 dallas/la.
Re: Purple Passion - the project begins
Reply #6 - 01/20/16 at 19:53:47
 
I did cam, Supertrapp/14 disks, jets, and if I could do it over I think I would not do that expensive Supertrapp, but do the Dyna. I didn't port it. Id do that if I had a chance. I did increase the volume between filter carburetor, and I don't think I would do that K and N filter again. Gotta have Something to go in there so you can ride while it dries.


That's a tasty looking purple. Left alone with that car, I don't think I could promise to not lick it.
Back to top


The people never give up their liberties but under some delusion.- Edmund Burke.
  IP Logged
Dave
YaBB Moderator
ModSquad
*****
Offline

SuzukiSavage.com
Rocks!

Posts: 17805
Camp Springs, Kentucky
Gender: male
Re: Purple Passion - the project begins
Reply #7 - 01/21/16 at 04:19:56
 
I put a Wiseco 95mm and Stage 1 cam and did some port clean up and made the donut in the exhaust port a bit bigger, and a DYNA muffler....and I ran the stock carb for a year before I did the Cafe' conversion.  The stock carb worked very well after it was jetted properly, and the engine ran great.  Later I switched to the VM carb and noticed it was a bit quicker to respond to the throttle changes - but the difference wasn't huge and it was easier to hold a steady speed with the stock carb....the stock carb actually worked really well.

The belt drive is really a pretty nice feature and it is very clean and requires very little maintenance.....you should consider keeping the belt drive and doing the single or double Kawasaki Pulley conversion.  The front pulley alone gives you an 8.7% overdrive.....and the front/rear combination gives you a 13.7% overdrive (and may be just a bit too tall for a stock engine).  If you did the front pulley and went to a 140/90 rear tire....you likely would get the 10% you are looking for.
http://suzukisavage.com/cgi-bin/YaBB.pl?num=1384949185


Back to top


Someday I will be old......But not today!

  IP Logged
justin_o_guy2
Serious Thumper
*****
Offline

What happened?

Posts: 55279
East Texas, 1/2 dallas/la.
Re: Purple Passion - the project begins
Reply #8 - 01/21/16 at 07:06:06
 
Something else that I did was slice the header up and removed the inner pipe. I'm not sure what that accomplished or harm it did. But, I Did study it carefully and planned every cut first, so all the pieces were indexed. It went together beautifully. The welder TIGged it up and got such a kick out of it and the way I put stuff up, it cost me nothing.
With the Dunlop rear tire on it the speedo was pretty accurate.
The carb is sensitive to atmospheric conditions and I only saw 100 MPH once, but the 0-60 time was either six seconds or dadgum close. Some of these guys have dropped weight off AND jacked up the little engine some. Depending on your riding style and choices of mods, this bike Can, be made to get across town, drag pegs around tight corners and longer sweepers, and generally just be a hoot to ride.. Now, what Dave has, I don't know how it acts off the line or wanting to go from 25 to 40.
But I can see cruising around and avoiding the Buzz.
By 20,000 miles I had to sew the rubber on the right side peg.
The underside was worn away , the end cap weld was almost gone. Baling wire was holding when I sold it. It Will corner hard enough to pinch a foot between the peg and engine.
Back to top


The people never give up their liberties but under some delusion.- Edmund Burke.
  IP Logged
smokin_blue
Serious Thumper
*****
Offline

From Cafes to
Streetfighters! I
build them all!

Posts: 830
St. Paul, MN
Gender: male
Re: Purple Passion - the project begins
Reply #9 - 01/21/16 at 19:26:05
 
Kris01 wrote on 01/20/16 at 19:05:31:
Waiting patiently...!  Wink

The 4.2 gal. tank sounds very enticing. Are you going to mod the stock tank or build a custom one? That should give us about another 50-75 miles per tank (roughly).


Here is the link for that mod

http://suzukisavage.com/cgi-bin/YaBB.pl?num=1453431803
Back to top
 
 
WWW   IP Logged
smokin_blue
Serious Thumper
*****
Offline

From Cafes to
Streetfighters! I
build them all!

Posts: 830
St. Paul, MN
Gender: male
Re: Purple Passion - the project begins
Reply #10 - 01/22/16 at 10:50:07
 
Ok so here is a before picture on the lift.


and here is a current picture


So far you can see I have the new tank on, I have the new rear wheel, the chain drive, and the seat done.  I will post details on each of these areas shortly.

as far as the rear wheel someone was asking so here are the details on that.

The back wheel  will be a 16" off an '83 GS550 but the one I bought has a frozen bearing so in the short term I am using the one off an '83 GR650 that I have parked in my garage.   They are essentially the same although the suzuki PN is different.  From what I can determine it is only their source of supply that was different.    There are a couple of 16" rear mags that are straight bolt ups that you can use the stock brake up and drive hub.


The front will be a 19" mag off a similar GS model.  There are several models you can choose from and there are some good prior build links to reference on the forum for that mod.  Brakes are your issue there but I will be addressing that also in my build.
Back to top
 
 
WWW   IP Logged
Kris01
Serious Thumper
*****
Offline

Eat, sleep, RIDE!

Posts: 3767
Tennessee
Gender: male
Re: Purple Passion - the project begins
Reply #11 - 01/22/16 at 12:44:24
 
Looking great so far! I wish I had half the talent that some of you guys have!  Smiley
Back to top


There's no problem that a full tank of gas and a sunny day can't fix!

2008 S40, Rotella T 15W-40 w/ZDDP added, Dyna, 140/90-15, Battery Tender Jr., Seat lift, #52.5/150/3 washers, Raptor
  IP Logged
smokin_blue
Serious Thumper
*****
Offline

From Cafes to
Streetfighters! I
build them all!

Posts: 830
St. Paul, MN
Gender: male
Re: Purple Passion - the project begins
Reply #12 - 01/25/16 at 18:21:47
 
So if you notice in the picture above that has the new tank in it the seat was also modified.  I wanted to take out the blocky nature of the rear pillion.  My wife never takes passengers but she does run saddlebags when we are on long trips so I wanted to leave some seat there.  I wanted to go with more of a fast back look.

So here is the process I used to mod the stock seat for both the gas tank change and for the making the back look more sleek.

Starting at the front.  Here is the stock seat foam up against the new tank.


You can see there is about an inch or so of interference with the tank.

Here is the trim line of the seat pan as traced off the tank.  It worked quite well that the seat fit just under the new tank so I could use it to lay out the new front edge.


Here is the pan trimmed.  Now it was key to watch the location of that trim line and it worked out perfect that it lined up with the front edge of where the tang meets the pan on the underside.  This leaves the tang in place with full strength.


After this was done I sanded and rounded all the edges so they wouldn't cut the seat cover.

From here the foam is trimmed back to match the pan and blend around the tank with a small gap.  For this I prefer to steal my wife's electric knife.   They work like a dream to carve seat foam.


If this is all you are doing then you can put the cover back on and pull the front down and staple it.  You will need to trip the cover cutting it back to fit down close and tight around the front of the tang.

Finished the front looked like this.


Now if you want to go ahead and turn the back into a fast back style that is a bit more involved.  

To do that you will be starting with a massive block of foam that looks about like this.


Note that the back of the seat is wide at the top and narrow at the bottom.  That look we need to reverse along with dropping the top elevation of the pillion area.  


There are three main challenges we will face in this.  The first two relate to the seat pan.  There are two high points in the pan that limit how low we can go.  And lastly, the strap leaves a nasty impression in the side that will need to be blended out.

I start by laying out some rough trim lines to guide me.


When I was cutting across I actually angled the knife up a bit in the middle rather than flat across.


When you are making that cut you need to be very careful of the hump in the pan that goes over the voltage regulator under the seat.  I trimmed it within about 1/2 inch to allow me a little for final shaping.  I used a small sharp wire to push through the foam and find out what my depth was to the pan at that location.  Kind of like a stick in the sand depth gauge.

When I do the shaping I will trim as much with the knife as possible but then I move to a sanding disk.  I have found that random orbit sanders don't seem to work.  I use a 3-5" disk on a drill and I like somewhere between 80 grit and 150 grit.  You need to have fresh very sharp sandpaper when you do this.  That will cut the foam smoothly.  Dull or too fine just doesn't work.  At this point you need to start blending and making it as smooth and professional as possible.  You would be surprised what can show through a seat cover.  You also need to blend out the depression from the old seat strap if you don't want that to show.

Here is where I got to.


Now at this point it was thinner but not the fast back look I was looking for.  The issue is you really can't taper the back of the seat due to a stupid hump they have in the pan for what appears to be no apparent reason other than to frustrate would be modifiers!   Undecided  it is the hump right where the rear steel tang attaches the secures the back of the seat to the fender.

So from here the pan was going to need more modification.  I started by cutting out just enough to drop the top of that hump down to the "next level" of the pan.

Here is the layout.


Here are the cuts.


A little more trimming to bring the front of the cuts to a nice V.  Then heat the bend point at the front of a T with a propane torch.  I planned to use my heat gun but I couldn't find the tip I was looking for so I went old school flame to get the job done.


Now the gap is closed and that surface that was too high is taken down about as low as you can go and it meets the rear of the seat pan.  From here it will be time to do some welding.

Again I should have had my heat gun but I used the propane torch.  I took the section that I had cut out and slit it lengthwise to make welding filler rod out of it.  I used the torch to soften the pan and the filler and slowly worked around in 1/2-3/4" long sections at a time.  I allowed them to cool as I worked on another section.  


The seat pan is polypropylene so it behaves a bit different from ABS if you have ever welded a fairing.  ABS is amorphous so it has a softening point and not a hard melting point.  It is much easier to sneak up on and work though a wide range of temperature.  PolyPro is semi-crystaline material and has an actual melting point that is more pronounced. The material will soften and you can work and weld it but you must be ready when it goes clear you hit the melting point.  At that point pull all heat and start to cool it.  I realize it is not pretty but it is strong.

You can also see in that picture I reattached the seat tang.  The holes moved forward a bit because I had to flatten the step in the tang since I lowered that surface of the seat pan.  Over all it worked out well.

From here I had a hollow section between the foam and the seat pan.  I did not want to just keep trimming the foam or I would eventually open a hole in the top surface.  So I took the same section out of the foam that I did on the seat pan.


From here I opened that slit and sprayed in 3M foam adhesive.  It is made for gluing foam and is awesome for working with seats.  Very strong stuff.   Cheesy

I closed the split and it looked like this.  


I did some final shaping so now the back of it slopes down rather than going straight back and dropping off.  The seat has more of tapered look to it.  Now it was ready for the cover.

I normally farm out my upholstery work but this time I wanted to see if I could re-use the stock cover.  I have a lot of respect for people that can do decent upholstery.  Those guys make it look so easy but it isn't!  The stock seat cover is not quite cut right for the new shape.  It took a lot of pulling and tugging to get it stretched right to not have any wrinkles back in the area of the old strap.  That was partially because I took down the top of the seat as it transitioned from the front to the back half of the seat.  

I finally got it on the way I wanted and here is the final product.


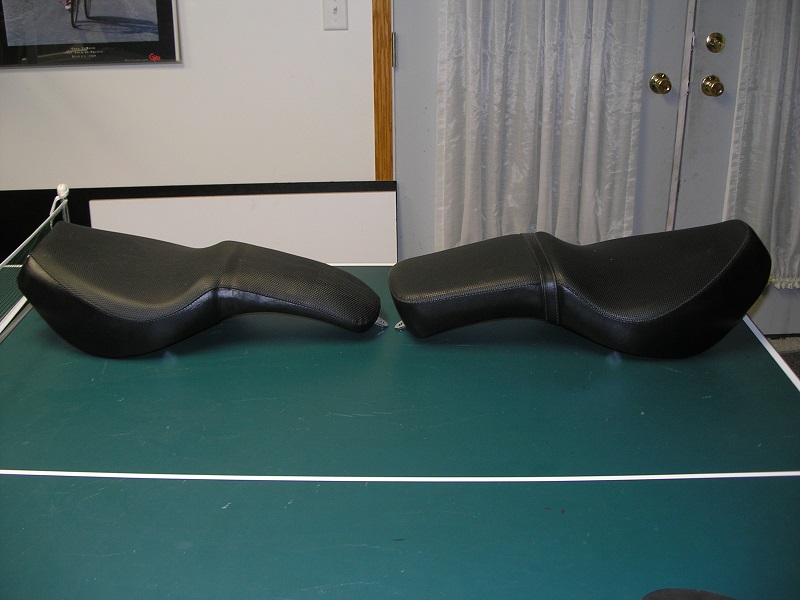
For those who want to know just how much did the seat really change here are a couple of comparison shots with a stock seat.


Up next will be the chain drive conversion with mag wheels including swingarm mods and modification of the stock belt cover for use with the chain.
Back to top
 
 
WWW   IP Logged
badwolf
Serious Thumper
*****
Offline

Ridin' my Lil'
Bagger - 153k miles
so far

Posts: 793
Palm Beach County, FL
Gender: male
Re: Purple Passion - the project begins
Reply #13 - 01/25/16 at 18:42:29
 
Smoking, You are doing a hell of a good job, not only on the project, but explaining it as you go! A big THANK YOU from all of us following now and in the future.
For my 2 cents, looking at the back of the seat pan the hump in front and back must be to keep the passenger's weight centered between them. Stiffening the back to keep the passenger from just sliding off under the Savage's ''tremendous acceleration''!  
Back to top
 
 
  IP Logged
Art Webb
Serious Thumper
*****
Offline

SuzukiSavage.com
Rocks!

Posts: 3007
columbus, Texas
Gender: male
Re: Purple Passion - (**UPDATE - Seat mods***)
Reply #14 - 01/26/16 at 17:03:19
 
yes indeedy, a very good job
Back to top
 
 
  IP Logged
Pages: 1 2 3 ... 5
Send Topic Print


« Home

 
« Home
SuzukiSavage.com
04/27/24 at 06:26:49


General CategoryRubber Side Down! › Purple Passion - (**UPDATE -Final Paint!! ***)


SuzukiSavage.com » Powered by YaBB 2.2!
YaBB © 2000-2007. All Rights Reserved.