Donate!
Welcome, Guest. Please Login or Register :: View Members
Pages: 1 2 3 4 5 
Send Topic Print
Supercharged Cafe LS650 (Read 689 times)
DragBikeMike
Serious Thumper
*****
Offline

SuzukiSavage.com
Rocks!

Posts: 4222
Honolulu
Re: Supercharged Cafe LS650
Reply #45 - 11/23/23 at 17:22:10
 
Your new bearing will be located even farther from the left-hand main bearing.  So, the potential excursion will be even more than .003”.  I don’t know if that’s a problem, but it seems like it could be.  It would result in the new bearing interfering with the normal up & down play in the left-hand main bearing.  It seems to me that would continuously work on the fitup between your extension shaft and the crank.

Have you devised a way to check the runout on your extension shaft.  It’s impossible to do with the engine fully assembled.  As you rotate the engine, the cam drive is pulling on the right side of the crank which causes the left side of the crank to wobble.  In addition, the rod is always pulling up or pushing down on the crank as you rotate it.  The only way I have been able to get decent runout readings with the crank in the engine is to remove the cylinder head, cylinder, & piston.  Then the crank rotates free and you can get half-decent runout readings.  I’m curious what sort of runout you have on the end of that extension shaft.  When you are all done you will have a three-bearing system and that’s not gonna tolerate much runout, especially with the extension shaft being threaded onto the crank.  It might even be preferable to only run a seal on the extension.  The seal will tolerate some runout, a roller bearing won’t.

How are you planning to lubricate the new bearing.  I’ve gone through several left-hand main bearings due to insufficient lubrication.  The oil for the left-hand main bearing is provided by the forward cylinder head drain.  That drain oil runs down the inside surface of the engine case, so almost none of that oil makes it into the alternator cavity.  That cavity runs pretty dry, and any oil that finds it’s way in there gets thrown of by the spinning rotor and flywheel.  I don’t think your new bearing will get much oil.  You might wanna consider installing an independent oil circuit for that new bearing.  This post provides some good info on the oil system.

http://suzukisavage.com/cgi-bin/YaBB.pl?num=1695617698

Back to top


Knowledge is power.
  IP Logged
zevenenergie
Serious Thumper
*****
Offline

SuzukiSavage.com
Rocks!

Posts: 1250
The Netherlands   Den Haag
Re: Supercharged Cafe LS650
Reply #46 - 11/24/23 at 01:06:03
 

I like to make a contribution:

If the extension of the shaft is turned on an adapter that has the same shape as the crankshaft, you will get a much smaller run out.

This adapter must be turned on the lathe and immediately turn the axle on it without removing the adapter, otherwise you will get runout from re-clamping in the chuck.

You should use a strong alloy steel for the shaft. You should not underestimate the forces that are placed on the thread. (Using mild steel, don't be surprised if it breaks off.)

You would benefit from choosing a sealed C5 bearing to absorb the runout and it does not require oil.
It is also important to keep the axle as short as possible.

But you have to remain realistic. It's not an ideal situation.

Only a seal is a good alternative. And I wouldn't use a v-belt but a toothed belt. And you must ensure that the belt cannot chatter by supporting both parts of the belt with bearings halfway between the pulleys.
Then you only absorb the driving forces from the compressor.

Your crankshaft bearing will then be subjected to a heavier load.
You Should have to calculate whether this remains within limits.
You can replace the crankshaft bearing with a cylinder bearing if necessary.
I have done this in high reving two stroke engines, and if you do this on one side it works fine. You can get away whit one balbaring to absorb the axial forces.


Back to top


Do what you know is right. (you can always use fear as a counselor later)
  IP Logged
DennyzfR6
YaBB Newbies
*
Offline

SuzukiSavage.com
Rocks!

Posts: 47

Re: Supercharged Cafe LS650
Reply #47 - 12/07/23 at 01:11:38
 
Hi All..  
Back again working on the project. Have been busy with a different project here at home.. finally realised a long time dream of having a bike lift at home.  It took a lot of work though, so have not worked that much on the Savage.  Grin Grin Grin

Just have to finish up the electricity etc, final step. Cables already run under the floor just have to hook things up. But really happy and a little proud!  Cheesy


Back to top
 
 
  IP Logged
DennyzfR6
YaBB Newbies
*
Offline

SuzukiSavage.com
Rocks!

Posts: 47

Re: Supercharged Cafe LS650
Reply #48 - 12/07/23 at 01:55:41
 
Soo.. onwards with the bike..  
Based on you guys' post we had a good look at the situation regarding the drive.. the extra shaft on the crank and the play etc.

We have put the bearing more inwards and closer to the crank. Everything has been moved more inwards quite a bit.
We have checked there is enough clearance on the rollerbearing to take up any play..   and I don't think it will be an issue to be honest.

In the topic of savagebob he simply pressed a bearing in the cover.. and that also held up, so I think this should definately work. If not..   new cover and we start over  Huh

It is a bit of an experiment after all   Roll Eyes

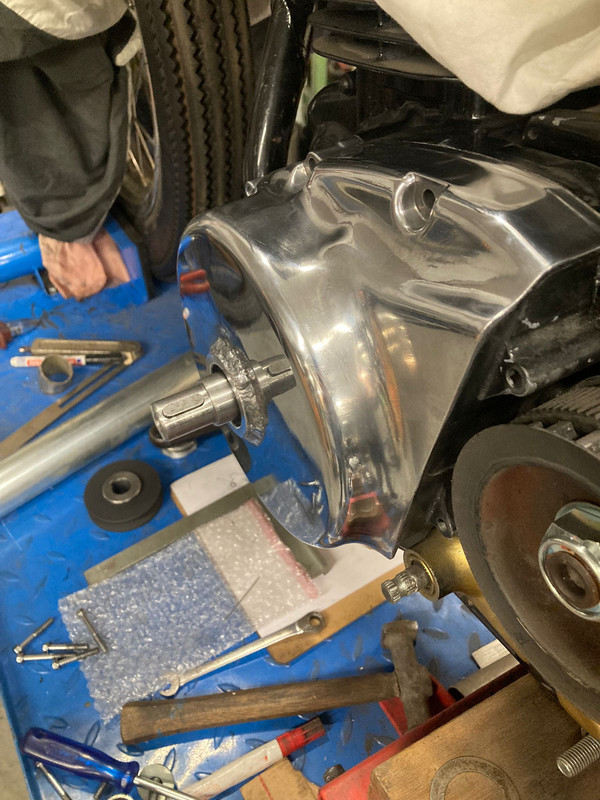
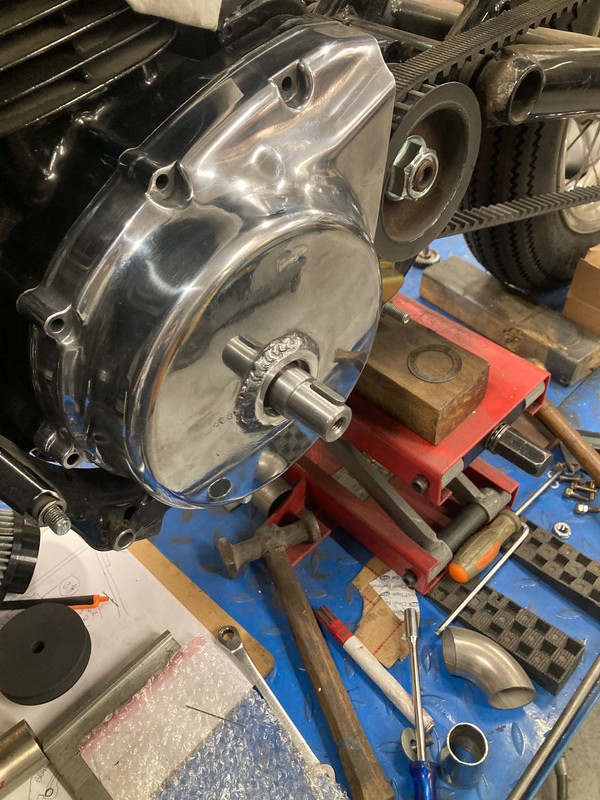
Although it is very difficult to do any welding on the cover due to the material, welding has gone well.. everything has been centered and it all fits perfectly. No warping..  

The extention shaft is made of hard steel. It has to be altered and shortened for the new dimension of the bearing and bushing etc..  
Will have to be done by a machining expert.. so again have to wait for this.

For lubrication I am hoping there is enough splashing around so that the bearing will at least receive some. Savagebob had issues with oil leaking through his pressed in bearing so there should at least be some oil being thrown around in there.  
Honestly, I don't even want to think about setting up a seperate oil system just for that bearing.

I did read through the enitre topic of DragBikeMike on the oil system. It is a shame it is so much work to do that type of upgrade..   Undecided   I would feel more comfortable with an extra oil cooler on the bike. But maybe down the line...   will think about it. It will also look nice to have something like that connected.. and should help the bike.  Also with the way the exhaust is routed.

I am not aiming for any maximum power gains though..  although more than stock is definately expected.

Ow, and thanks everyone for your inputs!  Smiley Smiley

Some more pictures:


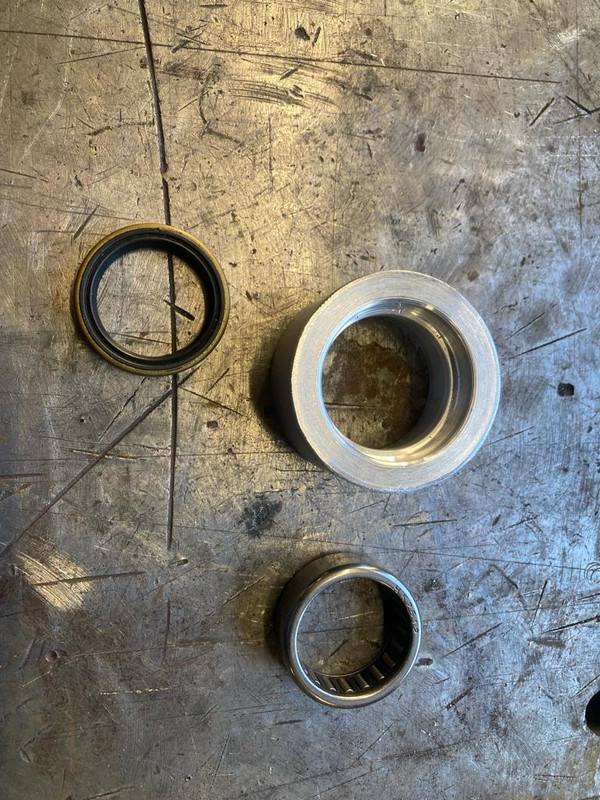
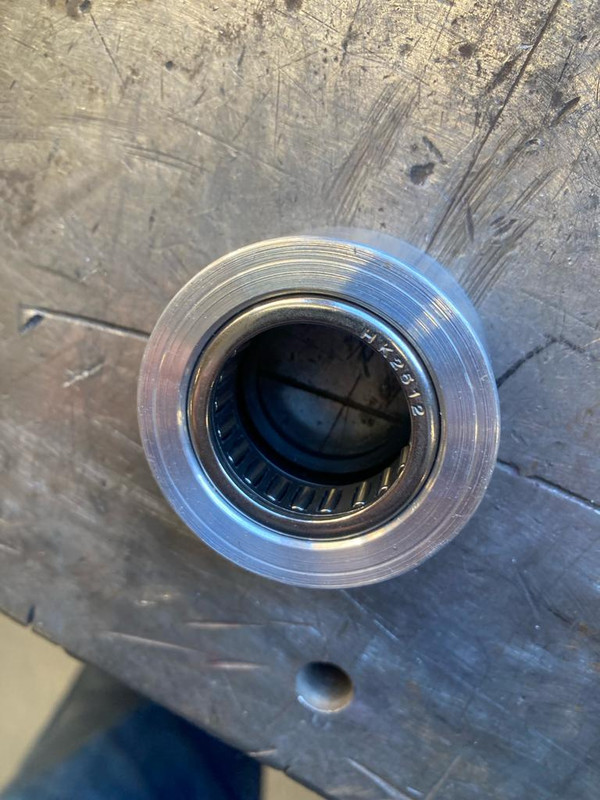
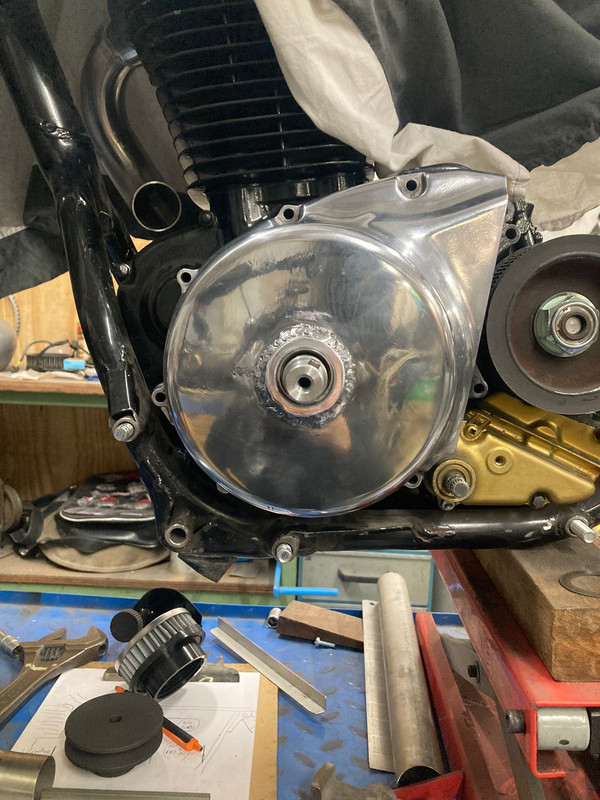
Here the bearing used for welding is in, this will be replaced with a fresh one:


Back to top
 
 
  IP Logged
DennyzfR6
YaBB Newbies
*
Offline

SuzukiSavage.com
Rocks!

Posts: 47

Re: Supercharged Cafe LS650
Reply #49 - 12/07/23 at 02:39:14
 
For inspiration on what to do with the tank and the seat and to take measurements for fabrication, I put my current ones on the bike.

It is a Savage tank in which I already filled the hole a few years back so it is pretty clean. And it's the Ryca seat unit.
Both will not be used on this bike.. so as I stated before, might have to build another more typical Ryca cafe down the line with all the leftover parts.

The goal for this one is to build a tank and seat unit out of 1 piece. All aluminium.  
Part of it will be painted, and part will be polished. That's the idea.
As so much fabrication is being done under the tank/seat unit, the goal is to be able to pivot the whole unit upwards from the rear, keeping it up with a (hidden) gas spring.

The exhaust will go underneath the seat down the middle and the rear light will be build into the rear seat unit with the same design as the exhaust tip.

We are still a long way away from that, but for now:


Back to top
 
 
  IP Logged
DennyzfR6
YaBB Newbies
*
Offline

SuzukiSavage.com
Rocks!

Posts: 47

Re: Supercharged Cafe LS650
Reply #50 - 12/07/23 at 02:46:11
 
Because everything will be visible under the seat and frame.. Suzuki's frame building quality had to be corrected..   It just was not clean.. and defintaley not straight  Huh


Back to top
 
 
  IP Logged
DennyzfR6
YaBB Newbies
*
Offline

SuzukiSavage.com
Rocks!

Posts: 47

Re: Supercharged Cafe LS650
Reply #51 - 12/07/23 at 02:53:13
 
Fabricated new parts, and cleaned up the frame...  


It now looks much much better.
Cleaned up the front coming from the yoke and the square part of the frame onto the new part of frame..  (don't know what to call it)


Also the bracket for the rear shocks has been changed to accept the Ohlins.


The frame will be strengtened again but will do this after the exhaust has been done and together with the brackets for the supercharger so we know where to place these etc.
Back to top
 
« Last Edit: 12/07/23 at 08:01:12 by DennyzfR6 »  
  IP Logged
ohiomoto
Serious Thumper
*****
Offline

SuzukiSavage.com
Rocks!

Posts: 2697
WTF is JOG?
Re: Supercharged Cafe LS650
Reply #52 - 12/07/23 at 17:13:32
 
DennyzfR6 wrote on 12/07/23 at 01:11:38:
Hi All..  
Back again working on the project. Have been busy with a different project here at home.. finally realised a long time dream of having a bike lift at home.  It took a lot of work though, so have not worked that much on the Savage.  Grin Grin Grin

Just have to finish up the electricity etc, final step. Cables already run under the floor just have to hook things up. But really happy and a little proud!  Cheesy

--------------------------
You should be a little proud!  Really cool idea to put it in the floor and nice job with the tile.  Looks nicer than a lot of people kitchens.
Back to top
 
 
  IP Logged
ohiomoto
Serious Thumper
*****
Offline

SuzukiSavage.com
Rocks!

Posts: 2697
WTF is JOG?
Re: Supercharged Cafe LS650
Reply #53 - 12/07/23 at 17:24:41
 
And the vision you have for this project is top-level.  Looking forward to seeing it come to fruition.
Back to top
 
 
  IP Logged
DennyzfR6
YaBB Newbies
*
Offline

SuzukiSavage.com
Rocks!

Posts: 47

Re: Supercharged Cafe LS650
Reply #54 - 12/08/23 at 11:45:41
 
ohiomoto wrote on 12/07/23 at 17:13:32:
You should be a little proud!  Really cool idea to put it in the floor and nice job with the tile.  Looks nicer than a lot of people kitchens.


Thanks!!  Grin


ohiomoto wrote on 12/07/23 at 17:24:41:
And the vision you have for this project is top-level.  Looking forward to seeing it come to fruition.  


And Thanks again  Grin Grin Cool
Back to top
 
 
  IP Logged
DennyzfR6
YaBB Newbies
*
Offline

SuzukiSavage.com
Rocks!

Posts: 47

Re: Supercharged Cafe LS650
Reply #55 - 12/08/23 at 11:58:26
 
Finally.. it is exhaust time!

To make it look a little different than most Savages..  and to have it flow nice with the lines of the bike, the idea is to bring it to the left side of the bike. Also because the sidestand will be moved to the right.

Have the exhaust follow the shape of the cilinder, then the line of the left stator cover and then move it back to the the middle of the bike. Move it up between the vertical rear of the frame just in front of the rear wheel en then have the tip come out of the rear seat.

With that in mind, mocking up the lines are the first step:


Back to top
 
 
  IP Logged
DennyzfR6
YaBB Newbies
*
Offline

SuzukiSavage.com
Rocks!

Posts: 47

Re: Supercharged Cafe LS650
Reply #56 - 12/08/23 at 12:09:25
 
Then it was time to start making segments..
Whilest doing this decided to give the cilinder a little more distance from the exhaust to hopefully provide a bit better cooling. I understand the current setup is not optimal in that regard..

Might get the exhaust coated in the inside..  to hopefully deflect a little more heat. Will have to look into this. Also, segments will be added later with springs for disassembly and heat expansion once everything is in place.


And then finally   Smiley  ...:


Back to top
 
 
  IP Logged
DragBikeMike
Serious Thumper
*****
Offline

SuzukiSavage.com
Rocks!

Posts: 4222
Honolulu
Re: Supercharged Cafe LS650
Reply #57 - 12/08/23 at 17:38:25
 
Denny, that is about the coolest lift setup I ever did see, and your exhaust plumbing is mighty fine too.  Excellent.

And you are moving at the speed of light.
Back to top


Knowledge is power.
  IP Logged
zevenenergie
Serious Thumper
*****
Offline

SuzukiSavage.com
Rocks!

Posts: 1250
The Netherlands   Den Haag
Re: Supercharged Cafe LS650
Reply #58 - 12/15/23 at 00:15:33
 
So then, that lift in that floor, that is no half measure. The pace at which you build... Tuut tuut that seems like Overtoom.

I think that exhaust looks spectacular, respect.

Back to top


Do what you know is right. (you can always use fear as a counselor later)
  IP Logged
DennyzfR6
YaBB Newbies
*
Offline

SuzukiSavage.com
Rocks!

Posts: 47

Re: Supercharged Cafe LS650
Reply #59 - 01/24/24 at 05:10:42
 
We're back.
End of the year has been very busy..   . Holiday season, other projects etc.
Making good use of the bike lift at home.. which is fully finished now aswel  Grin


PS. Don't worry about the front wheel clamp. That is secured and cannot slide off. It has a locking pin in place.  Wink


The work on the Supercharged Savage is also underway again. Firstly, some decisions had to be made, mostly around the exhaust.

First,  the points where to place the exhaust springs for easy disassembly. Because of the intricate bends the first one needs to be close to the head, so that has been fabricated.


The next big decision is how to run the exhaust after it 'wrapped' around the cilinder. Also, taking into account the position of the belts and tensioners for the supercharger.

We took some measurements whilst sitting on the bike to see where my legs will go. This was also necessary for the rearset and the start of the fabrication of the seat etc.

If it would simply run straight this would be it:


It looks clean in parallel with the charger and the frame etc, but it would make other things very difficult as it leaves very little room voor brackets and support for the pulleys and everything will have to be worked around the exhaust.

The belt will have to jump inwards to the center of the bike excatly where the exhaust would sit.


So after some more brainstorming and measurements:


The shape has been determined and will roughly be the following  Smiley :
It will leave room in the middle, also aesthetically and will make it easier to fabricate and place al the brackets etc for the transfer inwards,
the pulleys and tensioners.


Back to puzzling with cutting and welding!  Grin

Back to top
 
 
  IP Logged
Pages: 1 2 3 4 5 
Send Topic Print


« Home

 
« Home
SuzukiSavage.com
05/16/24 at 23:19:46


General CategoryRubber Side Down! › Supercharged Cafe LS650


SuzukiSavage.com » Powered by YaBB 2.2!
YaBB © 2000-2007. All Rights Reserved.