Donate!
Welcome, Guest. Please Login or Register :: View Members
Pages: 1 2 3 4 5 ... 28
Send Topic Print
Double RYCA build Mar 2019 updates (Read 17413 times)
Gyrobob
Serious Thumper
*****
Offline

Posers ain't
motorcyclists

Posts: 2571
Newnan, GA
Gender: male
Re: Double RYCA Build
Reply #30 - 05/13/11 at 05:48:38
 
On 21 March we did some prep work, like cutting the exhaust pipes where the RYCA videos say to cut.

We didn't know there were THREE tubes there. Jeeeez, those pipes are heavy.  It really makes you wonder how there could possibly be any bluing on the outer chrome when the heat gets dispersed over three layers of metal and two thin layers of mostly air.   It is also interesting how the pipes change relative positions when the pipe is cut near the muffler -- the inner pipe shrinks back into the second pipe which shrinks back into the outer pipe.  See the first pic attached.

We know a guy at the local airport who is a whiz with all sorts of welding, including thin wall tubing.  Aircraft exhaust systems see very tough duty, so the craftsmanship absolutely must be there in order for there to be any reliability.  Maybe we could have him weld up some stainless header/pipe assemblies that would hold up well, not have any bluing, and achieve those strange hues that hot stainless gets after a while.

Plus, those pipes would certainly be several pounds lighter!!!

Another thought is that we might be able to try a different route for the exhaust just for the fun of it.  As an example, see the second pic.


Back to top
 
« Last Edit: 05/13/11 at 07:00:18 by Gyrobob »  

If you think there's good in everyone, you haven't met everyone.
  IP Logged
MotoBuddha
Serious Thumper
*****
Offline

Let's roll!

Posts: 1416
Charlotte, NC
Re: Double RYCA Build
Reply #31 - 05/13/11 at 06:17:34
 
Yeah some different kind of exhaust might be in the future for my bike.
Back to top


Travel kills ignorance.
  IP Logged
Gyrobob
Serious Thumper
*****
Offline

Posers ain't
motorcyclists

Posts: 2571
Newnan, GA
Gender: male
Re: Double RYCA Build
Reply #32 - 05/13/11 at 06:57:12
 
One issue we ran into was the seal at the bottom of the speedo drive cable.  Bob's bike had one, Jud's was misplaced somewhere during the last eighth of a century.  Suzuki doesn't stock these anymore.

Some solutions are offered on this forum, like use an o-ring or put a thin coat of grease on the moving part, then reassemble it all with silicone seal and let it sit for a couple of days.

We found a supplier in Atlanta that will sell ten seals for $50.  $5/seal.

That might be a reasonable thing, but the supplier won't order them unless we pay first, nonrefundable.  We won't pay unless we are sure they'll fit, and all we know now is that the measurements we took come pretty close to the measurements in his catalog.

This issue was addressed in another thread a while back.  http://suzukisavage.com/cgi-bin/YaBB.pl?num=1299698615/15


Back to top
 
« Last Edit: 05/14/11 at 19:52:53 by Gyrobob »  

If you think there's good in everyone, you haven't met everyone.
  IP Logged
MotoBuddha
Serious Thumper
*****
Offline

Let's roll!

Posts: 1416
Charlotte, NC
Re: Double RYCA Build
Reply #33 - 05/13/11 at 08:08:12
 
It's tempting to somehow seal off the hole in the case and switch from a mechanical speedo to a digital one. A bonus is that the digital one would read actual front wheel speed instead of being calibrated off engine speed. That means the reading wouldn't be affected by changes in tire diameter or changes in final drive ratios via conversion to chain drive.
Back to top
 
« Last Edit: 05/14/11 at 06:13:27 by MotoBuddha »  

Travel kills ignorance.
  IP Logged
Gyrobob
Serious Thumper
*****
Offline

Posers ain't
motorcyclists

Posts: 2571
Newnan, GA
Gender: male
Re: Double RYCA Build
Reply #34 - 05/13/11 at 20:14:10
 
Great  idea!!  I've used bicycle digital speedometers for rotor tachs in gyrocopters using this idea.  Cheap and accurate.
Back to top


If you think there's good in everyone, you haven't met everyone.
  IP Logged
Gyrobob
Serious Thumper
*****
Offline

Posers ain't
motorcyclists

Posts: 2571
Newnan, GA
Gender: male
Re: Double RYCA Build
Reply #35 - 05/14/11 at 16:04:46
 
While we had the forks apart, we figured we'd replace the seals.  Both bikes were showing a thin film of fork oil above the dust covers, which means the fork seals weren't sealing very well.  

Turns out a simple $3 piece of PVC from Lowe's, 2' long and 1.5" diameter is a perfectly dimensioned fork seal tool for the 39mm forks on the LS650.

See the thread http://suzukisavage.com/cgi-bin/YaBB.pl?num=1300797103/0

The folks here were a lot of help.


First pic shows fork stuff and new parts,.. clip-ons, fork tools, one set of upgraded fork springs. Jud's using the stock springs with heavier fluid. Bob went with the stiffer Progressive springs option.


This next pic shows shows the fork internals, and the aluminum tube from RYCA for the lowering mod.  That bushing gave me some trouble on the way out and getting it back in.  The experts here were a lot of help.


Here's the seal installation tool mentioned above.  Only mod needed is to round off the inner diameter at one end so you don't abuse the seal on installation.  The beauty of the long pipe is that while the bushing, and then the seal are being tapped in, they are kept in perfect alignment while being tapped in.  (perpendicular to the tube)


Here's the end with the inner edge rounded off to be gentle with the seal.


Nice fit, eh?


Imagine all this stuff slid down in the fork leg.  First do the bushing, then the seal.


Back to top
 
« Last Edit: 05/14/11 at 19:50:10 by Gyrobob »  

If you think there's good in everyone, you haven't met everyone.
  IP Logged
Gyrobob
Serious Thumper
*****
Offline

Posers ain't
motorcyclists

Posts: 2571
Newnan, GA
Gender: male
Re: Double RYCA Build
Reply #36 - 05/17/11 at 13:43:35
 
We were shocked, nonplussed, taken aback, and agog at the condition of the wheels after we took off the tires/tubes. All four wheels had lots of rust. Supposedly both bikes had been stored inside or in a carport, so they shouldn't have been wet a lot.  


Nonetheless, there were some pretty healthy rusty areas.  For about 14 seconds, we considered getting new (lighter, straighter, cooler) wheels, but,..naaah,.. we'll just make these work.


First of all, you might consider not cutting the spokes on the rear wheel like we did.  You might want to use them or sell them later. Or,.. at least don't cut the spokes until you get the tires off the wheels.  You'll bleed less that way.  


We were in a hurry to get the stuff shipped off to RYCA, thinking we didn't want to delay the process of getting the wheels back so we could assemble our spiffy new cafe racers.  Had we known, now TWO months later, the kits would still not be here, we might have taken more time.  Silly us.


This first pic shows the spoke-cut wheels.  Doing it this way does save an hour or two, but with a two-month wait tacked on, what's the rush?


One of Jud's wheels.


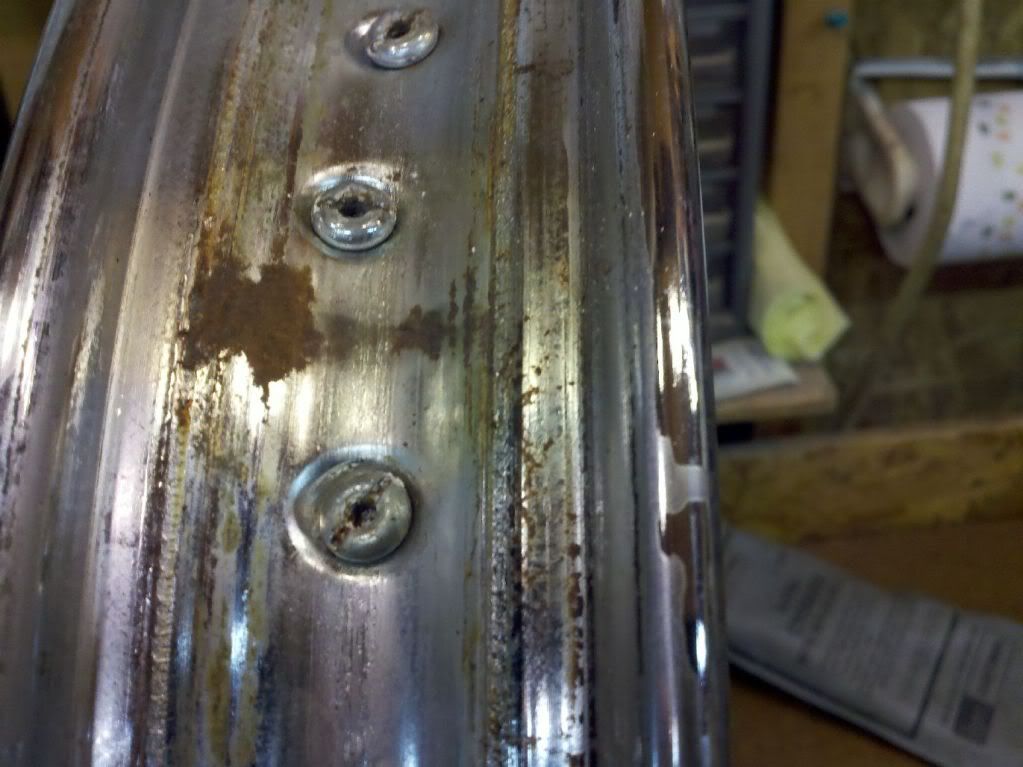
One of Bob's wheels.


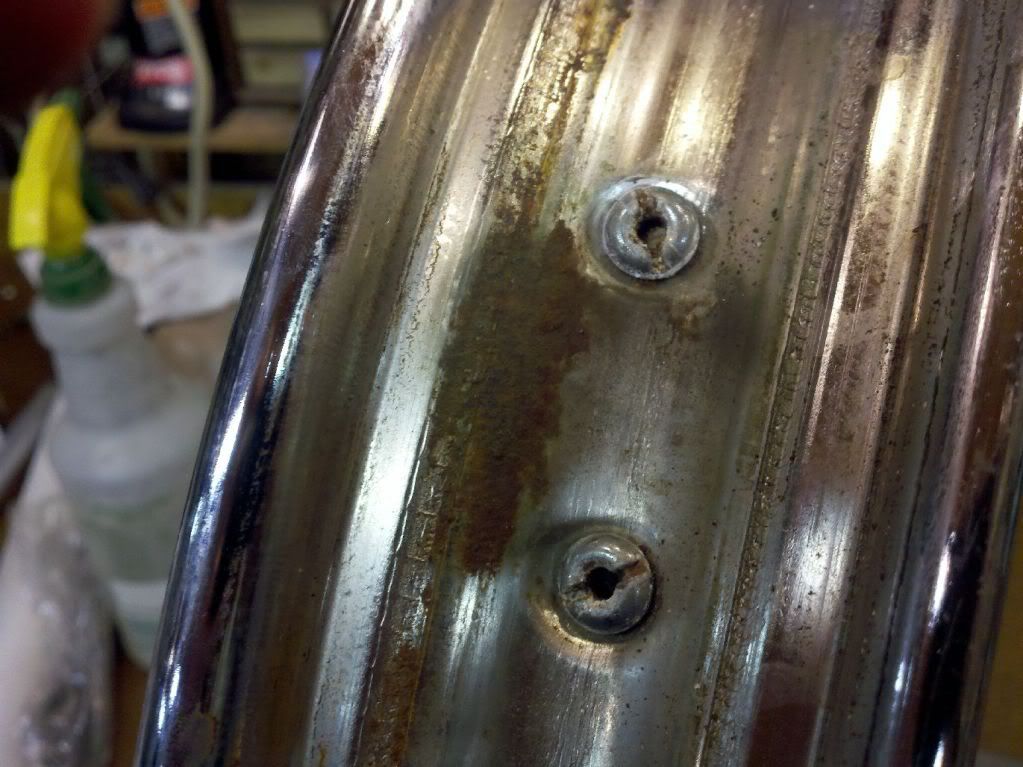
Here's a technique we used to get the large thick areas of rust removed.  Since the areas were pitted significantly, using rust remover and/or a wire brush would have taken forever, and would have violated my sense of laziness.  If you use your trusty metal engraver and just slowly and gently let the point hammer away at the pitted areas, you can get about 95% of the rust off, and even get most of it out of the deepest of the pits on the first pass.  Be sure to wear eye protection -- The tiny shards of rust really come flying out of there occasionally.  After a few minutes of this, I put on some breathing protection as well, because there was a visible thin cloud of what looked like rusty smoke hovering around the engraver.  I wish I had a pic of what I looked like with goggles, a respiratory protection device, and ear muffs,... all surrounded by a reddish-brown cloud.  Goofy-looking, I'm sure.


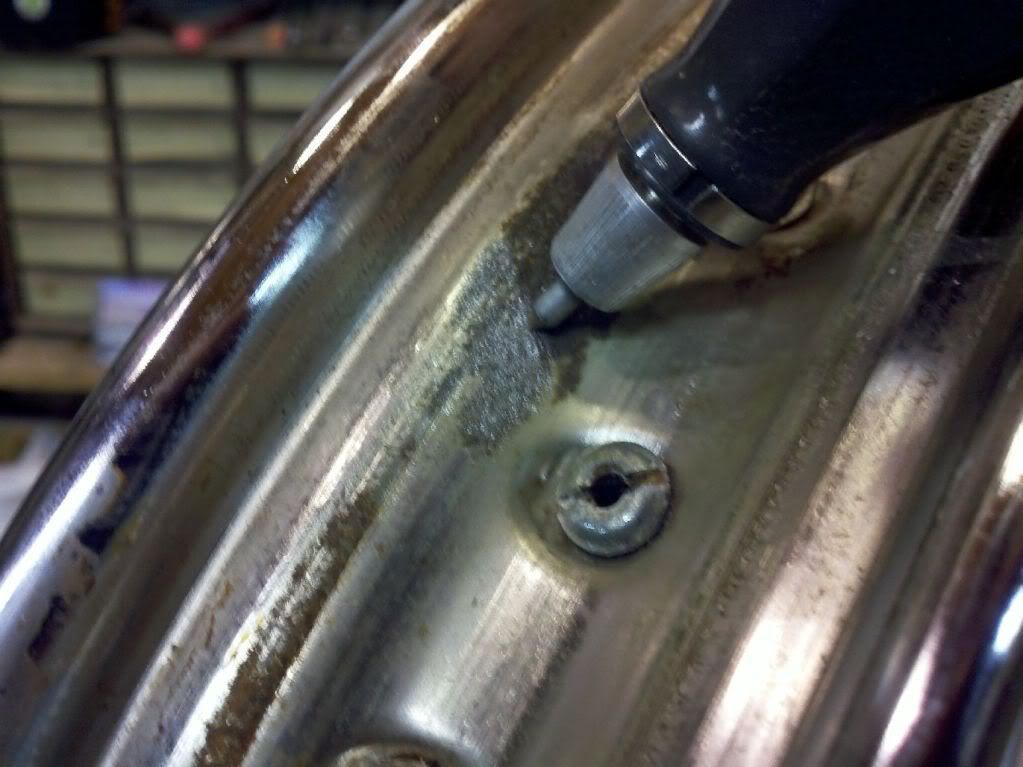
Here's further progress on that same wheel.  


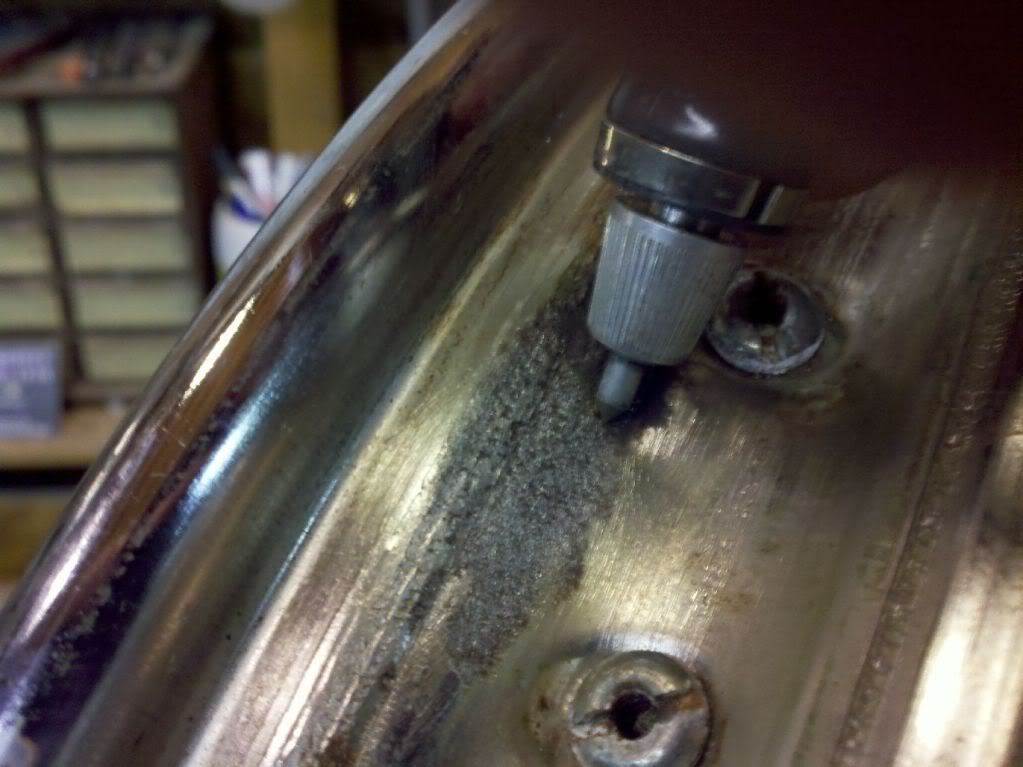
Here's that same wheel all tidied up,..... derusted, scotch-brited, naval-jellied, acetoned, and with a couple of coats of Krylon clear satin.  (the wheel has been flipped 180degrees in this pic -- the previously rusty area being on the right side instead of the left)


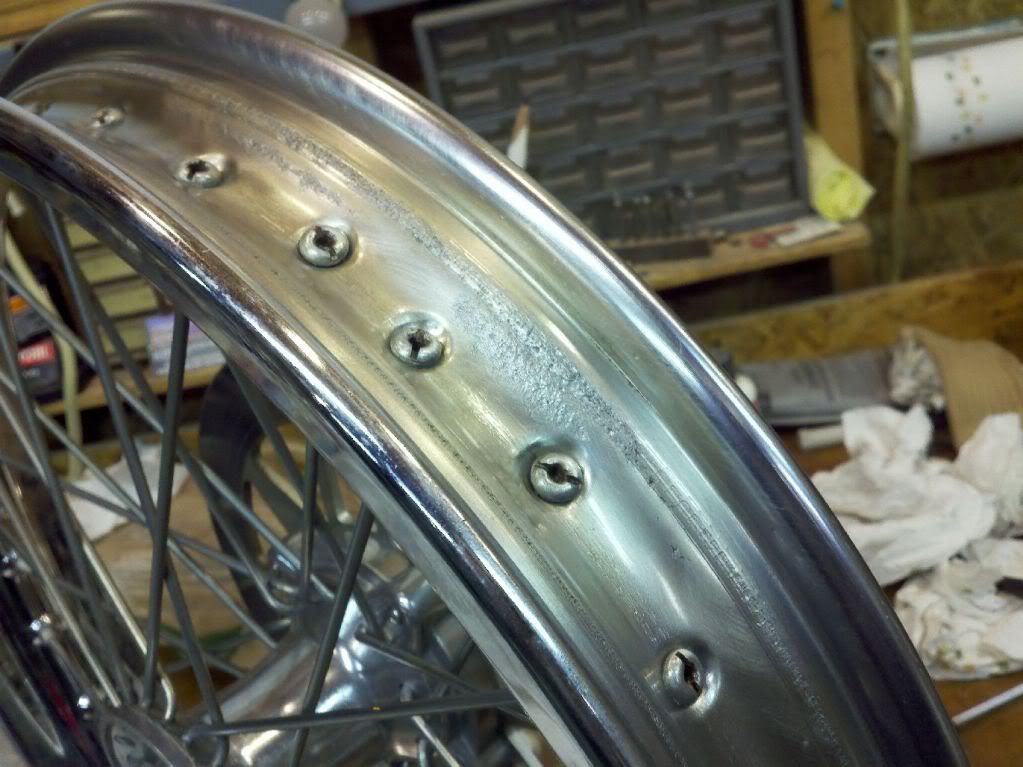
One of Jud's wheels after our engraver-based process, showing what used to be an obscenely rusty area.   GAWD, I hate rust!!.
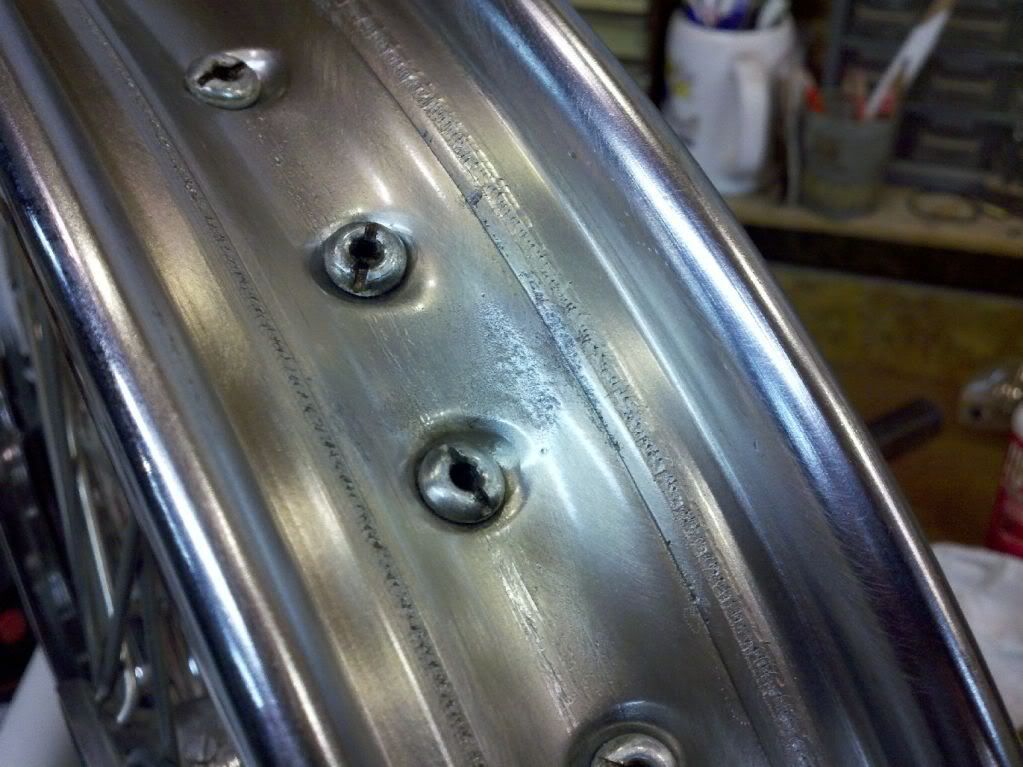

Back to top
 
« Last Edit: 05/03/13 at 18:41:03 by Gyrobob »  

If you think there's good in everyone, you haven't met everyone.
  IP Logged
MotoBuddha
Serious Thumper
*****
Offline

Let's roll!

Posts: 1416
Charlotte, NC
Re: Double RYCA Build -- added stuff about wheels
Reply #37 - 05/18/11 at 07:30:20
 
Would sandpaper have accomplished the same thing with less tedium?
Back to top


Travel kills ignorance.
  IP Logged
Gyrobob
Serious Thumper
*****
Offline

Posers ain't
motorcyclists

Posts: 2571
Newnan, GA
Gender: male
Re: Double RYCA Build -- added stuff about wheels
Reply #38 - 05/18/11 at 11:12:02
 
I tried a few different methods, including sandpaper, but they only took the rust down to the surface.  Getting the rust out of the deeply pitted areas was the problem.

Eventually I had this EUREKA moment where I was thinking it would be cool to have something tough and sharp that would poke in and out of all these rust-filled pits very rapidly.  The engraver happened to still be sitting out on the bench because I had been using it lately for marking some valuables.  My brilliant mind finally connected the two ideas,... having both situations sitting right in front of me might have helped some, eh?

Sandpaper, wirebrushes and the like work well on rusty areas that aren't pitted badly, but this engraver trick works pretty well on pitted areas.

If my blasting cabinet were about a foot larger in every dimension, I would have just sandblasted it!!!  In fact, it would probably pay to go to the trouble of hauling wheels rusted like these to a shop that has sandblast cabinets large enough to do the job.  It would probably take only about 5 minutes for each wheel to be derusted that way.

I probably spent a few hours just derusting and clearcoating the wheels.

Then I had a look at how straight the wheels were.   Oh,....jeeeeeeeezzz.  That is another story altogether, a few hours more.  I am becoming rather disenchanted with steel wire wheels.
Back to top
 
« Last Edit: 05/20/11 at 06:29:42 by Gyrobob »  

If you think there's good in everyone, you haven't met everyone.
  IP Logged
Gyrobob
Serious Thumper
*****
Offline

Posers ain't
motorcyclists

Posts: 2571
Newnan, GA
Gender: male
Re: Double RYCA Build -- added stuff about wheels
Reply #39 - 05/20/11 at 06:16:05
 
The tires arrived 23 March.  Coincidentally, Jud's Firestone Deluxe Champions (ordered from Coker Tire) arrived at his house the same day Bob's Avon Speedmasters (ordered from Dennis Kirk) arrived at his.

Jud likes the "personality" of the vintage Deluxe Champions.  The prototype CS-1 (Casey’s bike)  used these tires.

Bob is using the Avon Speedmasters because his first ever new bike was a 1965 Norton Atlas that came with those tires.  It's just a sentimental thing, and he thinks they look cool in a period-correct kind of way.  In the mid-60's Avon Speedmasters were a big deal.


The tires as delivered from Dennis Kirk.  The fat one is for an FJR-1300,.. Bob's daily driver.


The amount of time to get from taking the front tire/wheel off the LS650s to the pic below is maybe ten hours per tire/wheel.  We had no idea it would be so involved.  Getting the old tires off was easy,.. we have the tools.  Getting over the shock of seeing how rusty the wheels were and getting dizzy from how out of round they were took a while.  Then there was derusting.  Then there was clearcoating (for rust prevention) the rims.  Then there was truing.  Then there was ordering rim strips.  

Then there was mounting the tires. Here’s a technique we used to minimize the balancing that might be required later:
 - Mount the tire/tube to the rim
 - Put the tire/wheel on an axle mounted in a vise or on a wheel balancer.
 - Spin the wheel and observe where and how rapidly it comes to rest.  Mark that spot.
 - Pop the tire loose from the wheel and rotate it 90 degrees relative to the wheel/tube.
 - Remount the tire.
 - Spin it again and observe where and how rapidly it comes to rest.  Mark that spot and compare it to the first mark.
Keep this up (moving the tire around relative to the wheel/tube) until you get the tire/tube/wheel assembly to come to rest as slowly as possible. At that point you have minimized the overall imbalance.  If you are patient and lucky, you might get the imbalances to all cancel out just right so no balancing (ugly looking wheelweights) will be necessary later.
Back to top
 
« Last Edit: 09/30/11 at 07:02:23 by Gyrobob »  

If you think there's good in everyone, you haven't met everyone.
  IP Logged
kevinphan
Full Member
***
Offline


Posts: 220
Dracut, Massachusetts
Gender: male
Re: Double RYCA -- 20 May,.. mount/balance frnt ti
Reply #40 - 05/20/11 at 10:35:31
 
Another easy way of mounting tires is to use a trash bag. There is a video on YouTube showing you how. Basically just place the tube slightly inflated into the tire, then place a trash bag unfolded on top of the rim then just push the tire down onto the rim. It takes little effort and is so much easier than tire spoons and risking the tube

Back to top
 
 
WWW diverseclothing   IP Logged
Gyrobob
Serious Thumper
*****
Offline

Posers ain't
motorcyclists

Posts: 2571
Newnan, GA
Gender: male
Re: Double RYCA --
Reply #41 - 05/20/11 at 12:12:34
 
What a fantastic idea!  I'll try it on the next tire event.  When the RYCA shipment finally gets here, it'll have our rear wheels in it, so I'll have a chance to do it then.

Update: the trash bag thing is a cool idea, but we couldn't get it to work on the tire/rim combination we have.


Back to top
 
« Last Edit: 09/30/11 at 07:04:22 by Gyrobob »  

If you think there's good in everyone, you haven't met everyone.
  IP Logged
Gyrobob
Serious Thumper
*****
Offline

Posers ain't
motorcyclists

Posts: 2571
Newnan, GA
Gender: male
Re: Double RYCA, 23 May, RYCA 1st shipment
Reply #42 - 05/23/11 at 14:20:37
 
27 April was a nice day,.. we got three boxes of stuff from RYCA.


The side covers after I gave them an initial shot of thick primer to start filling in some of the casting depressions.


The seats look cool.  I wonder what the small area and the thin amount of padding will feel like after a few hours in the saddle.  The padding seems like pretty good quality, but there is not all that much of it, and I have a boney 64-year-old butt.


The tanks are nicely modified, but there is a lot of bodywork to do.  The bottom seam where they cut and rewelded the tank ripples in and out a bit.  (see the lower edge of the tank in the pic below)  

Silly me, I thought that when I decided to not strip the tank and to just pay the extra to have them do it, it would save me from having to strip the tank.  It turns out they strip it enough to cut and weld it, but not enough to start bodywork and/or painting. Figure on a few hours to get a tank ready for bondo.


Back to top
 
« Last Edit: 05/23/11 at 18:46:04 by Gyrobob »  

If you think there's good in everyone, you haven't met everyone.
  IP Logged
MotoBuddha
Serious Thumper
*****
Offline

Let's roll!

Posts: 1416
Charlotte, NC
Re: Double RYCA Build
Reply #43 - 05/23/11 at 14:28:48
 
I don't think it's intended as a "few hours in the saddle" kind of bike. More of an errand runner and bar hopper.
Back to top


Travel kills ignorance.
  IP Logged
Gyrobob
Serious Thumper
*****
Offline

Posers ain't
motorcyclists

Posts: 2571
Newnan, GA
Gender: male
Re: Double RYCA Build
Reply #44 - 05/23/11 at 14:52:35
 
I agree, but there are a few rides in the hills north and east of Atlanta I'd like to do with this thing.  Dragon's Tale, etc.  I'd rather not have to trailer it there -- it's a self-esteem issue.

Maybe I could ride for 30 or 40 minutes, get a burger, ride some more, get some pie, ride some more, get some gas, ride some more, stop in at a bike shop to look around and allow the locals to ooh-and-ahh over the CS-1, ride some more, get some pizza,.. so on and so forth.  I'd be there before I knew it!!


Back to top


If you think there's good in everyone, you haven't met everyone.
  IP Logged
Pages: 1 2 3 4 5 ... 28
Send Topic Print


« Home

 
« Home
SuzukiSavage.com
05/05/24 at 00:51:12


General CategoryRubber Side Down! › Double RYCA build Mar 2019 updates


SuzukiSavage.com » Powered by YaBB 2.2!
YaBB © 2000-2007. All Rights Reserved.