Donate!
Welcome, Guest. Please Login or Register :: View Members
Pages: 1 2 3 4 5 ... 8
Send Topic Print
DRZ Tracker Project (Read 1389 times)
Gary_in_NJ
Serious Thumper
*****
Offline

LS650 Cafe Racer

Posts: 2626
Amongst the Twisty Roads
Re: DRZ Tracker Project
Reply #30 - 02/06/17 at 05:44:01
 
Dave wrote on 02/06/17 at 04:07:01:
You got a lot done - glad the bike is dirty but cared for mechanically.

Do the hubs have the same diameter at the place where the spokes mount on the hub.....can you use the back spokes on the front?  Good choice on the 3.50-18 rear rim......that is what it takes to use the modern tire sizes properly.

Maybe you could powder coat the hubs if the back one won't clean up.


That's exactly why I'm posting this build on this site...it's full of smart people willing to offer good advice.

Dave, I hadn't given any thought to powder coating the hubs...but of course that's an excellent option.

Not sure if the spoke centers are the same front to rear, but I will check. I'm fairly certain that the spoke diameters are different, that in and of itself may preclude me from using the rear spokes on the front.
Back to top


A life-time student of motorcycling.
LS650 Cafe, DRZ400SM, FZ6N, SV650S, CB900C, Ducati ST2, CB550F-SS
My LS650=> http://suzukisavage.com/yabb2.2/Attachments/Left.JPG
  IP Logged
xaman
Junior Member
**
Offline

SuzukiSavage.com
Rocks!

Posts: 97

Re: DRZ Tracker Project
Reply #31 - 02/19/17 at 09:03:31
 
Have any thoughts on this deal?

https://neworleans.craigslist.org/mcy/6009275623.html

I've been hunting for a DR650 but ran across this ...   I'm thinking scrambler type build.  I don't know near as much about the DRZ, what kind of questions would you be asking beyond the obvious?

Back to top
 
 
  IP Logged
Gary_in_NJ
Serious Thumper
*****
Offline

LS650 Cafe Racer

Posts: 2626
Amongst the Twisty Roads
Re: DRZ Tracker Project
Reply #32 - 02/19/17 at 16:12:39
 
Given the nature of the damage to that bike, I would have to think that the steering head is bent. In addition to needing a new frame or significant welding, the forks are bent. If you know someone that can weld, that bike could be back on the road with little effort. I would replace the usd forks for the 400S or E forks that are almost exactly the same as the SM, but sell for a fraction of the price.

The value of that bike is every thing behind the steering head. For something that you want to transform, it's not so bad. If the steering head isn't bent, that's a good starting point.
Back to top


A life-time student of motorcycling.
LS650 Cafe, DRZ400SM, FZ6N, SV650S, CB900C, Ducati ST2, CB550F-SS
My LS650=> http://suzukisavage.com/yabb2.2/Attachments/Left.JPG
  IP Logged
xaman
Junior Member
**
Offline

SuzukiSavage.com
Rocks!

Posts: 97

Re: DRZ Tracker Project
Reply #33 - 02/19/17 at 16:37:32
 
Thanks for taking time to respond. I'll let you know if it ends up in my garage  Smiley
Back to top
 
 
  IP Logged
ohiomoto
Serious Thumper
*****
Offline

SuzukiSavage.com
Rocks!

Posts: 2691
WTF is JOG?
Re: DRZ Tracker Project
Reply #34 - 02/20/17 at 06:12:47
 
The frame is usually the last and least likely part to sustain damage on a off road motorcycles.   Not saying there is no way it's bent, but I wouldn't be surprised if it's not as bad as is looks.  I'd snag that thing up if it were local to me.
Back to top
 
 
  IP Logged
Gary_in_NJ
Serious Thumper
*****
Offline

LS650 Cafe Racer

Posts: 2626
Amongst the Twisty Roads
Re: DRZ Tracker Project
Reply #35 - 03/07/17 at 08:29:41
 
A couple of things up front:

1. I don't have any photoshop skills. This image is cobbled together in powerpoint just to see how things could fit together.
2. The wrong bike is used in this image (it's a supermoto DRZ), but it's the best stripped to the frame image I can find. The forks are wrong (USD) and there's no way to lower the front (rasie the forks) in the image. I'm not sure that I will lower the front anyway because it makes the steering rake too steep and reduces the amount of usable fuel in the tank.
3. Tires are low profile 17's, not the high aspect ratio 18's that will be on the bike. So they look small, because they are.

With that said, I've been playing with a few ideas. One is the seat. I think there is an opportunity to use the stock seat and fender. In the image the seat has been cut 3-4 inches from where it begins its up-sweep that follows the fuel tank. I believe that the forward part of the seat can be retained (it has the slot that attaches to the frame) because the tank will sit on top of that flat section. This will allow me to make a simple bracket to attach the rear part of the tank to the frame/seat. A new seat cushion can be made that provides a little up-sweep to match the profile where it meets the tank.

I also think I can use an OEM rear fender, cut down to the shape and size I want. I'll experiment with the faded fender that came with the bike and if I can get it to where I want it, I'll buy a new fender and replicate the modification.

In the image, the gray area under the seat represents the undertray that houses all of the bikes electronics (just like on the Ellaspede bike). This will be formed with 0.040 2024-T3 aluminum, flush riveted with solid rivets and sealed.

Finally, rather then relocate the two OEM radiators like Ellaspede did, I'm going to replace the two radiators with a single one as shown in Dave's post of Jan 16th. I've seen this done on several DRZ conversions. I've done a lot of research on this radiator and it appears to be from a '08-'11 KFX450R ATV. It has the right capacity and measures 12w x 8.25h x 1.62d. I can buy a new unit from Feeda Cooling (pn SW039) for $65 and sell my OEM units for over $100. This is a much easier solution to integrate as it only requires the fabrication of two support brackets. It also has much easier plumbing. The Ellaspede solution is actually quite complex. Leo had to fabricate a filler block and I think it sits a bit too low - potentially causing a restriction in the lower (pump) line. The radiator relocation is necessary because the exhaust header pipe and space claim of the metal fuel tank.

My wheel hubs are back from powder coating (thanks for the idea Dave) and I received my rims and spokes from Buchanan yesterday. I'll post some photos as they come together.

With a plan now in place, I do believe this will be a fast build. I just need to get my cafe racer off the build stand. I painted the frame and sent the swingarm and all of my fabricated brackets out for powder coating when the DRZ wheel hubs were done. All of these parts should all come together this weekend....but the painter is on his own schedule. Hopefully it will be back together this month.
Back to top
 

DRZ-2.jpg

A life-time student of motorcycling.
LS650 Cafe, DRZ400SM, FZ6N, SV650S, CB900C, Ducati ST2, CB550F-SS
My LS650=> http://suzukisavage.com/yabb2.2/Attachments/Left.JPG
  IP Logged
justin_o_guy2
Serious Thumper
*****
Offline

What happened?

Posts: 55279
East Texas, 1/2 dallas/la.
Re: DRZ Tracker Project
Reply #36 - 03/07/17 at 18:10:43
 
This posting has been deleted by its author.

Ooopsies.
Back to top


The people never give up their liberties but under some delusion.- Edmund Burke.
  IP Logged
Gary_in_NJ
Serious Thumper
*****
Offline

LS650 Cafe Racer

Posts: 2626
Amongst the Twisty Roads
Re: DRZ Tracker Project
Reply #37 - 03/18/17 at 11:48:08
 
OK, this part of the project was so easy it made me angry - angry that I've paid to have this done in the past.

I sent my wheel hubs out for powder coating. They looked terrible and quite frankly I was going to replace them, but Dave suggested powder coating. I was having parts for my cafe racer done, so I figured why not give it a try. Cost for powder coating - $30 for both (including degreasing and media blasting). They came out great and it sure was a lot less expensive then replacement hubs. It also committed me to black wheels because the reason they were so inexpensive to coat was I was already having parts coated black.

So I watched a few videos on youtube about building and truing wheels and thought "I can do that". I got myself a wheel stand for $40 and a spoke wrench for $10 and I was on my way. The hoops and spoke kit came from Buchanan's. I also replaced the wheel bearing because 1) they wouldn't survive the powder costing process and 2) in one of the videos I watched the builder said if you have worn bearings, you'll never get the wheels trued.

First photo, getting ready. I cut a few spacers so the hoops were always centered on the hub. The front hub measured 4.25" and the rim is 3.00" wide on the outside (2.15" inside) so I made 0.625" spacers for that wheel and the rear hub measured 6.50" and the rim is 4.25" (3.50 inside) so that got 1.125" spacers.


This is a photo of the fist side of the front wheel complete. It took a bit of trial and error to figure out how it all went together but once I discovered how the parts worked together, I was amazed how fast it went together.


Front wheel assembled. About 30 minutes.


Rear at the half-way point:


Rear complete - 15 minutes total work.


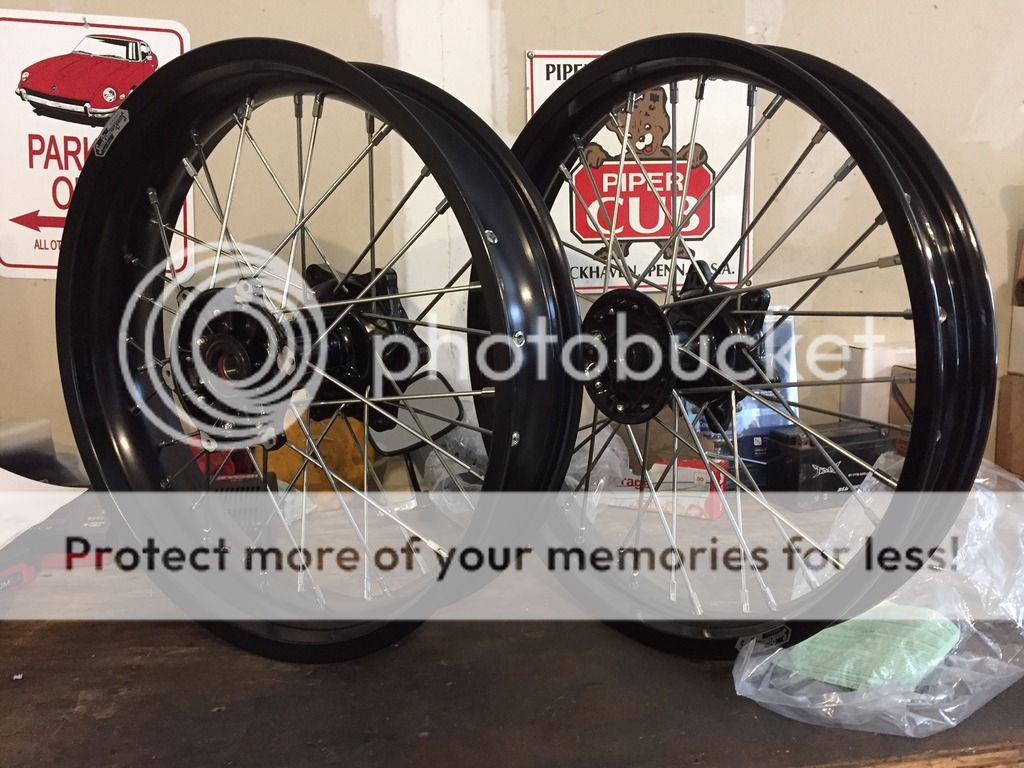
Both together. What you can't see is the big smile on my face.

Back to top


A life-time student of motorcycling.
LS650 Cafe, DRZ400SM, FZ6N, SV650S, CB900C, Ducati ST2, CB550F-SS
My LS650=> http://suzukisavage.com/yabb2.2/Attachments/Left.JPG
  IP Logged
Ruttly
Serious Thumper
*****
Offline

Thumpers Rule

Posts: 4997
Manteca , CA
Gender: male
Re: DRZ Tracker Project
Reply #38 - 03/18/17 at 12:32:57
 
Nice job Gary ! I don't mind lacing a wheel , but I hate trueing them. I take them to a guy , that's all he does. If you need custom stuff made he is the guy to see
Back to top


The Topic Terminator
  IP Logged
Kenny G
Serious Thumper
*****
Offline

SuzukiSavage.com The
Singles Club...LOL

Posts: 1754
Robson Ranch, Denton, Texas
Gender: male
Re: DRZ Tracker Project
Reply #39 - 03/18/17 at 13:42:37
 
Gary,

The spacer idea to keep the hub centered is really good to get started. I wish I would have thought of that before I ever did my first wheel.

Kenny G
Back to top
 
 
  IP Logged
ohiomoto
Serious Thumper
*****
Offline

SuzukiSavage.com
Rocks!

Posts: 2691
WTF is JOG?
Re: DRZ Tracker Project
Reply #40 - 03/18/17 at 19:41:23
 
Nice
Back to top
 
 
  IP Logged
Gary_in_NJ
Serious Thumper
*****
Offline

LS650 Cafe Racer

Posts: 2626
Amongst the Twisty Roads
Re: DRZ Tracker Project
Reply #41 - 03/22/17 at 06:01:30
 
I spent an hour on each of the last three nights truing the front wheel. Using a dial gauge I was able to get 0 lateral run out. The dial gauge makes this easy (but time consuming) because it points to the spoke that needs adjusting.

I'm disappointed with my radial run out result. I'm around 0.032" to 0.040" of extension (I didn't put the dial on this, just eyeballed) on about 20-25 degrees of the rim. I've got the spokes about as tight as I can get them in this section, and loosing the opposite side didn't do anything to fix it.

Any suggestions? Will I even feel this? From what I've read this morning 1/32" is acceptable, and I might actually be there.
Back to top


A life-time student of motorcycling.
LS650 Cafe, DRZ400SM, FZ6N, SV650S, CB900C, Ducati ST2, CB550F-SS
My LS650=> http://suzukisavage.com/yabb2.2/Attachments/Left.JPG
  IP Logged
Kenny G
Serious Thumper
*****
Offline

SuzukiSavage.com The
Singles Club...LOL

Posts: 1754
Robson Ranch, Denton, Texas
Gender: male
Re: DRZ Tracker Project
Reply #42 - 03/22/17 at 06:32:46
 
Gary,

The best guy that I have ever known for lacing a wheel was Ray Texter at Lancaster Harley Davidson. Tex always checked the wheel for radial run out before he started adding spokes. If the wheel is out of round before you start it is all but impossible to pull it into being round. The lateral run out can be easily corrected. It is always possible that the hub is not bored to be 100% round either.

The few wheels that I laced I could never get 100% round.

Kenny G
Back to top
 
 
  IP Logged
justin_o_guy2
Serious Thumper
*****
Offline

What happened?

Posts: 55279
East Texas, 1/2 dallas/la.
Re: DRZ Tracker Project
Reply #43 - 03/22/17 at 06:44:04
 
Id try loosening every spoke Not involved in the section that is being difficult.

If you're looking at a 90* arc that won't suck down and the measurement is somewhere between .025 & .040", across 90*, seems like giving it .010" slack across the 270* would give it a place to go.
The same adjustment for each spoke.

I put wire on a board and rotated the rim past it, checking run out and wobble at the same time.

Some rims, no spokes, just laying on the floor, are not very nice looking.

Look at the threads above the nipples.
If you're straining to adjust or its screeching and hopping, you're getting too tight. Or they are too dry.
Watch the spokes and see if you are twisting the spokes. Just a dot from a Sharpee will make it easy.

. a drop of oil can be your friend or make it easy to get it Krazee Tight.
I never Needed to get violent with the ten speed rims, but if the Bump doesn't wanna lay down and you've given it a place to go and tightened the spokes in that arc, I don't see why a piece of wood down in the valley and a few quick raps with a hammer would be a problem.

Back to top


The people never give up their liberties but under some delusion.- Edmund Burke.
  IP Logged
Dave
YaBB Moderator
ModSquad
*****
Offline

SuzukiSavage.com
Rocks!

Posts: 17824
Camp Springs, Kentucky
Gender: male
Re: DRZ Tracker Project
Reply #44 - 03/22/17 at 06:49:02
 
I believe that you need to work the radial runout first...while the spokes are still relatively loose.  Then when that is within range you start working on truing the wheel left/right as you snug up the spokes.

I am somewhat of a NOOB to doing wheels....and each one takes me a very long time.  It is kind of relaxing and therapeutic at first....then frustrating as the hours drag on.
Back to top


Someday I will be old......But not today!

  IP Logged
Pages: 1 2 3 4 5 ... 8
Send Topic Print


« Home

 
« Home
SuzukiSavage.com
05/09/24 at 03:39:05


General CategoryThe Cafe › DRZ Tracker Project


SuzukiSavage.com » Powered by YaBB 2.2!
YaBB © 2000-2007. All Rights Reserved.