Donate!
Welcome, Guest. Please Login or Register :: View Members
Pages: 1 2 3 
Send Topic Print
Tachometer Installation (Read 2064 times)
Todd James
Full Member
***
Offline

SuzukiSavage.com
Rocks!

Posts: 238
Mansfield, Ohio
Gender: male
Tachometer Installation
08/25/14 at 20:01:35
 
   
I installed a Ryca Tachometer on my 2007 S40 and it has
worked well so I thought I would share the installation details.


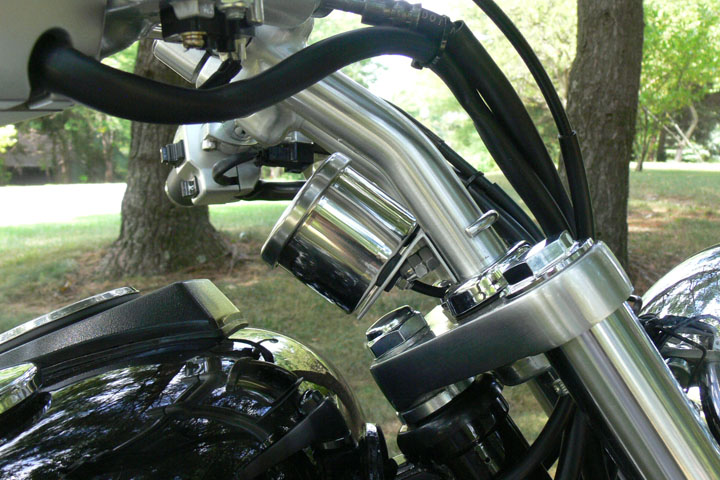
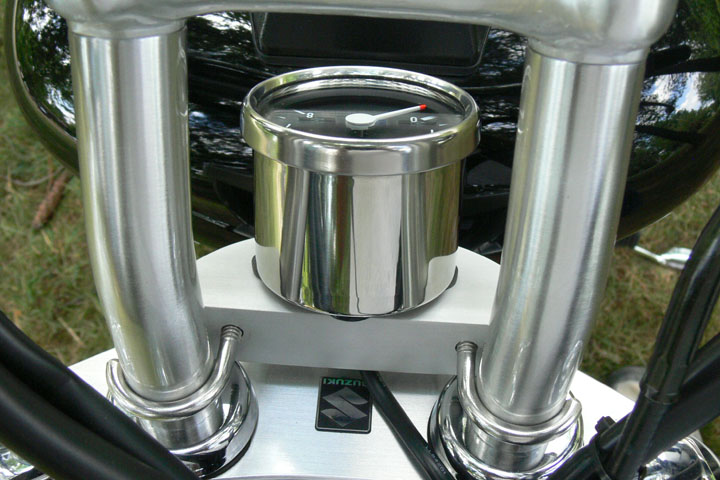
I mounted it in a location that I thought looked somewhat "stock"
and used rubber grommets to isolate it from harsh vibration.
Refer to the pictures that follow for clarification of the parts and instructions.

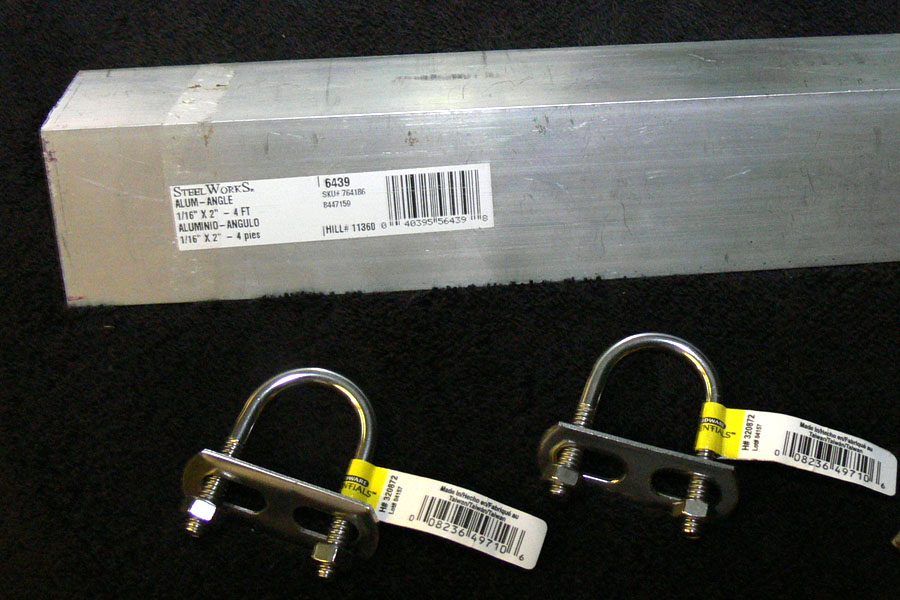
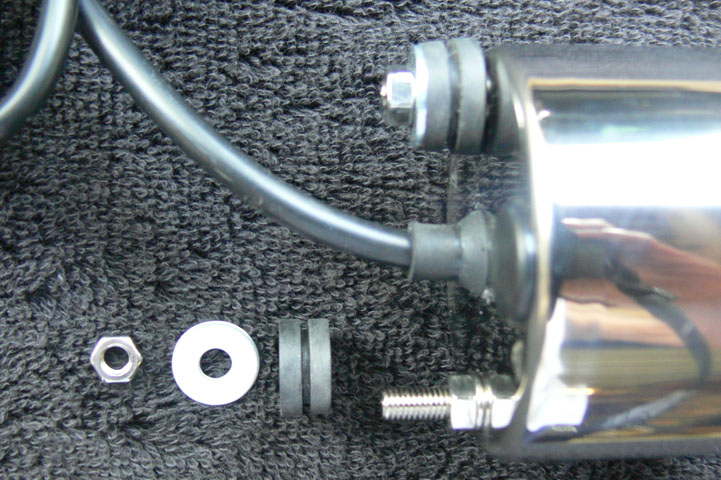
Parts List
   Tachometer from Ryca
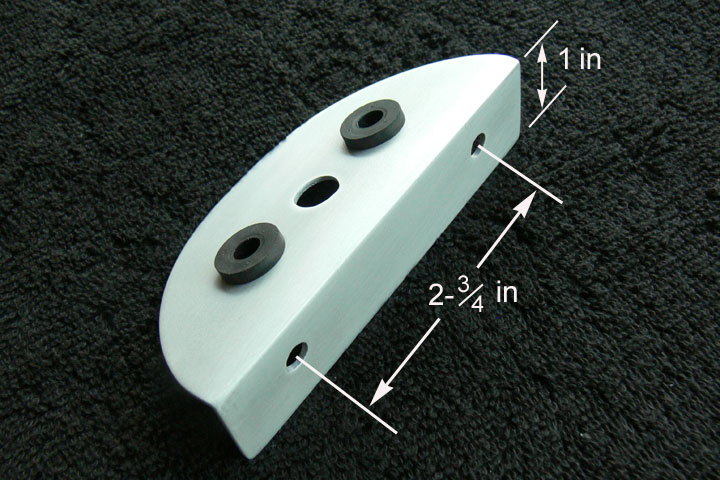
   Aluminum Angle  -   1/16" x 2" x 4-1/4" Long
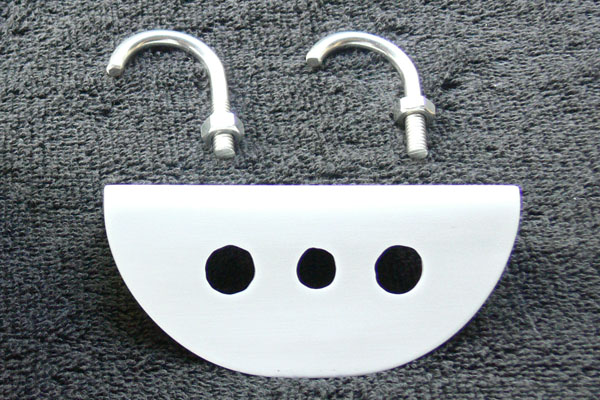
   Stainless Steel U-Bolts - 1 inch  (2)
   Rubber Grommets with I.D. that fits over nuts on tach mounting studs  (2)
   Washers with O.D. approximately same as grommets  (2)
   Krylon Clear Satin Finish (spray can)

Tools Needed
   Hack saw
   Drill and Bits
   File
   Wet-or-dry sandpaper, 400 grit and 600 grit

Instructions

Cut aluminum angle to length of 4-1/4"
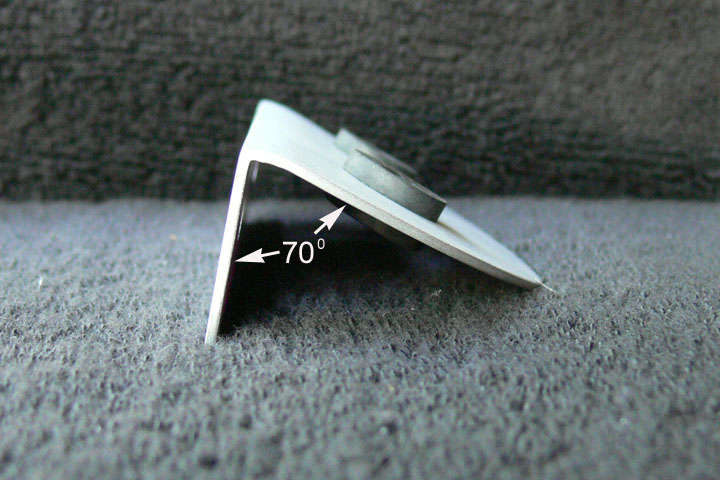
Bend angle from 90 degrees down to 70 degrees
Cut one leg of angle from 2 inches wide down to 1 inch wide
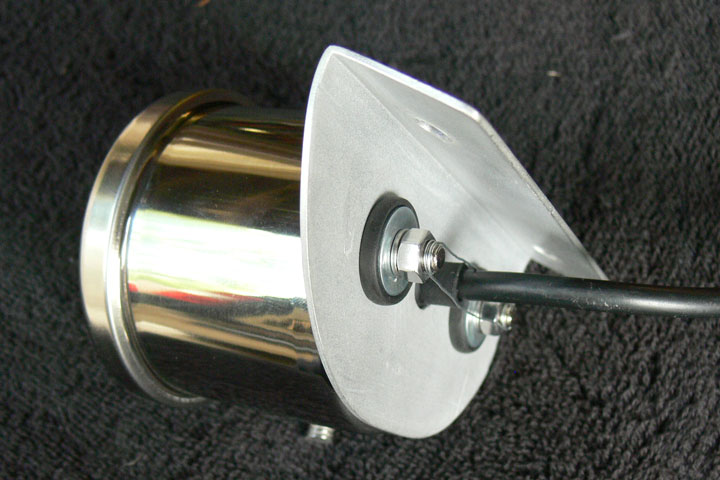
Cut and shape 2 inch leg as shown in photos or to your own preference
In the 2 inch leg drill two holes for the grommets and one hole for the cable
In the 1 inch leg drill two clearance holes for the u-bolts spaced 2-3/4 inches on center
File and sand all edges of bracket smooth
Wet sand bracket with 400 grit, then 600 grit to satin finish
Coat bracket with Krylon Clear Satin Spray Finish
Check fit of u-bolts on risers and bend open slightly to fit if necessary
Cut off one leg of each u-bolt as shown in photos then file and sand smooth
Cut threaded leg of each u-bolt to proper length by test fitting on risers with bracket
Mount tachometer and bracket assembly on risers
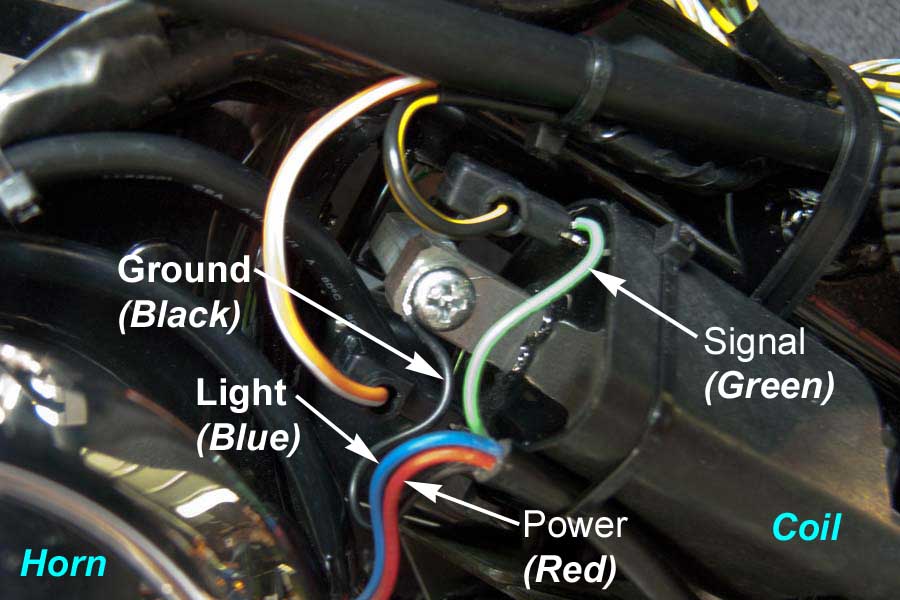
Connect wires to coil and horn as shown
Note: Connect both the Blue and Red wires to the positive (+) horn wire (Orange/Black)


Back to top
 
« Last Edit: 09/01/18 at 10:04:29 by Todd James »  

2007 S40, Dyna, 52.5/150, .073 Spacer, 2 Turns
2007 Sportster 1200, V&H Pipes
  IP Logged
luckylouie82
Junior Member
**
Offline

SuzukiSavage.com
Rocks!

Posts: 50
Richardson Texas
Gender: male
Re: Tachometer Installation
Reply #1 - 08/26/14 at 09:48:31
 
Todd, thanks so much for the instructions.  One question, because I don't want to mess the install up.  Pretty obvious where the tach wires into coil.  How do I connect to horn? splice? solder? into switch? Thanks so much.
Back to top


2011 S40 Raptor petcock. idle screw 2 turns out
  IP Logged
Todd James
Full Member
***
Offline

SuzukiSavage.com
Rocks!

Posts: 238
Mansfield, Ohio
Gender: male
Re: Tachometer Installation
Reply #2 - 08/26/14 at 10:02:39
 
luckylouie:
As I recall I was able to slip the two wires into the spade
connector on the horn. I am not certain about that, and unfortunately
my S40 is at our coach in North Carolina.
An alternative is to get an in-line splice connector at an auto parts store.
You can identify the proper horn wire with a 12 volt test light or voltmeter.
Whichever wire has 12 volts with the ignition switch on is the correct one.
Back to top


2007 S40, Dyna, 52.5/150, .073 Spacer, 2 Turns
2007 Sportster 1200, V&H Pipes
  IP Logged
Boogie_with_Stu
Senior Member
****
Offline

Look Ma, no hands!

Posts: 280
Raleigh, NC
Gender: male
Re: Tachometer Installation
Reply #3 - 06/02/15 at 09:46:45
 
Ok, so yeah...I know this is an old thread....but I'm new here so it's "new" to me  Smiley

This Ryca tach must use a dual fire ignition setup, yes? Since the Savage ignition fires twice per revolution of the drive shaft (one for combustion, one "wasted spark"), then wouldnt ANY dual fire ignition tach work on the Savage? I.e., any Harley tach? Or any 2 cyl 2 cycle engine ? So long as the tach is set up to accept 2 signals as the input for one revolution, it should work on the Savage....or not?

I'm ready for an education....fire away!
Back to top


03 Savage, Pearl Novelty Black,Raptor mod, Boulevard seat, Rectifier mod -'07 Honda Nighthawk 250 stock
  IP Logged
Dave
YaBB Moderator
ModSquad
*****
Online

SuzukiSavage.com
Rocks!

Posts: 17738
Camp Springs, Kentucky
Gender: male
Re: Tachometer Installation
Reply #4 - 06/02/15 at 15:24:31
 
Here is a link to the RYCA website....and it shows that the tach needs 1 spark for each revolution.  A 2 cycle single cylinder, a 2 cylinder 4 stroke bike with a distributor....or a single cylinder 4 stroke bike without a distributor and one wasted spark in the engine cycle meets that requirement.

You need to just be sure what you are ordering will work with one spark for each revolution of the crankshaft.

http://shop.rycamotors.com/mini_tachometer.html
Back to top


Someday I will be old......But not today!

  IP Logged
Boogie_with_Stu
Senior Member
****
Offline

Look Ma, no hands!

Posts: 280
Raleigh, NC
Gender: male
Re: Tachometer Installation
Reply #5 - 06/04/15 at 15:04:18
 
Ok, so I am REALLY not a "motor guy" Shocked

So the crankshaft rotates twice to complete the 4 cycles...yes? Does the engine internals then gear it down to ONE rotation of the drive shaft for every TWO rotations of the crankshaft?

Pls, just tell me to go to Wikipedia at any time if you feel these questions are beneath answering...lol
Back to top


03 Savage, Pearl Novelty Black,Raptor mod, Boulevard seat, Rectifier mod -'07 Honda Nighthawk 250 stock
  IP Logged
Art Webb
Serious Thumper
*****
Offline

SuzukiSavage.com
Rocks!

Posts: 3007
columbus, Texas
Gender: male
Re: Tachometer Installation
Reply #6 - 06/04/15 at 20:49:00
 
Why would the output shaft be geared down? the transmission provides gear reduction
Which is my way of saying I don't think so, but i might be wrong
Back to top
 
 
  IP Logged
Dave
YaBB Moderator
ModSquad
*****
Online

SuzukiSavage.com
Rocks!

Posts: 17738
Camp Springs, Kentucky
Gender: male
Re: Tachometer Installation
Reply #7 - 06/05/15 at 03:56:00
 
The camshaft is geared down to rotate once for every two rotations of the crankshaft.

The "primary drive" then is geared down so the clutch is not turning as fast as the crankshaft (input shaft), further reduction is then done in the transmission , and then the "final drive" (front and rear pulley) reduces the rotations even more. (front pulley is connected to the transmission output shaft).
Back to top


Someday I will be old......But not today!

  IP Logged
T140V
Ex Member


Re: Tachometer Installation
Reply #8 - 02/04/17 at 18:18:55
 
I made this mount out of 1/4" X 1" aluminum flat bar. I bent it with a hammer and a vice then sanded and filed them to match the rest of the bike. I screwed them to the bottom of the triple clamp. The Ryca tach works perfectly.
Back to top
« Last Edit: 02/06/17 at 02:42:15 by T140V »  

image_054.jpeg
  IP Logged
IslandRoad
Serious Thumper
*****
Offline

It doesn't vibrate,
it purrs!

Posts: 1147
The Kiewa Valley, Australia
Gender: male
Re: Tachometer Installation
Reply #9 - 02/04/17 at 21:18:41
 
Those brackets look great!

T140V wrote on 02/04/17 at 18:18:55:
I made this mount out of 1/4" X 1" aluminum flat bar. I bent it with a hammer and a vice the sanded and filed them to match the rest of the bike. I screwed them to the bottom of the triple clamp. The Ryca tach works perfectly.

Back to top


S40, 2014, Dyna, Raptor, 52.5/152.5, spacer mod, sea level, cat-eye LED tail light, bullet style halogen turn signals, 'Superbars' with custom 40mm risers, modified stock seat, Metzeler tyres.
  IP Logged
IslandRoad
Serious Thumper
*****
Offline

It doesn't vibrate,
it purrs!

Posts: 1147
The Kiewa Valley, Australia
Gender: male
Re: Tachometer Installation
Reply #10 - 02/04/17 at 21:22:26
 
I used Todd's method. I couldn't get the exact dimensions for the materials, but I worked it out  Smiley
Back to top
 

IMG_20170205_162456.jpg

S40, 2014, Dyna, Raptor, 52.5/152.5, spacer mod, sea level, cat-eye LED tail light, bullet style halogen turn signals, 'Superbars' with custom 40mm risers, modified stock seat, Metzeler tyres.
  IP Logged
T140V
Ex Member


Re: Tachometer Installation
Reply #11 - 02/05/17 at 01:20:21
 
IslandRoad wrote on 02/04/17 at 21:22:26:
I used Todd's method. I couldn't get the exact dimensions for the materials, but I worked it out  Smiley


I had time to spare so I first bent them to fit the angle of the forks. I drilled a hole in the base's and mocked them up. After figuring out the right spot for the tach I marked the studs on the tach with Persian blue and touched the brackets with the studs. I drilled a center hole for the wire and then the two mounting holes. Once they were loose fitted I tietend everything up. It's real solid now. Smiley
Back to top
 

image_056.jpeg
  IP Logged
Kris01
Serious Thumper
*****
Offline

Eat, sleep, RIDE!

Posts: 3767
Tennessee
Gender: male
Re: Tachometer Installation
Reply #12 - 02/05/17 at 20:00:45
 
The perfect spot! Looks great!
Back to top


There's no problem that a full tank of gas and a sunny day can't fix!

2008 S40, Rotella T 15W-40 w/ZDDP added, Dyna, 140/90-15, Battery Tender Jr., Seat lift, #52.5/150/3 washers, Raptor
  IP Logged
IslandRoad
Serious Thumper
*****
Offline

It doesn't vibrate,
it purrs!

Posts: 1147
The Kiewa Valley, Australia
Gender: male
Re: Tachometer Installation
Reply #13 - 02/06/17 at 00:40:46
 
I reckon these two versions place the tach in the best possible positions. They're great options!

As opposed to the Ryca bracket, which costs about 50 bucks, and looks like it would mount the base of the tach at the height where the handlebars are bolted to the risers. That would be way too high on the savage with stock risers.

This forum is the gift that just keeps giving!  Smiley
Back to top


S40, 2014, Dyna, Raptor, 52.5/152.5, spacer mod, sea level, cat-eye LED tail light, bullet style halogen turn signals, 'Superbars' with custom 40mm risers, modified stock seat, Metzeler tyres.
  IP Logged
T140V
Ex Member


Re: Tachometer Installation
Reply #14 - 02/06/17 at 02:34:52
 
Here is what the brackets look like. A little filing, sanding and polishing gives you a sleek looking mount. Cost was $12 for the aluminum and a couple dollars for the bolts.
Back to top
 

image_057.jpeg
  IP Logged
Pages: 1 2 3 
Send Topic Print


« Home

 
« Home
SuzukiSavage.com
03/29/24 at 06:58:14


General CategoryTechnical Documents/Reference › Tachometer Installation


SuzukiSavage.com » Powered by YaBB 2.2!
YaBB © 2000-2007. All Rights Reserved.