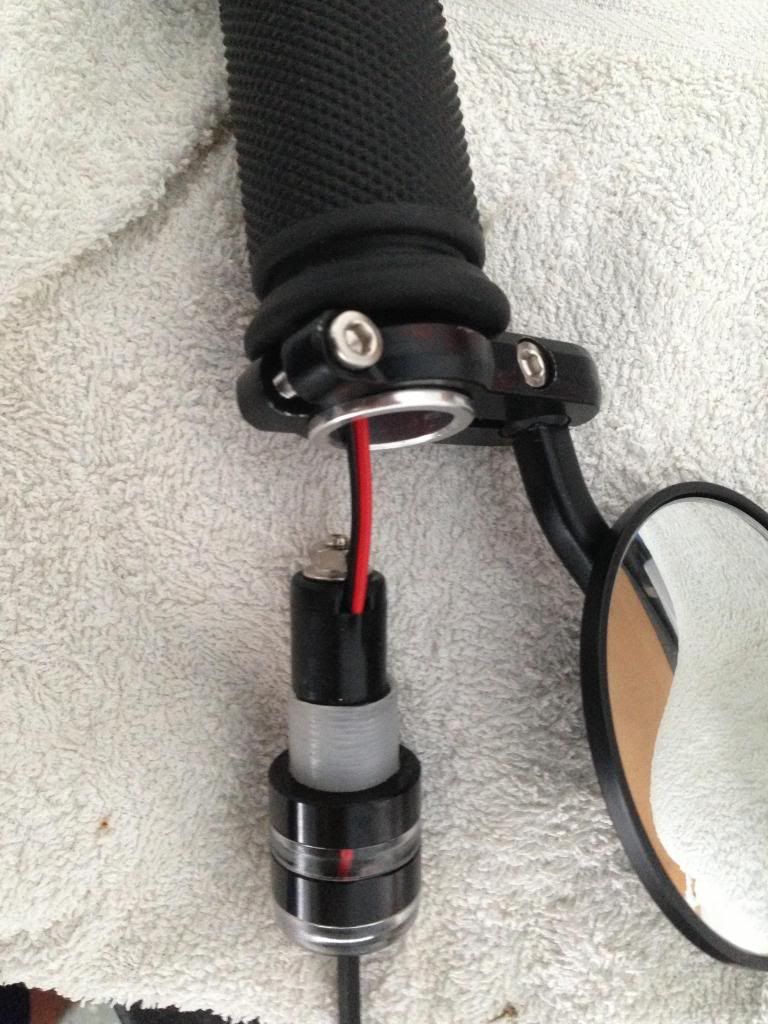
Donate!
Welcome, Guest. Please Login or Register :: View Members
Pages: 1 2 3 4 
Send Topic Print
My trip down RYCA lane (Read 1856 times)
Dave
YaBB Moderator
ModSquad
*****
Offline

SuzukiSavage.com
Rocks!

Posts: 17832
Camp Springs, Kentucky
Gender: male
Re: My trip down RYCA lane
Reply #15 - 08/21/13 at 12:18:08
 
Well that surprised me.....I thought you were getting the aluminum bits smooth so you could polish them.

I didn't anticipate the shiny black!
Back to top


Someday I will be old......But not today!

  IP Logged
JenRides
YaBB Newbies
*
Offline

SuzukiSavage.com
Rocks!

Posts: 4
Everett, WA
Gender: female
Re: My trip down RYCA lane
Reply #16 - 08/21/13 at 12:29:56
 
so exciting!  can't wait to see the progress unfold more  Cheesy
Back to top


2013 Suzuki Boulevard S40, Pearl Mirage White / Metallic Veil Silver, Clear Windshield, S40 Engine Guard, S40 Saddlebags, Kisan pathBlazer, Kisan tailBlazer...
  IP Logged
WD
Serious Thumper
2005 No Login
*****
Offline

Professional
"scooter
trash".

Posts: 5207
Rosemark TN
Gender: male
Re: My trip down RYCA lane
Reply #17 - 08/21/13 at 15:31:41
 
Nice! Full or partial chrome and polish delete? I'm likely going with full chrome delete on mine, can't stand that stuff.
Back to top


On 2 wheels since 7/87

Black and Chrome 2003 1950s style custom
  IP Logged
ToesNose
Serious Thumper
*****
Offline

Pardon me, do you
have Hot Sauce?

Posts: 1993
Mooresville, NC
Gender: male
Re: My trip down RYCA lane
Reply #18 - 08/21/13 at 15:37:00
 
Your project is really coming along nicely, it's plain to see how much thought and effort you are putting into it to get everything just right.   Wink

Looking forward to seeing the bike all done for sure!   Cheesy
Back to top


The Suzuki LS650, bringing Miles of Smiles everywhere!
  IP Logged
gdrseeker
Senior Member
****
Offline

Addicted!!

Posts: 365
Carson Valley NV
Re: My trip down RYCA lane
Reply #19 - 08/21/13 at 16:33:45
 
I like it so far.  I look forward to following this thread.
Back to top


1996 Savage, Jardine, K&N, 145 / 55 jets, 1 turn out at 5000 ft. elevation.
  IP Logged
Gheorghe
Junior Member
**
Offline

SuzukiSavage.com
Rocks!

Posts: 88

Re: My trip down RYCA lane
Reply #20 - 08/22/13 at 07:46:07
 
Dave wrote on 08/21/13 at 12:18:08:
Well that surprised me.....I thought you were getting the aluminum bits smooth so you could polish them.

I didn't anticipate the shiny black!


I was thinking about polishing at first but then I thought about striking a balance between black and polish. I don't know if it is for everyone but the rims will be polished and the hubs are black....
I also want the paint on the tank, seat and sides to be mainly black as well. We'll see how it turns out, if it is too much one way or the other I will change it over the winter
Back to top
 
 
  IP Logged
Gheorghe
Junior Member
**
Offline

SuzukiSavage.com
Rocks!

Posts: 88

Re: My trip down RYCA lane
Reply #21 - 08/22/13 at 07:47:52
 
WD wrote on 08/21/13 at 15:31:41:
Nice! Full or partial chrome and polish delete? I'm likely going with full chrome delete on mine, can't stand that stuff.

Thank you very much!
Yeah, I am not too big on the chrome myself, the only non powder/paint bits on this bike will be polished
Back to top
 
 
  IP Logged
Gheorghe
Junior Member
**
Offline

SuzukiSavage.com
Rocks!

Posts: 88

Re: My trip down RYCA lane
Reply #22 - 08/22/13 at 07:49:29
 
ToesNose wrote on 08/21/13 at 15:37:00:
Your project is really coming along nicely, it's plain to see how much thought and effort you are putting into it to get everything just right.   Wink

Looking forward to seeing the bike all done for sure!   Cheesy


Thank you very much for the compliments, I loved this project so far.

Stay tuned for more updates.
Back to top
 
 
  IP Logged
Gheorghe
Junior Member
**
Offline

SuzukiSavage.com
Rocks!

Posts: 88

Re: My trip down RYCA lane
Reply #23 - 08/22/13 at 08:03:08
 
I kept reading that the stock fuel cap is not the more reliable unit out there so I decided to see if I could find a better solution. What I found is this guy:
http://www.meancycles.com/store/parts/view.cfm?partID=214609
You get a bung as well as a vented pop up cap. I decided to give it a whirl...

Stock Bung out


Cleaned up the opening:


Used some spit and presto:

Back to top
 
 
  IP Logged
Ralph_86-Savage
YaBB Newbies
*
Offline

Romans 10:9

Posts: 20
Fayette Co., WV
Gender: male
Re: My trip down RYCA lane
Reply #24 - 08/22/13 at 08:58:24
 
I'm LOVING this thread.  This is better than the original American Chopper show.
Back to top


1986 4spd Savage
Approx. 6,000 Miles
  IP Logged
Dave
YaBB Moderator
ModSquad
*****
Offline

SuzukiSavage.com
Rocks!

Posts: 17832
Camp Springs, Kentucky
Gender: male
Re: My trip down RYCA lane
Reply #25 - 08/22/13 at 09:33:16
 
Gheorghe:

I am not sure how you are going to attach the bung.....but don't underestimate the power of acid flux and solder.  With the low heat there will not be any warping, and it will hold plenty strong for a fuel bung and cap.  It also makes a nice fillet at the joint.

I put my new petcock mount on my tank with solder.....lots of vintage tanks only used solder for the seams.  The metal has to be clean, and you must use Acid flux on steel.....not Rosin or the flux you use for copper or brass pipe.

Back to top
 

Tanksolder.jpg

Someday I will be old......But not today!

  IP Logged
Gheorghe
Junior Member
**
Offline

SuzukiSavage.com
Rocks!

Posts: 88

Re: My trip down RYCA lane
Reply #26 - 08/23/13 at 04:21:41
 
Hi Dave,

Thanks for the heads up, I wish I would have known about this a little sooner because what I wound up doing is taking it to a local welding "expert" and had him TIG welded it. That was all good and well but he warped the tank a bit in one spot and I am generally unhappy with how it came out. I will be able to fix it with some body work (pull the metal back) and then smooth it with a tiny amount of body filler but still, I thought it would be smooth considering this guy supposedly builds tanks from scratch...
I will keep the soldering idea in mind for future builds though

I appreciate all of the positive feedback guys!!
Back to top
 
 
  IP Logged
Gheorghe
Junior Member
**
Offline

SuzukiSavage.com
Rocks!

Posts: 88

Re: My trip down RYCA lane
Reply #27 - 08/28/13 at 05:19:47
 
Clip ons:
I directly stole a page from RpNSht on this one, right down to the hand grips. While the hand grips from RYCA are pretty cool I wanted the Driven hand grips seen here:
http://www.bikerperformance.com/images/products/driven-racing-sbk-streetbike-...

The problem, as outlined by RpNSht, is that they are only made for 7/8" bars and the RYCA ones are 1".
One way to tackle the issue of making the grips fit is to soak them in boiling water to make then super soft. Another way, and this is what I did, is to use this stuff:
http://www.hondapartworld.com/image/data/Honda_SpryClnr_Plsh.jpg
Yes, Honda Spray Cleaner and Polish is a miraculous tool. Not only will it clean and polish your honda   Grin it will also allow you to put on 7/8" grips on 1" bar. All I had to do is spray the inside of the grip, outside of the bar and push it on. It took a bit of force but it was not hard to do. The hardest part was the throttle because it is plastic and I didn’t want to break it but that wasn't super hard either. Sorry I do not have any pictures of this but the grips fit and look great. One thing I did on the throttle (sorry no pics of this either) is I ground down the ridges on the throttle that are used as locating/anti spin feature on the stock grips. I did this to make the throttle smooth and not be visible through the Driven grips.

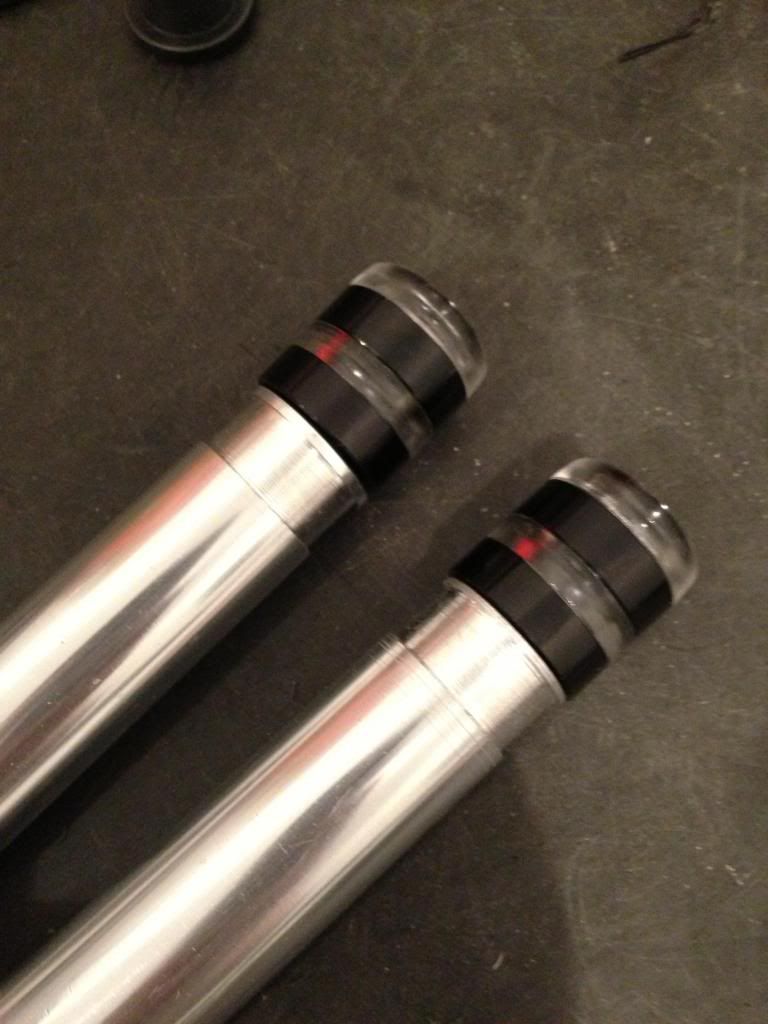
DCC bar end signals:


These signals are made to fit both 7/8" bars and 1" bars but I didn't like the extra slop the shank had so I had my dad make me some nylon spacers to make them fit perfectly


One other thing I wanted to do is use clip on mirrors. Unfortunately those only come in 7/8" flavor so we had to machine the end of the clip on to accept this:


Back to top
 
 
  IP Logged
botticelli
Junior Member
**
Offline

Custom Savage Build
Coming!

Posts: 66
Boston
Re: My trip down RYCA lane
Reply #28 - 08/28/13 at 10:23:39
 
Great work, thanks for the step by step photos on this, I'm planning to do the same on my RYCA build this winter. Really looking forward to seeing how your project comes out.
Back to top


Four wheels move the body, two move the soul!
  IP Logged
Gheorghe
Junior Member
**
Offline

SuzukiSavage.com
Rocks!

Posts: 88

Re: My trip down RYCA lane
Reply #29 - 08/29/13 at 05:53:22
 
botticelli wrote on 08/28/13 at 10:23:39:
Great work, thanks for the step by step photos on this, I'm planning to do the same on my RYCA build this winter. Really looking forward to seeing how your project comes out.


Thank you very much for the comments. I try to do my best and to possibly inspire other people as I have been inspired by the people on this board.

More work....

I kept reading that the little thumper will vibrate like crazy so one other thing I did to the clip ons is fill them with shot (shot peening material). Sorry no pictures but the idea of filling the bars with shot is to increase their mass and therefore decrease their vibration vrequency.
Back to top
 
 
  IP Logged
Pages: 1 2 3 4 
Send Topic Print


« Home

 
« Home
SuzukiSavage.com
05/18/24 at 20:47:52


General CategoryRubber Side Down! › My trip down RYCA lane


SuzukiSavage.com » Powered by YaBB 2.2!
YaBB © 2000-2007. All Rights Reserved.