Donate!
Welcome, Guest. Please Login or Register :: View Members
Pages: 1
Send Topic Print
Harley muffler guide... (Read 7398 times)
Serowbot
YaBB Moderator
ModSquad
*****
Offline

OK.... so what's the
speed of dark?

Posts: 28344
Tucson Az
Gender: male
Harley muffler guide...
02/25/11 at 19:03:37
 
Note: Please post questions in the Rubberside or PM me...

The Harley "Shorty" muffler is the most popular muffler swap for the Savage.
It gives a slightly louder, much deeper tone,... looks great,... and saves 7 lbs over the stock unit.   The chrome finish is top quality, and the swap is fairly easy...

Providing you select the right Harley muffler...

This is a guide to point you in right direction...


Quote:
Note...  Some mufflers may be sold with the center baffle knocked out, (this essentially makes it a straight pipe),... so ask the seller, or check it yourself... (you can insert a stick into the muffler and feel the baffle plate blocking passage near the center of the muffler..)( or look down the tube with a flashlight)...


Quote:
Note... If you are considereing using a muffler with the bafflle removed, or even going with an open pipe, watch this video first...
It, will change your mind...
http://www.youtube.com/watch?v=KjKUKhHQLHg


All the Harley short mufflers are internally the same, with the exception of some having a sort of heating coil at the front, which seems to make little difference to sound or flow.  They are probably California models, and are stamped on the side as  "Catalytic".
Externally,...
...they all mount very different...

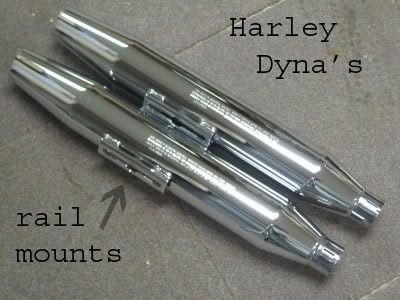
The easiest swap is with the "Dyna" model.  This is the one you want, if you can find it.  Wink...
It's "rail mount" will bolt right up to the original muffler bracket.


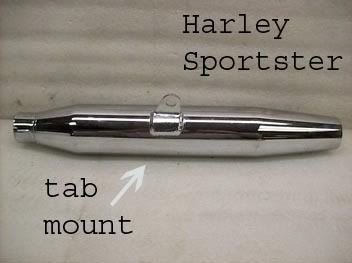
Second place goes to the Pre-04' Sportster muffler.
It is a "tab mount",... and will likely require slightly bending the tab (use a rubber mallet) and drilling a new bolt hole in the muffler bracket.


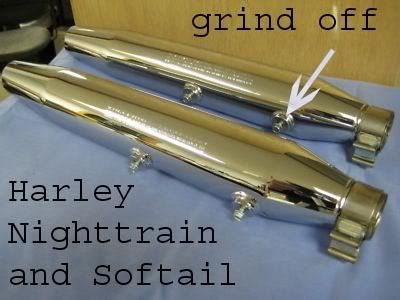
Third place,... Is the Harley Softail/ Nightrain muffler.  It has two protruding bolts,... the end one lines up with the stock Savage mount, the other must be ground off...
This muffler is a new find, and may be better or equal to the Sportster.... (Thanks to Boofer)...


Lastly, is any other Harley mounting system.  Not really recommended, but... if you find one for a price you can't refuse (like free!),... you can make anything fit one way or another.  
...and internally you will get the same.

Screaming Eagle's and other aftermarket Harley clone mufflers are usually much louder, and the build quality on some of these may not be as good.  But,.. if you want louder, they are out there.

A good price on a Harley shorty is anywhere from free to $30.00.  They are thrown away at dealerships and are known as "cast-offs".
So,... you definitely don't want to pay a lot.
Do a search on E-Bay any day and you'll find dozens...
Problem is,... many sellers don't know what they came off, and some will mislabel them as for the wrong bike.  
So, study the pictures.  Wink...

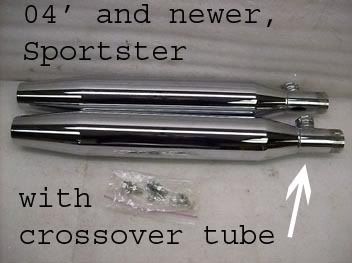
Now,... for the one you don't want...
It's the newer model's with a crossover tube at the front.  If you get one of these, you will have to plug that tube, and live with the ugly thing sticking out there.  So stay away from them.


Good luck,.. happy hunting... Huh...


...and now for some installation tips...

Since each type connects a little different to the mount bracket, and these have been described in the above section,...
...let's concentrate on the front pipe mount.

All the Harley pipes are slightly larger in diameter than our stock pipe.

If you can save the old gasket intact, (usually it gets boogered), you might possibly use it to help fill the space.  
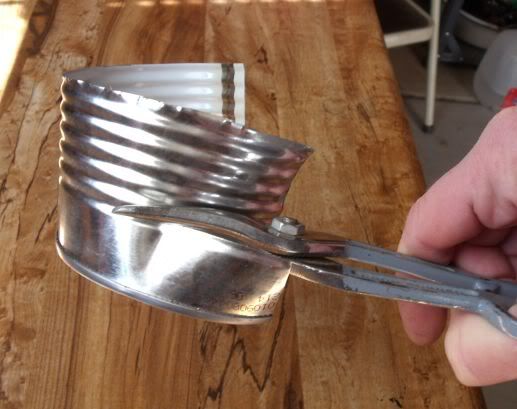
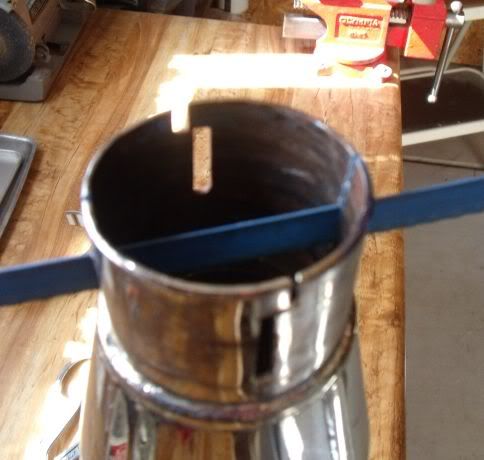
I use a bit of tin can... (reports are, aluminum works, too)...

Quote:
NOTE... Wear gloves, like I didn't,... or you'll surely get cut, like I did... Huh...


Cut a strip with some tin snips... the wavy part helps make a nice crush seal...


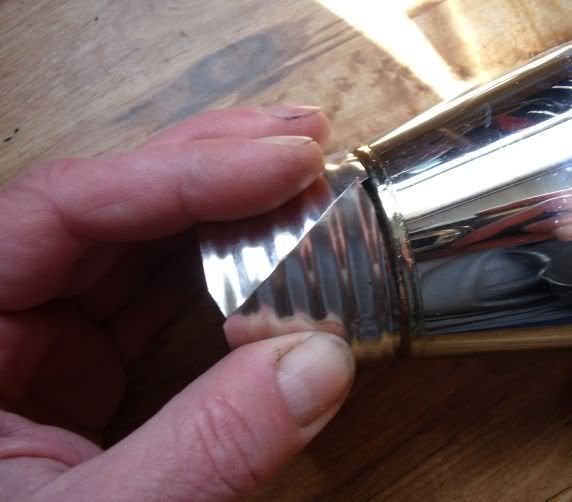
Cutting a diagonal on the ends helps the seal too...
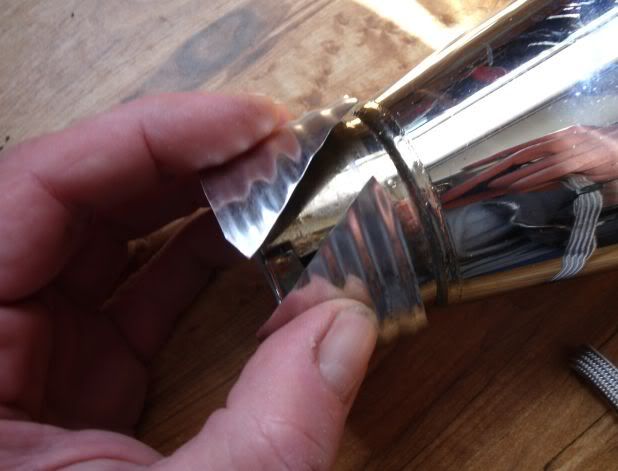

nice fit...


use a wide , sturdy clamp... (Harley makes one,.. I found this one at a dollar store)... shop around...


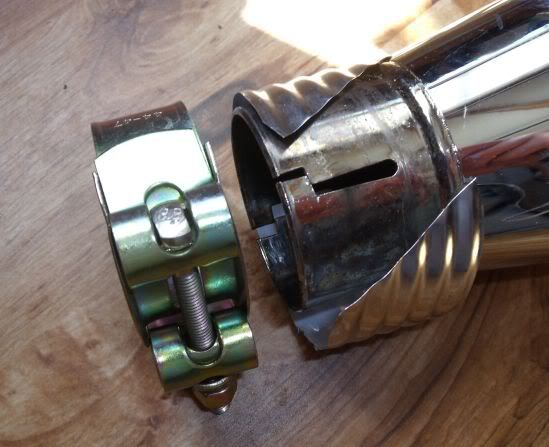
Cutting a series of slots in the end of the muffler will allow the clamp to neck down the muffler to the pipe diameter...


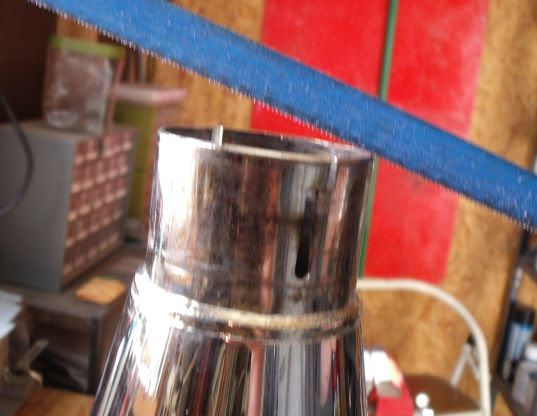
I usually make about six or eight slots,...
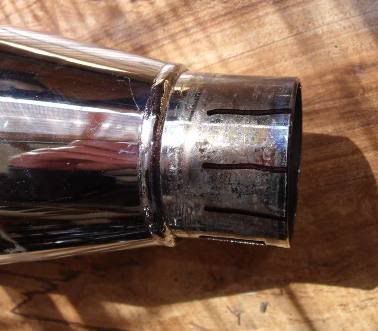

...like so...


Now that you have all your parts together and prepped, you are ready to install...

It's best to disconnect the exhaust pipe at the cylinder head, so you don't put strain on the exhaust gasket up there...
If you loosen the two chrome nuts that hold the right footpeg and muffler guard, you can have more wiggle room... but you don't have to...
Slide the clamp onto the pipe, up past the end as far as you can, then wrap the tin gasket around the end of the pipe.  
Get the muffler over the gasket and pipe, and slide it home...
Now,... attach the muffler to the bracket, (using whichever method applies to the type of muffler you bought)...
Once you have that secured, go to the front and re-attach the exhaust pipe at the head. (use some anti-seize on those bolts if have any)...
Now that the front end and the rear end are aligned and secured, clamp the muffler to the pipe.  Any slight miss-alignment will kinda' bend out as the clamp cinches down...
You can buy a chrome cover shield to hide the clamp area if you want.  Harley sells one, as do others ($10 to $20)... they usually attach with hose clamps....
Re-attach your footpeg and heat guard, (making sure the brake return spring is positioned)...

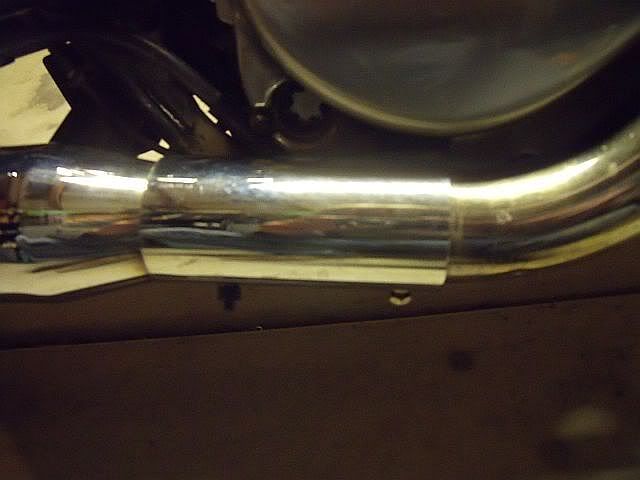
Here's a pic of the muffler/pipe connection... notice, the muffler butts up right to the heavy ring of the pipe...

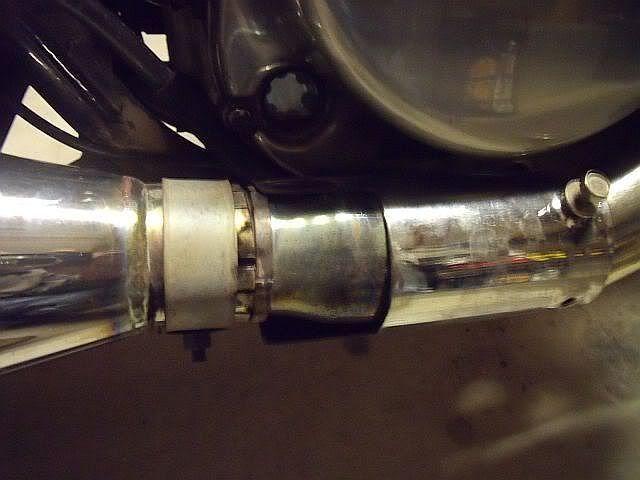
... and one of the same, with the cover in place...


... and you are ready to ride... Wink...
(Well,... clean up your mess first)... Huh...
Listen to that purrr!...

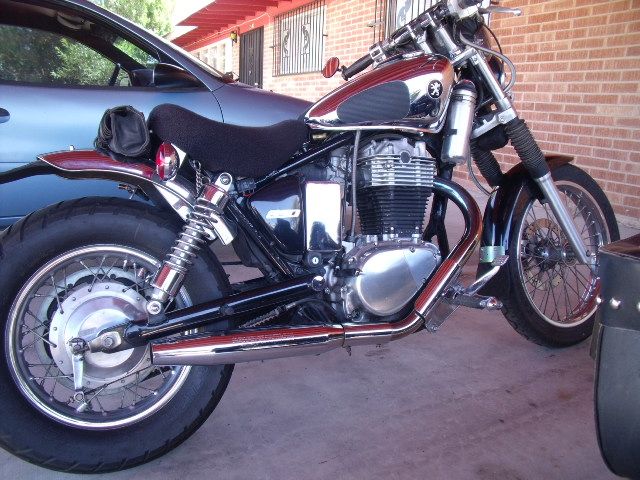
Here's a finished look...


***Note... some other members have had a muffler shop make an adapter with a 10' offset angle, and necked down at one end to adapt the mufflers to the pipe... This has the advantage of putting the muffler out past the brake lever on the rear hub, and not sooting it up...
On the other hand,... you are on your own with attaching the muffler to the bracket in this case,... because it will be dependent on the length and contour of the adapter pipe... and it will require two
clamps and a more sophisticated heat shield to cover the joint...
... but, you might want to study the option, and see if it will be more suitable for your application.

*** Note... for best performance, you will likely need to rejet.  
One or two steps higher on the main, and do a 2/3 thickness mad to the needle jet spacer...
Actual amount will vary, depending on your elevation, humidity temps, other mods (air filter), and riding style...
Generally speaking... if you are riding at less than 3,000ft elevation... a change to a 150/50# main/pilot and 2/3 thickness spacer will not hurt...  (the spacer mod is optional, and will mostly affect acceleration)...


Back to top
 
« Last Edit: 06/19/14 at 20:50:28 by Serowbot »  

Ludicrous Speed !... ... Huh...
  IP Logged
Bubbasan
YaBB Newbies
*
Offline

SuzukiSavage.com
Rocks!

Posts: 23
Champaign, Il
Gender: male
Re: Harley muffler guide...
Reply #1 - 03/06/11 at 20:55:00
 
Thank you Serowbot for your post on this topic.

I just got mine on and thought I would add my experience.


I got this muffler on ebay for $20+10 shipping from Tri-County HD.  The HD model# is 65657-82A.  It is 17" long.  

The slide bracket only allowed mounting to the front hole, which I think is fine.  I bought an 8mm bolt, plain nut, and locknut and used the original muffler washers.  I used the plain nut to secure the bolt to the slide, this also pushed the muffler a little bit out from the frame, and I used the locknut on the bottom side.

I used a 1 3/4" reducer that I had hanging around.  I had a 7" heat shield that I put on to cover the joint.

The only 2 things I will probably replace is the clamp and the shield.  I do not like the clamp I used.  And the shield has the floppy joint type which was a little difficult to secure so I will probably replace it with the radiator hose clamp type.

The funny thing is when I fired it up in my small shed it was loud as hell.  I wasn't sure but when I got it out of the shed today it sounded great.  I could still hear the engine run and the cone filter sucking air.

Oh yeah, you will notice the 12.5" shocks.  I bought these used off ebay.  Paid a little bit for them but they came off a private owner bike with less than 3000 miles, not a stripdown parts seller.  Another of Sero's mods.  Can't wait for some warm temperatures.     Bub

UPDATE: As mentioned I did not like the clamp or shield I had so I got a 1 3/4" clamp and shield made by Cobra.  The clamp is more like a band and the shield has radiator bands.  They both worked great.  Much happier with it.  I also sealed the pieces with a bead of Loctite Red RTV silicone gasket compound.
Back to top
 
« Last Edit: 03/12/11 at 14:16:16 by Bubbasan »  
  IP Logged
babyhog
Serious Thumper
*****
Offline

Find a Cure for
Breast Cancer!
 NOW!!

Posts: 3802
WV
Gender: female
Re: Harley muffler guide...
Reply #2 - 03/13/11 at 17:58:51
 
Installed the same one Boofer used on my son's '87 today. Went on easily. Didn't have to cut that forward bolt off either.  I think it sat in front of the bracket just fine. Only one bolt through the bracket, but the clamp seems to be holding it just fine.  Will post some pics when I get them uploaded.  Sounds better than my Dyna, so am considering swapping mine out now too.

Adding a couple pics...  Oh, this is Harley number 65842-07.  


Back to top
 
« Last Edit: 03/14/11 at 05:42:11 by babyhog »  

~ 2006 Black, Big Crank battery, HD Softail muffler, engine guard/o-ring pegs, Spitfite windshield, custom mounted Saddlemen bags, Mustang seat! ~ oh, and Hairdo by Helmet! ~
  IP Logged
jandaso
Full Member
***
Offline

Do you want fries
with that?

Posts: 145

Re: Harley muffler guide...
Reply #3 - 03/15/11 at 11:39:13
 
I had the same situation were I only had one hole to bolt the Muffler since it was sticking out. I just went and filed down the two little nipples that are inside the Dyna muffler and doing so the muffler slided in more making it fit the two holes on the muffler mount.
Back to top


2006 S40 - Mikuni VM38 (UFO and Dial-a-Jet), K&N filter, Barnett Clutch, Dyna Muffler, and Verslavy.
  IP Logged
EJID
Serious Thumper
*****
Offline

Work to ride and
ride to work.

Posts: 1536
Pocatello, ID
Gender: male
Re: Harley muffler guide...
Reply #4 - 03/21/11 at 14:43:11
 
You got me curious about which Muff I had in the box of goodies the previous owner gave me with my bike. I thought it was a Dyna, but it didn't have the rail mount, come to find out it was actually a Softtail Harley number 65842-07 (just like the one BH & Boofer posted).

I used a adapter pipe to get it away from the brake cable though. It was a 7" adapter with a 10o bend that a muffler shop bent for me for $15.


Back to top
 
« Last Edit: 05/18/12 at 07:33:01 by EJID »  

05 S40 15" Memphis Slim, FXDWG Bars, Moved Rear Signals, Saddlebags, Fork Bag, Mini-Tach, Raptor, Cone Filter, Fishtail Muffler, Mix Screw Out 2.5 Turns, 4" Fwd Controls, 147.5 Main/55 Pilot @ 4500
  IP Logged
Cavie
Full Member
***
Offline

My wife made me do
it

Posts: 107
Port charlotte Fl
Gender: male
Re: Harley muffler guide...
Reply #5 - 02/25/12 at 17:56:57
 
I had a banner day. Local salvage yard. I found what I beleive is a Harley knock off. Part #65616 86A. No standard info or disclamer found on stock mufflers. Anyway, It has a single tabb mounted on the side pointing down, not the top. 19" long. Looks just like the 17" Dyna with the side rail. The best part is it has the nessessary 10 degree bend to get it away from the brake cable built in to the motor end. It does require a sleve over the exhaust pipe. $10.00!!!!!! Polished up like new.
Back to top


'05 Boulavard S40
'03 Volusia Intruder
  IP Logged
clearush
Senior Member
****
Offline

SuzukiSavage.com
Rocks!

Posts: 261
Deer Park,TX
Gender: male
Re: Harley muffler guide...
Reply #6 - 06/09/12 at 22:03:20
 
Put on a 65357-05 Harley Softail Deluxe FLSTN today using the Ryca Motors muffler bracket  http://shop.rycamotors.com/muffler_bracket.html   solid mounting and nice tone, still quite till you get on the throttle.


Back to top
« Last Edit: 06/17/12 at 20:18:59 by clearush »  

hd_65357-05_01.jpg
  IP Logged
sytvngale
YaBB Newbies
*
Offline

SuzukiSavage.com
Rocks!

Posts: 31

Re: Harley muffler guide...
Reply #7 - 07/21/12 at 09:10:45
 
What great info!  I am off to Ebay to find a Dyna muffler.  Don't know much about rejetting, however.  I also want to lose the airbox on my '87 and go to a cone filter.  I will look for more info on jetting.
Back to top
 
 
  IP Logged
Pascal
YaBB Newbies
*
Offline

SuzukiSavage.com
Rocks!

Posts: 10
France
Gender: male
Re: Harley muffler guide...
Reply #8 - 10/07/12 at 02:18:30
 
My new muffler  Smiley

Big sound, a quiet baffle will be necessary  Wink


Back to top
 
 
  IP Logged
Pascal
YaBB Newbies
*
Offline

SuzukiSavage.com
Rocks!

Posts: 10
France
Gender: male
Re: Harley muffler guide...
Reply #9 - 10/22/12 at 12:14:08
 
Back to top
 
 
  IP Logged
Greg
Serious Thumper
*****
Offline

Molon Labe

Posts: 1251
Southeast PA, uSA
Gender: male
Re: Harley muffler guide...
Reply #10 - 10/22/12 at 15:17:21
 
Did one of those exhaust size adapters really work with the Savage?
Back to top


2002 Savage.
WWW   IP Logged
Pascal
YaBB Newbies
*
Offline

SuzukiSavage.com
Rocks!

Posts: 10
France
Gender: male
Re: Harley muffler guide...
Reply #11 - 10/23/12 at 09:01:28
 
I cut the end of the exhaust and TIG welded a sleeve of 38 mm diameter.
I then put an exhaust gasket and installed the muffler.
The internal muffler diameter is 42 mm.

Exaust:


Exhaust gasket: http://www.shogunmoto.com/pieces-moto-cross/FR/produit_id_34807/joint-manchon...


Back to top
 
 
  IP Logged
Eric
YaBB Newbies
*
Offline

SuzukiSavage.com
Rocks!

Posts: 2

Re: Harley muffler guide...
Reply #12 - 10/28/12 at 15:38:13
 
Followed this guide nearly to the letter and all went well.  Two things:

1.  The gap between the size of the Dyna muffler I bought ($35 on feeBay...) was very small and I used a single wrap of metal from an aluminum can.  You stated I should use steel - not aluminum.  Why no aluminum?
2.  I re-jetted main/pilot but did not do the washer.  Bike runs great, no bike back-firing.  It appears that the header pipe is "yellowing".  Is this from running too lean/hot?  My next step might have to be checking the spark plug - tank removal and all...

Thanks.  
Back to top
 
 
  IP Logged
Serowbot
YaBB Moderator
ModSquad
*****
Offline

OK.... so what's the
speed of dark?

Posts: 28344
Tucson Az
Gender: male
Re: Harley muffler guide...
Reply #13 - 10/29/12 at 11:04:39
 
Eric,.. aluminum is fine... I just say tin, because tin cans usually have that rippled part that helps with the crush seal...
Golden/yellow to blue pipes are normal on this bike...
Most Savages do it... especially if you ride in traffic, or up mountains...
It won't hurt anything, unless the color bothers you...

PS.. questions will get answered faster in the Rubberside section...
This Tech section is pure tutorial...

Enjoy your new rumble... Wink...
Back to top


Ludicrous Speed !... ... Huh...
  IP Logged
redsticksavage
YaBB Newbies
*
Offline

2006 S40

Posts: 19
Baton Rouge, La
Gender: male
Re: Harley muffler guide...
Reply #14 - 11/10/12 at 08:58:22
 
Just did the Dyna install.

Key steps:

1. The Dyna muffler with rail that bolts directly on our Savage is HD  65747-94
2. Do put a minimum of 6 cuts in Dyna pipe flange
3. Do loosen the right side footpeg bolts and the exhaust header at the engine-this will allow you to wiggle the pipe and muffler  around to fit.
4. After install, tighten in reverse order - rail bolt, muffler clamp, foot bracket (note: these go through frame to other side so put a wrench on the other side while tightening), and then finally the  header to engine gasket.
5. Use a tin can (I used a green bean can) and tin snips to make a crush gasket under the HD clamp and also between the muffler and header pipe. I tried an aluminum soda can but it was too thin and gave me exhuast leaks.
6. An unbaffled Dyna is loud, I am experimenting with a 1-5/8 tub drain strainer as a makeshift baffle. Softens the edges but is still too law enforcement attracting loud.
Back to top
 
« Last Edit: 11/11/12 at 06:09:26 by redsticksavage »  

2006 S40, EBC organic front/stock rear pads, 4900 miles, Rotella T6, Shinko 712s, Fram fuel filter, Raptor, no 4 nylon washer, 3 turns air mix, jets 150/52.5, open Dyna, stock air box
  IP Logged
Pages: 1
Send Topic Print


« Home

 
« Home
SuzukiSavage.com
03/28/24 at 10:39:46


General CategoryTechnical Documents/Reference › Harley muffler guide...


SuzukiSavage.com » Powered by YaBB 2.2!
YaBB © 2000-2007. All Rights Reserved.