Donate!
Welcome, Guest. Please Login or Register :: View Members
Pages: 1 2 
Send Topic Print
Rikko's Build Your Own Bike Lift/Stand (Read 1421 times)
Savage_Rob
Serious Thumper
Alliance Member
*****
Offline

Mechanically
Inclined Amateur

Posts: 6972
Texas (Dallas area)
Gender: male
Rikko's Build Your Own Bike Lift/Stand
11/13/04 at 12:55:41
 
Link to Nightrider.com

This is a great idea.  I have seen it posted on several sites (including this one and Bert Heise's) and decided to try it recently.  I was unable to locate any 4x8's near me but I used two lengths of 2x8 pressure treated pine and lag-bolted them together.
Back to top
 
« Last Edit: 12/04/12 at 12:16:59 by Oldfeller--FSO »  

1998|MAC muffler|ceramic coated header|K&N air filter|Amal Mk2 carb|Odyssey battery|iridium plug|NC windshield|Dunlop 491s|Superbrace|EBC brake rotor|12.5" Progressive shocks|Kuryakyn ISO grips
Savage_Rob RidingTX   IP Logged
georgekathe
Ex Member


Re: Rikko's Build Your Own Bike Lift/Stand
Reply #1 - 07/23/06 at 19:38:12
 
Hi - this worked well for me too while I waited for various parts to arrive to take off wheels, do brakes, etc.

A few of point(er)s -

a) I too had to buy an 8' length of 2" x 8* & cut it in 2. I did not lag bolt as Savage Bob, but took the other path of using the recommended dry wall screws - 14 in totalall, a row spaced in a line 1 & 1/2 from each edge on one side, 2" from each edge the other.

b) I don't know why the length of wood is 3' in the "parts" list, but I would go for 4' (makes even more sense if you buy an 8' legth of 2" x 8'

c) I used 5/16" x 4" eye bolts (which I think are a must) if anyone wants knows, screwed in until 2" is left above the surface, measured from top of wood to top of eye. I can't recall what bit size I used for the pilot hole.

d) NOTE - I luckily tried the 3" x 5/16' lag bolts before I left the store to see if one fitted through the 4 holes in the flange. It wouldn't so I bought 4 3' x 1/4 lag bolts & used the relevant socket to screw them down. Again, I can't recall the bit size for the pilot hole.

e) NOTE - don't worry if the flange does not fit right into the 1 & 3/8" hole - the paddle bit is the correct size. My flange didn't but as one lag bolts it down it is pulled into the hole.

f) NOTE - enure the bar goes easily, but snuggly as possible, through the 1" hole. Although again the paddle bit size (1") is correct, I could not get the shaft through the hole until I wiggled the paddle bit around in the hole. Don't make it too loose, but just enough so it goes through to the flange so you can start threading into it.

It cost me $30 to make it (maybe things are more expensive than in the location of the original site, or it was an old one?

Still, for the money & a few hours. a great inexpesive bike lift (much better than a couple of strong mates to lift it on & off a milk crate).

Hope these few cents help anyone with minor woodworking talents (like mine) make this an even easier job than it already is!!
Back to top
 
 
  IP Logged
Savage_Greg
Serious Thumper
Alliance Member
*****
Offline

Don't go around your
ass to reach your
elbow...

Posts: 7844
SW Washington State
Gender: male
Re: Rikko's Build Your Own Bike Lift/Stand
Reply #2 - 10/30/07 at 04:10:38
 
Yep.  This one has been around a long time, and sometimes simple is the best way to go.  After all, the principle is just using one of the most basic of tools.  A simple lever.

Works the same as the "store bought" one that Kropatchek shows in one of his photos.
Back to top


  IP Logged
Oldfeller2
Senior Member
****
Offline

I love YaBB 1G -
SP1!

Posts: 323

Gender: male
Re: Rikko's Build Your Own Bike Lift/Stand
Reply #3 - 11/01/07 at 15:24:23
 
I built mine out of a part of a left-over oak pallet -- used a long wood 2x4 as my handle so it lays flush to the floor making part of a floor support "triangle" when the lift is completed.

(us crip old men with bad knees and hips and back need that extra long handle leverage)  

Works good for front end work as-is, has a wooden box to go under the air filter area to lift up the back end for rear tire changing work.

Mine has eyebolts on the ends of the long 2x8" part so I can rope the handle bars to the under part to keep tip overs from happening during tire changes and such.

10 seconds to get lifted and squared to add oil or do oil change work -- it is very quick and easy to use.

Oldfeller
Back to top
 
 
  IP Logged
bill67
Serious Thumper
*****
Offline

old  tired

Posts: 8517
genoa city wisconsin
Gender: male
Re: Rikko's Build Your Own Bike Lift/Stand
Reply #4 - 11/02/07 at 12:06:30
 
If i put mine to back of frame the rear wheel go up.It  works good both front and rear I don't use any tie down either. Just have to watch you don't  bump it real hard.
Back to top


william h krumpen
  IP Logged
DangMan
Senior Member
2005 No Login
****
Offline

Thump thump thump

Posts: 327
Denmark
Gender: male
Re: Rikko's Build Your Own Bike Lift/Stand
Reply #5 - 04/24/11 at 15:04:11
 
Just want to mention that I tweeked it a bit, instead of the long rod I used an angle bracket !


Back to top
 
 
WWW   IP Logged
paulmocan
YaBB Newbies
*
Offline

SuzukiSavage.com
Rocks!

Posts: 25
Transilvania
Gender: male
Re: Rikko's Build Your Own Bike Lift/Stand
Reply #6 - 04/30/11 at 08:02:03
 
I had some work done on my bike, like... checking my belt alignment, and had to come to some "interesting" methods. One of them involved hanging the bike from under the sissy bar to the ceiling of my workshop, with a strap and lifting the rear wheel of the ground, but after i saw this great tool i immediately made my own. I had a slightly different approach to it.
So here are some pictures.
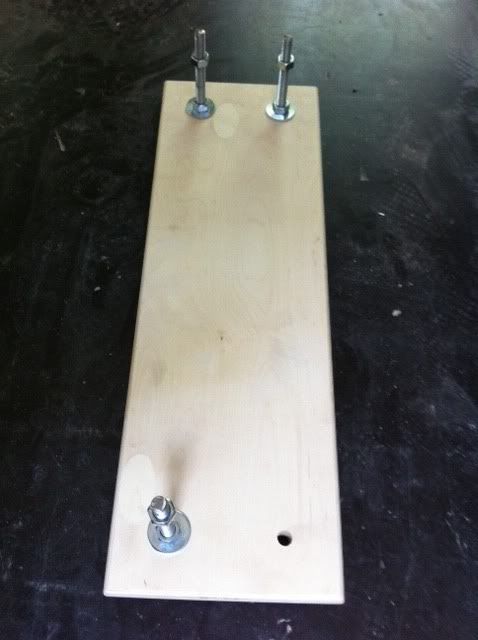
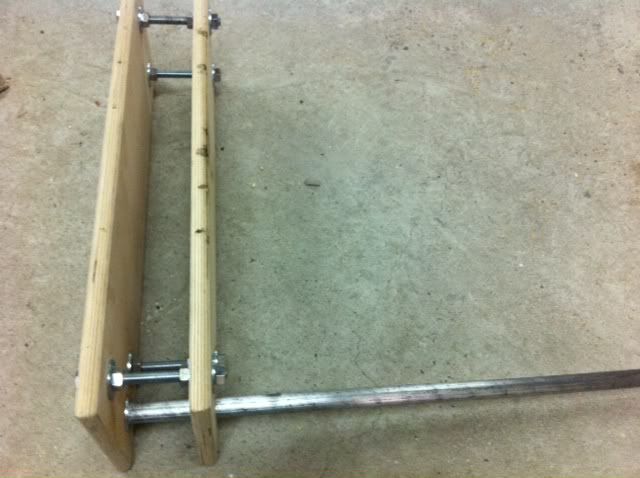
I used .70" birch plywood, M12 threaded rod, nuts and washers and a pipe i had laying around.


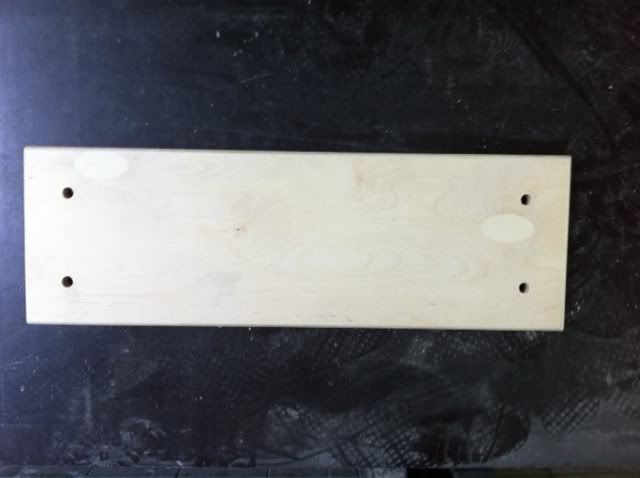
These is one of the two sides. I used a router to round the edges of the boards.


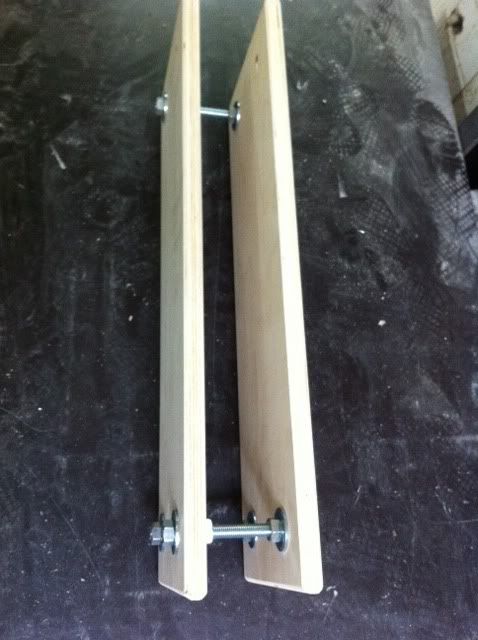
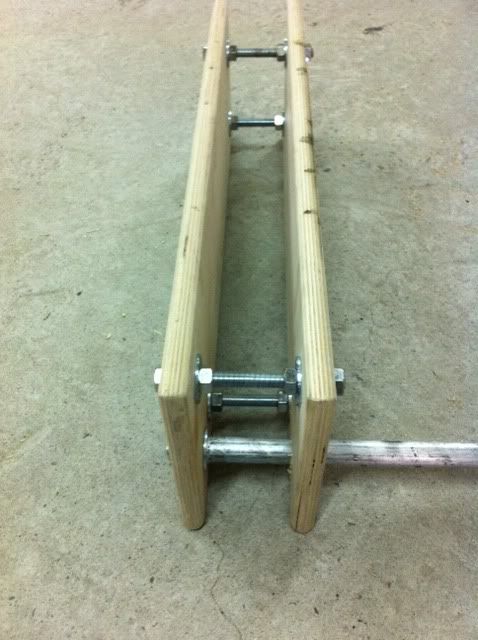
This is how it looks all bolted together.


And Voila. This is it. It works great, and it took me less than one hour to build.
EDIT:
Sorry for the link... Hope now they are all good...
Back to top
 
« Last Edit: 04/30/11 at 11:15:52 by paulmocan »  
  IP Logged
Scott_H
Full Member
***
Offline

SuzukiSavage.com
Rocks!

Posts: 130
Escondido, CA
Gender: male
Re: Rikko's Build Your Own Bike Lift/Stand
Reply #7 - 04/30/11 at 11:01:50
 
Pic links are busted.
Back to top
 
 
  IP Logged
MulletViper
Junior Member
**
Offline

Professional
Rivethead

Posts: 53

Re: Rikko's Build Your Own Bike Lift/Stand
Reply #8 - 05/10/11 at 16:25:02
 
No lies here. My father bought a craftsman lawn tractor with a snow blower in the early 90's. It came with instructions on how to attach the snow blower to the underside of the tractor, as well as a schematic of this exact lift to raise the blower to the tractor mounts, drilled 4x8 and and threaded pipe even included!
Back to top
 
 
  IP Logged
Serowbot
YaBB Moderator
ModSquad
*****
Offline

OK.... so what's the
speed of dark?

Posts: 28344
Tucson Az
Gender: male
Re: Rikko's Build Your Own Bike Lift/Stand
Reply #9 - 09/27/12 at 14:02:35
 
Here's another video showing how fast and easy it is to lift and strap down yer' bike...  40 seconds...
Not bad... Huh...

Back to top
 
« Last Edit: 10/31/21 at 08:49:16 by Serowbot »  

Ludicrous Speed !... ... Huh...
  IP Logged
thelowfreq
YaBB Newbies
*
Offline

SuzukiSavage.com
Rocks!

Posts: 13

Re: Rikko's Build Your Own Bike Lift/Stand
Reply #10 - 10/13/13 at 10:50:21
 
After reading   some posts   here,I was   inspired to build myself  a  stand  for the S40.....it took two attempts to get the dimensions about right
Back to top
 

Stand2.jpg
  IP Logged
thelowfreq
YaBB Newbies
*
Offline

SuzukiSavage.com
Rocks!

Posts: 13

Re: Rikko's Build Your Own Bike Lift/Stand
Reply #11 - 10/13/13 at 10:51:15
 
Here's the   stand   again........
Back to top
 

StandRtSide.jpg
  IP Logged
MagicTwanger
YaBB Newbies
*
Offline

SuzukiSavage.com
Rocks!

Posts: 4

Re: Rikko's Build Your Own Bike Lift/Stand
Reply #12 - 08/18/19 at 07:17:56
 
I have a question about placement of these wooden lifts. About half way to the front of the down tubes, the engine starts to extend below the frame, so forward placement would support most of the bikes weight on the engine instead of on the down tubes. Further back a muffler support bracket extends down below the frame and would get in the way. Should I worry about putting weight on these things. Was the one lift made with lag bolts, resulting in a space in the middle, designed to dodge the support bracket?
Undecided
Back to top
 
 
  IP Logged
Jdvt600
Junior Member
**
Offline

SuzukiSavage.com
Rocks!

Posts: 83

Re: Rikko's Build Your Own Bike Lift/Stand
Reply #13 - 05/26/20 at 16:13:47
 
Just wanted to add one more to the list of successful lifts/stands. I used two 4' 4x8's screwed together with 6" 2x4s in between. The handle is an old floor jack handle.


Added a bit of support


Foreman approves
Back to top
 
« Last Edit: 05/26/20 at 21:36:21 by Jdvt600 »  
  IP Logged
Tocsik
Serious Thumper
*****
Offline

the singularity

Posts: 1140
Denver, CO
Gender: male
Re: Rikko's Build Your Own Bike Lift/Stand
Reply #14 - 01/07/21 at 15:47:36
 
I made two.  A small one for minor, quick things like checking/adjusting belt tension, and a longer one with eye-bolts for tie-down straps to really hold the bike stable.
I just transfer the leverage pipe between them.  And I have a through-holed bored in the other end of the long one so I can shove another pipe through it to keep the wooden lift from tipping/rolling forward or backward.
[img][/img]
Back to top
 

bike_lift_collage.jpg

'08|Raptor|Dyna|Stock jets & no other carb changes @ 5280' alt|'slavy CCT|Kawa front pulley|130/90 rear tire|7" LED headlight|3" straight risers|FIAMM El Grande horns|Mutazu hard bags
  IP Logged
Pages: 1 2 
Send Topic Print


« Home

 
« Home
SuzukiSavage.com
03/28/24 at 12:16:41


General CategoryTechnical Documents/Reference › Rikko's Build Your Own Bike Lift/Stand


SuzukiSavage.com » Powered by YaBB 2.2!
YaBB © 2000-2007. All Rights Reserved.