Donate!
Welcome, Guest. Please Login or Register :: View Members
Pages: 1
Send Topic Print
Wiring Harness Guide Misrouted (Read 265 times)
Digger
Serious Thumper
2005 No Login
*****
Offline

Ya gotta be tough to
ride singles!

Posts: 1604
Colorado Springs, CO
Gender: male
Wiring Harness Guide Misrouted
03/22/13 at 14:52:27
 
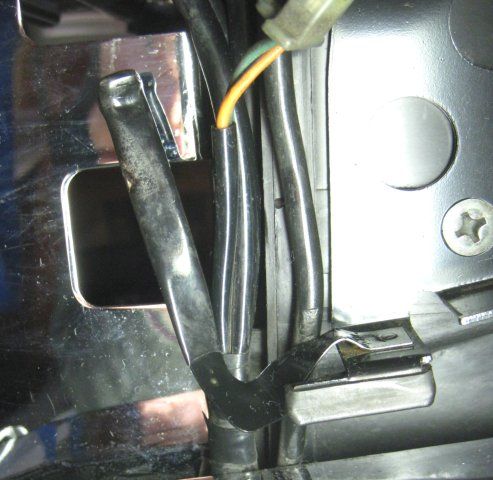
While cleaning up the battery box before popping in a new battery (the old one had lasted over 9 years and one month, btw!), I casually noticed that there was what looked to be a wire harness keeper that had somehow become entangled with one of the holes on the port side of said battery box.  Since said wire harness keeper seemed to be connected to the bottom of the ignitor bracket, I pulled said ignitor off the bike to gain a better look at what was going on:


I somewhat disinterestedly disentangled said wire harness keeper from said battery box:


It seemed as if this thing had had a purpose in life at one time......I wondered how long it had been in the position I had discovered it in.  A languid glance into the starboard side of the empty battery box revealed this witness mark:
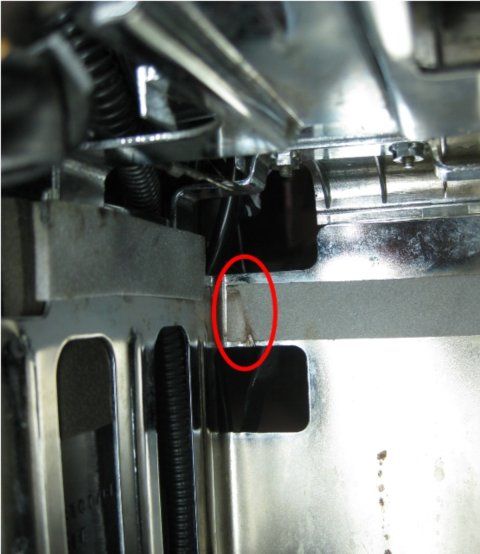


“Hmmm,” said I, “looks like this has been going on for a while....”

My mind lazily recalled the various maintenance procedures I'd performed on this bike in the past.  I had bought the bike (a 2001 model) used in OCT of 01.  Although it had only 60 miles on it at the time, it had spent the previous 9 months sitting in a shed that had been cooked daily by the hot Houston summer sun (The owner, a woman who bought the bike new, rode it only once (on a very windy day) and had decided then and there that she did not like to operate her own motorcycle.).  As a result, the carb was pretty gummed up and, after purchasing the bike (for a princely sum of $3000) I had had to remove said carb, clean it, and dip it, in order to get the bike to run well.  Although that was the last time I'd had the carb off of this bike, I distinctly remembered having to remove the battery box in order to be able to do so.

(On a side note, I DO remember being extremely busy and preoccupied during that phase of my life (I was neck deep into training for my upcoming mission to the Hubble Space Telescope - my kids like to remind me that my wife had bought them a guinea pig during that time and installed its cage in clear view in our front room....I still, to this day, remember no such thing!).  So, I can only presume that I was rushed during this job and probably forced the wire harness keeper into the wrong position when reinstalling said battery box.

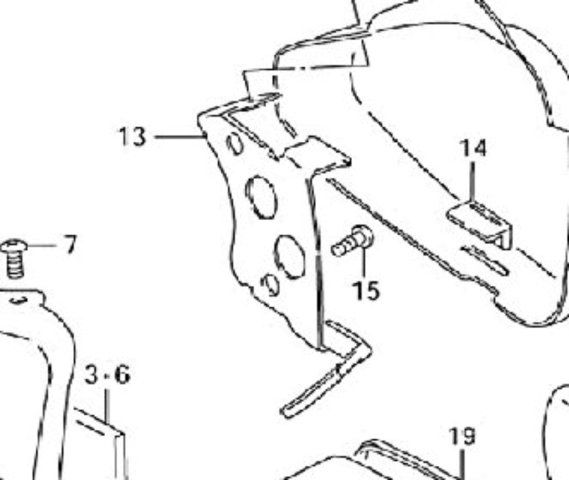
Becoming a bit more engaged, I began wondering where this wire harness guide was supposed to go.  Some research involving a factory schematic (item #13):


and a photo from the very excellent Savage Companion Photo CD (which I purchased several years ago - something I've never regretted) – see inside the red oval:


made it clear that said wiring harness guide had originally extended inboard, between the battery box's rear-facing surface and the airbox's forward-facing surface.


“Hmmm,” said I, “was that worth rectifying?”


Still only mildly interested, I tried to re-form the wiring harness guide back to its original orientation.  I got it started pretty good, but was having trouble routing it into what I felt was the proper position with respect to the various wires and the wiring loom that were running through the tight confines between the battery box and the airbox.

Then, I noticed something that made my blood run cold.  My senses became fully aroused at this point, all synapses firing.  I detected the stench of danger in the air.  What I was seeing was most definitely NOT was the design engineers had in mind:


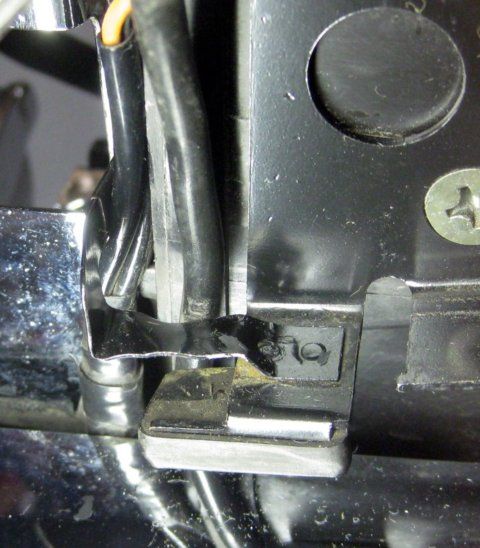
The vertically running large black wire, (which is aft-most of the wires seen in the above photo) is the negative battery cable.  You can see that the insulation shows signs of distress in the area adjacent to the wiring harness guide I tried to correct.  Just ahead of said negative battery cable is a wire harness that contains several wires.  There was a bit of insulation damage here, to.

Although not clearly shown in the above photo, closer scrutiny revealed that the forward-facing exterior surface of the airbox had, near its front-port corner, a long vertical tab that looked as if it were meant to contain these wires in a position a bit starboard of where they were currently situated.

Well well....do y'all think it is worth pulling the battery box to properly route the wiring harness keeper into the tight spot between the battery box and the airbox?  Y'all know how lazy I am.....
Back to top


Digger
2001, Metallic Glacial Blue, Raptor Petcock, Verslavy (first hole) (otherwise, mechanically, the bike is stock), 13,xxx miles
I don't own a cage.
www.astronautbiker.com
WWW   IP Logged
justin_o_guy2
Serious Thumper
*****
Offline

What happened?

Posts: 55279
East Texas, 1/2 dallas/la.
Re: Wiring Harness Guide Misrouted
Reply #1 - 03/22/13 at 16:24:34
 
(I was neck deep into training for my upcoming mission to the Hubble Space Telescope - my kids like to remind me that my wife had bought them a guinea pig during that time and installed its cage in clear view in our front room....I still, to this day, remember no such thing!).


You comfort me,,,I thot surely I was alone in my getting so involved in things I overlooked obvious , real, change.
Back to top


The people never give up their liberties but under some delusion.- Edmund Burke.
  IP Logged
Serowbot
YaBB Moderator
ModSquad
*****
Offline

OK.... so what's the
speed of dark?

Posts: 28385
Tucson Az
Gender: male
Re: Wiring Harness Guide Misrouted
Reply #2 - 03/22/13 at 16:30:27
 
Digger wrote on 03/22/13 at 14:52:27:
Y'all know how lazy I am.....

I think you just answered your own question... Grin...

Myself,.. I might be willing to spend 10 minutes on it,.. but, if was more work than that,...
I'd just wait for something to go wrong...
Huh...

...( I must assume it would take way more time than making this post did,... and this is a pretty involved post)...
Back to top


Ludicrous Speed !... ... Huh...
  IP Logged
verslagen1
YaBB Moderator
ModSquad
*****
Offline

Where there's a
will, I want to be
in it.

Posts: 28780
L.A. California
Gender: male
Re: Wiring Harness Guide Misrouted
Reply #3 - 03/22/13 at 18:21:01
 
I think you voided your warranty.   Huh
Back to top
 
 
WWW   IP Logged
thumperclone
Serious Thumper
Alliance Member
*****
Offline

PGR rider  riding
with respect

Posts: 5822
Grand Junction Colorado
Gender: male
Re: Wiring Harness Guide Misrouted
Reply #4 - 03/22/13 at 22:49:37
 
youd better fixit or youll never make it down the runway Roll Eyes
Back to top


standing for those who stood for US


  IP Logged
Serowbot
YaBB Moderator
ModSquad
*****
Offline

OK.... so what's the
speed of dark?

Posts: 28385
Tucson Az
Gender: male
Re: Wiring Harness Guide Misrouted
Reply #5 - 03/22/13 at 23:07:11
 
thumperclone wrote on 03/22/13 at 22:49:37:
youd better fixit or youll never make it down the runway Roll Eyes

Those dudes don't use runways... Huh...

I bet,.. dealers cancel Digger's warranties,.. when they find out he uses the term "launch" quite literally...
Grin Grin Grin...
Back to top


Ludicrous Speed !... ... Huh...
  IP Logged
Digger
Serious Thumper
2005 No Login
*****
Offline

Ya gotta be tough to
ride singles!

Posts: 1604
Colorado Springs, CO
Gender: male
Re: Wiring Harness Guide Misrouted
Reply #6 - 03/23/13 at 18:44:38
 
My life involves a constant struggle between the forces of sloth and those of anility.  This time, after sleeping on it, anility won out....

It seemed as if the correct routing of the wires in question was supposed to be inboard of where they were currently located.  Another look at the abovementioned photo from the Savage Companion CD (see the second from bottom photo in this thread's original post) seemed to confirm that.  Since things were such a tight squeeze in there, I had no choice but to remove the battery box to see if my theory held water.

Out came the battery box.  While cleaning things up a bit (I had had an oil leak in the area a while ago (http://suzukisavage.com/cgi-bin/YaBB.pl?num=1169960660), I made another, even grimmer discovery.

Due to the misrouting of these wires over eleven years and over 12,000 miles ago, some damage had occurred.  My guess was that there was some very slight, and, most likely, intermittent contact with the drive belt here:


After cleaning off the dirt from years of exposure, I examined the damage a bit closer:


The damaged wiring harness contained five wires.  Three yellow ones, an orange one, and a green one.  The three yellow wires go from the magneto to the VRR.  The orange and green wires go to the ignitor.  My FSM indicates that said orange and green wires originate at the pick-up coil.  One presumes that these two wires provide the timing signal to the ignitor.  One may also presume that the current load in these wires is probably quite low.

Here is a summary of the damage I found to the harness sheath and each individual wire:  The harness' protective outer sheath had been badly breached.  It was still intact on the inboard side, but a good sized section of the outboard portion had been abraded away (presumably by the drive belt).  One of the yellow wires appeared unscathed.  The second yellow wire had a small section of moderate insulation abrasion.  The third yellow wire's insulation was abraded almost, but not quite to, the conductor.  The orange wire's insulation was completely breached in one spot, but no conductor damage was evident.  The green wire was in the worst shape of the five - about half of its conductor strands were broken.

Looks like work to me.....grrrrr!
Back to top
 
« Last Edit: 03/23/13 at 20:37:56 by Digger »  

Digger
2001, Metallic Glacial Blue, Raptor Petcock, Verslavy (first hole) (otherwise, mechanically, the bike is stock), 13,xxx miles
I don't own a cage.
www.astronautbiker.com
WWW   IP Logged
ZAR
Serious Thumper
*****
Offline

Rock this town! Rock
it inside out!

Posts: 961
Kentucky, USA
Gender: male
Re: Wiring Harness Guide Misrouted
Reply #7 - 03/23/13 at 21:32:54
 
Good catch Digger! Now it's "honesty" time........ Grin.........you're telling us you met all the requirements for crewing on the shuttle......and you're afraid of a little work Shocked .....you are getting lazy,aren't you? Wink
Back to top


Yellow 1996 Jetted and Dunstall exhaust. Dakota Chubby Bags, Memphis Slim shield,Tank Bib from?? Seat riser mod. More to come!
  IP Logged
LANCER
Serious Thumper
Alliance Member
*****
Offline

Savage Beast
Performance Parts

Posts: 10606
Oklahoma
Gender: male
Re: Wiring Harness Guide Misrouted
Reply #8 - 03/24/13 at 05:49:08
 
It's the little pesky things that go wrong or you forget that get to you...me anyway.
It's like getting everything put back together only to find you left out a lock washer or pin of some sort and just cannot operate safely without it.
Yep, it's a GRRRRR moment.
Back to top
 
 
  IP Logged
Digger
Serious Thumper
2005 No Login
*****
Offline

Ya gotta be tough to
ride singles!

Posts: 1604
Colorado Springs, CO
Gender: male
Re: Wiring Harness Guide Misrouted
Reply #9 - 03/24/13 at 18:42:45
 
ZAR wrote on 03/23/13 at 21:32:54:
Good catch Digger! Now it's "honesty" time........ Grin.........you're telling us you met all the requirements for crewing on the shuttle......and you're afraid of a little work Shocked .....you are getting lazy,aren't you? Wink


Well, I guess I'm lazy by nature.  However, I was raised Catholic and sometimes that old guilt thing rears its ugly head.....then I have to work hard!
Back to top


Digger
2001, Metallic Glacial Blue, Raptor Petcock, Verslavy (first hole) (otherwise, mechanically, the bike is stock), 13,xxx miles
I don't own a cage.
www.astronautbiker.com
WWW   IP Logged
Digger
Serious Thumper
2005 No Login
*****
Offline

Ya gotta be tough to
ride singles!

Posts: 1604
Colorado Springs, CO
Gender: male
Re: Wiring Harness Guide Misrouted
Reply #10 - 03/24/13 at 19:04:50
 
Do to the close proximity of their connector, I was able to pull on the green and orange wires enough to make “loops” to gain some slack and working room in the area of the wounded harness sheath (since said wires exited the sheath a short distance from said connector).  However, I could not do the same for the three yellow wires.  Although there was no conductor showing for any of these latter three wires, the fact that the potential between them is specified to be over of 100 V made me want to shore up any damaged insulation if I possibly could.

So, I cut an entire section from the damaged portion of harness sheath, in order to gain sufficient "wiggle room":


I wrapped the two yellow wires and the orange one that had simple insulation damage with some electrician's tape :


Since its conductor had been compromised, the green wire would need the damaged section to be removed to make room for a soldered-in section.  I prepped a short section of wire that was larger in gauge than the damaged wire (to be safe).  Since the work location did not lend itself to the use of my "third hand" soldering clamp thingie, I found the soldering job to be a bit of a beyatch...especially for an old man who'd had too much coffee to drink that morning.

It didn't help that I had pre-positioned a piece of heat shrink tubing that ended up being too small (it was 1/8" ID) to slip over the solder joints.  I had to break one of the joints (melting the insulation on the "downstream" end of the bike's green wire in the process  Embarrassed), pull off the too-small heat shrink tubing, pre-position some 3/16" ID heat shrink tubing (adhesive-lined, with a 3:1 recovery ratio) and resolder the joint I had just separated.  In any event, here's what the splice job looked like when I was done soldering (the actual joints look cold-soldered in the pic, but they were actually pretty good):


Not the prettiest job in the world - go ahead and throw your spears (I'd feel unloved if you didn't)!  The little piece of black electrical tape you see on the green wire, adjacent to the left-most of the two solder joints, is what I used to try to repair the section of insulation I had just damaged.

I then pulled my pre-positioned length of heat shrink tubing (you can see one end of it “in waiting” in the above photo, just to the right of the right-most solder joint) into place over the two splices and used a heat gun to shrink it.  Since I had pulled out "loops" of the green and orange wires (see above) to gain working room, I then pulled on the upper ends of these wires (by their upper connector's housing) to feed said loops back into the upper portion of the harness sheath.

On a side note, my Gold Wing forum occasionally rages with “wire repair” wars.  There is one camp that maintains that I should have used a butt splice to make the repair.  There is another camp that claims that soldering is usually best.  My practice is to solder in these types of situations, if I can.  If the repair is to serve in a high vibration and/or high mechanical stress environment, I think it is best to cover the repair with good quality adhesive-lined heat shrink tubing to help lend some mechanical strength to the repair.  Here is what things looked like at this point:


To finish up the repair, I wrapped some standard electrician's tape around the area to take the place of the wiring harness' sheath that had been abraded away and also the section of same that I had removed.  I finished up with a double layer of heat shrinkable electrical tape:


This stuff, while expensive, is rated for high abrasion environments.  Here is a look at the finished product:


Hmmm.....I wonder if this wire damage could have been related to the problem I reported in this thread:

http://suzukisavage.com/cgi-bin/YaBB.pl?num=1274415984

a few years back?  I'm presuming that the pick up coil circuit is protected by one of the fuses.  Maybe one of our resident Savage electrical experts (Bobbert?) could chime in here with an informed opinion.  Perhaps the act of fiddling with the wires under that tank and seat (as detailed in the above referenced thread) moved the damage wires enough to reach a condition of stability, however temporary.....

Oops!  I just noticed that I never wrapped the heat shrink tubing that I put over the spliced-in joint on the green wire with electrician's tape.  Although I wrapped the entire bundle in electrician's before finishing up with the heat shrink tape, I never did wrap the individual green wire and its splice with said electrician's tape.  A relatively minor process escape, to be sure, and not one I'm likely to use any sleep over, but a mistake nonetheless!   Embarrassed Embarrassed Embarrassed
Back to top


Digger
2001, Metallic Glacial Blue, Raptor Petcock, Verslavy (first hole) (otherwise, mechanically, the bike is stock), 13,xxx miles
I don't own a cage.
www.astronautbiker.com
WWW   IP Logged
ZAR
Serious Thumper
*****
Offline

Rock this town! Rock
it inside out!

Posts: 961
Kentucky, USA
Gender: male
Re: Wiring Harness Guide Misrouted
Reply #11 - 03/24/13 at 20:03:59
 
Good work Digger,and I'm with you.....being a ham operator and doing way too much wireing, I only use crimp on connectors for temporary work. Anything that has to last a while,or in damp conditions or vibration gets the solder treatment!
Back to top


Yellow 1996 Jetted and Dunstall exhaust. Dakota Chubby Bags, Memphis Slim shield,Tank Bib from?? Seat riser mod. More to come!
  IP Logged
rfw2003
Serious Thumper
*****
Offline

SuzukiSavage.com
Rocks!

Posts: 1108
Yantis, TX
Re: Wiring Harness Guide Misrouted
Reply #12 - 03/24/13 at 20:28:48
 
I'll have to agree as well,  I only use crimp connectors for temp jobs to make sure it's working properly or if in need of a fast repair on the road.  I then later redo the repair with a soldered and heat shrunk job for the permanent repair.  Even when I do new connectors after I crimp on the pins I normally finish up with some solder on them to make sure they will not fail or come apart at a later date.

When possible when I have to replace connectors on anything I use the GM style weather tight connectors for replacements as I've had the best luck with those in keeping any corrosion out of the contacts, of any other connector I've used in the past.  I believe the are called weather pak connectors?  while not all that cheap they are great and very reliable in my experience and solidly lock together.

R.F.
Back to top


1996 Savage, Corbin Seat, K&N filter, Slip Streamer Enterprise II windshield, LED bullet signals, Cat's eye LED tail light Ryca reverse cone long muffler
  IP Logged
Digger
Serious Thumper
2005 No Login
*****
Offline

Ya gotta be tough to
ride singles!

Posts: 1604
Colorado Springs, CO
Gender: male
Re: Wiring Harness Guide Misrouted
Reply #13 - 03/25/13 at 19:30:15
 
rfw2003 wrote on 03/24/13 at 20:28:48:
.....When possible when I have to replace connectors on anything I use the GM style weather tight connectors for replacements as I've had the best luck with those in keeping any corrosion out of the contacts, of any other connector I've used in the past.  I believe the are called weather pak connectors?  while not all that cheap they are great and very reliable in my experience and solidly lock together.

R.F.


Link?

TIA!
Back to top


Digger
2001, Metallic Glacial Blue, Raptor Petcock, Verslavy (first hole) (otherwise, mechanically, the bike is stock), 13,xxx miles
I don't own a cage.
www.astronautbiker.com
WWW   IP Logged
Digger
Serious Thumper
2005 No Login
*****
Offline

Ya gotta be tough to
ride singles!

Posts: 1604
Colorado Springs, CO
Gender: male
Re: Wiring Harness Guide Misrouted
Reply #14 - 03/25/13 at 19:32:58
 
Here is a better look at the vertical tab (near the forward-lower-port corner of the airbox) that looks as if it is meant to contain the wires in the area and keep them from straying to port toward the perils of the drive belt (look just to the right of my fingertips):


This shot shows the wiring harness I just repaired along with the other wires that are supposed to be held in place by the wiring harness guide I misrouted all those years ago (you can see said wiring harness guide, now in its proper orientation, toward the top of this photo - also, note that the negative battery cable (which was previously misrouted) is also now being routed properly):


Here is another close up look at the abovementioned vertical tab near the forward-lower-port corner of the airbox.  You can see it in action here, keeping the wires from the drive belt (it is the raised ridge at the far right portion of the airbox body):


There are two foam pads located on the airbox's forward-facing exterior surface.  The bottom-most of said two foam pads was wearing away at it's bottom-port corner (this worn section can be seen in the bottom-right portion of the foam in this photo):


I trimmed the damaged section of foam away, cleaned up the glue residue that was left sticking to the airbox (actually, this stuff ended up being a thin film that was rather easily rolled off of said airbox's surface using just my fingers), and replaced said damaged section with a piece of foam backed UHMW polyethylene tape (the white rectangle you see in the photo below):


Said foam-backed tape is rather dear (check the bottom of this page for same: http://www.mcmaster.com/#uhmw-polyethylene-tape/=m1afp4) and I'm cheap, so I use it only when I mean business, and then only sparingly!

End of problem (I hope)!

The moral of this grim little tale:  Machines don't care, neither about the "back story" or your little personal problems.  They obey only the laws of physics and cold, hard logic.  You will always pay for a job sloppily done!

On a closing note, perhaps someone can verify that I guessed right and routed things as they were routed from the factory......

TIA!
Back to top


Digger
2001, Metallic Glacial Blue, Raptor Petcock, Verslavy (first hole) (otherwise, mechanically, the bike is stock), 13,xxx miles
I don't own a cage.
www.astronautbiker.com
WWW   IP Logged
Pages: 1
Send Topic Print


« Home

 
« Home
SuzukiSavage.com
05/17/24 at 23:36:36


General CategoryRubber Side Down! › Wiring Harness Guide Misrouted


SuzukiSavage.com » Powered by YaBB 2.2!
YaBB © 2000-2007. All Rights Reserved.