Donate!
Welcome, Guest. Please Login or Register :: View Members
Pages: 1
Send Topic Print
12 Step Cone Filter Mod and Re-Jet (w/pics) (Read 3147 times)
Balderdash
Full Member
***
Offline


Posts: 117
Minnesota
Gender: male
12 Step Cone Filter Mod and Re-Jet (w/pics)
07/08/07 at 13:35:01
 
Background: I ride my savage every day to work and because it saves me $7 a day vs. driving the car I’ve been afraid of doing rebuild or modification work on the bike for fear of being down more than a day…

But since my bike went down with a broken gear shift rod and neither of the local Suzuki dealers had a spare in stock I had a order a rod to be shipped to me, thus, I’ve got mandated down time … so I might as well do some mods and maintenance that have been building up  while I can afford to “risk down time.”

First project, put on the cone filter I bought a couple of months ago, but didn’t want to put it on without rejetting the carb at the same time...

Parts I used:
Cone filter with clamp (bought on e-bay, like this one)
155 main jet (switched to 152.5 after a couple of months use to regain some lost MPG)
.055 pilot jet w/ vent holes (Both jets bought on e-bay, like these)

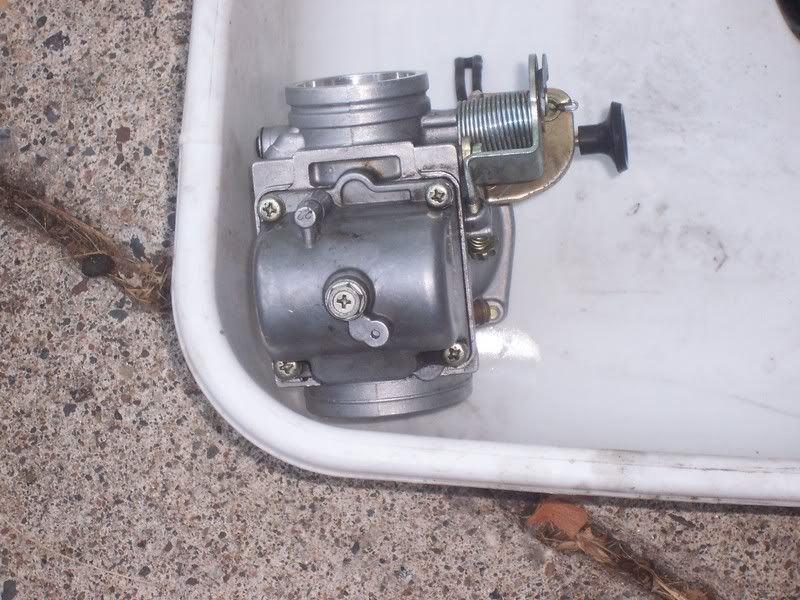
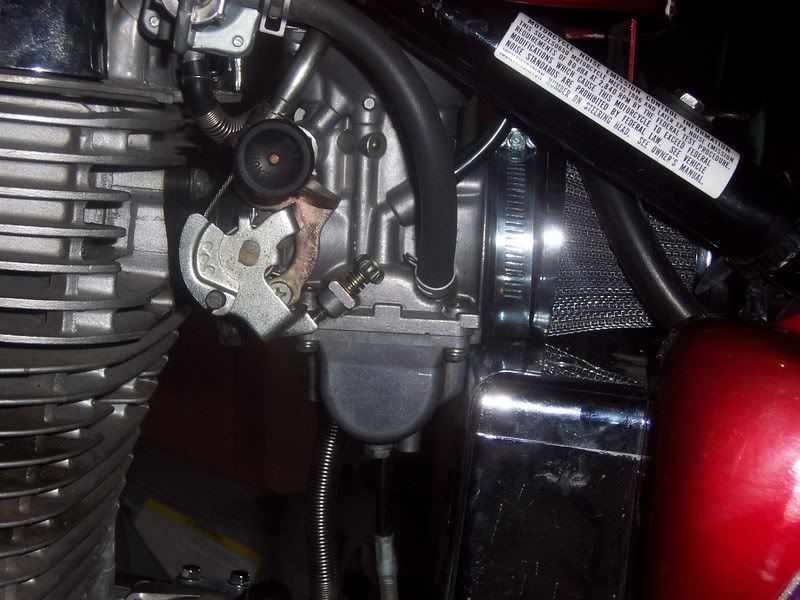
What the savage looks like before:


Step 1:
Take off seat and unbolt gas tank.  (My tank doesn’t like to come off, it’s the kind that has the petcock jam under the frame bar when you try to lift it, so it takes some twisting and jimmying to get it to come up… very frustrating if you weren’t expecting it)

Step 2:
Disconnect throttle cable: done by twisting throttle linkage by hand and removing cable end from the hole, pull out cable body from the top after removing clip (very stiff, had to be banged gently by putting a screwdriver head in the slot and tapping the screwdriver with a hammer to get it to pop out).

Step 3:
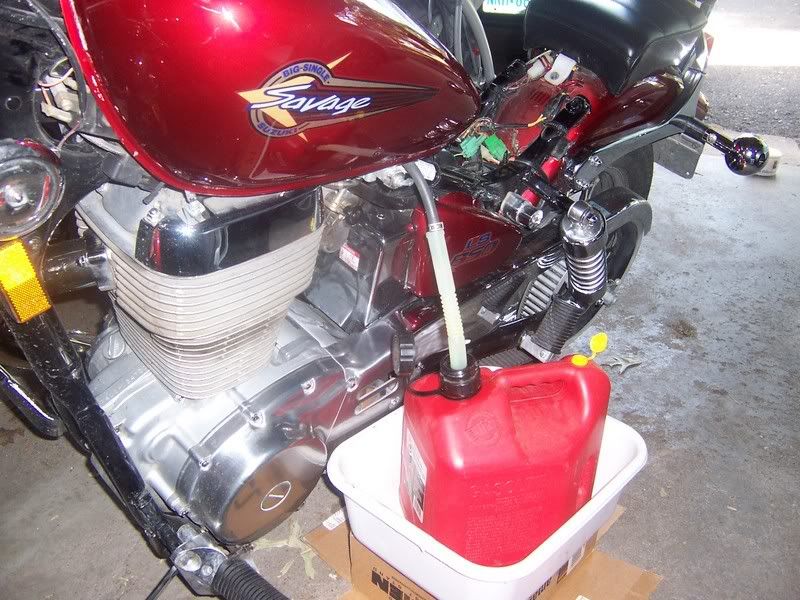
Drain tank by pulling the gas feed tube first and very quickly put it where you want the gas to go.  Gas can be held in the tube with the tip of your finger though.


Have a spare tank to pour the gas into, and then just wait for the bike tank to drain, takes a while, you won’t want to have to hold the spare gas tank the whole time… Prop it up and leave it alone…


Step 4:
Disconnect all the other tubes, one black on left side and one black on right side.  Air vent tube from the petcock refuses to come loose on the right side of mine though… so I proceeded to step 5 anyway.
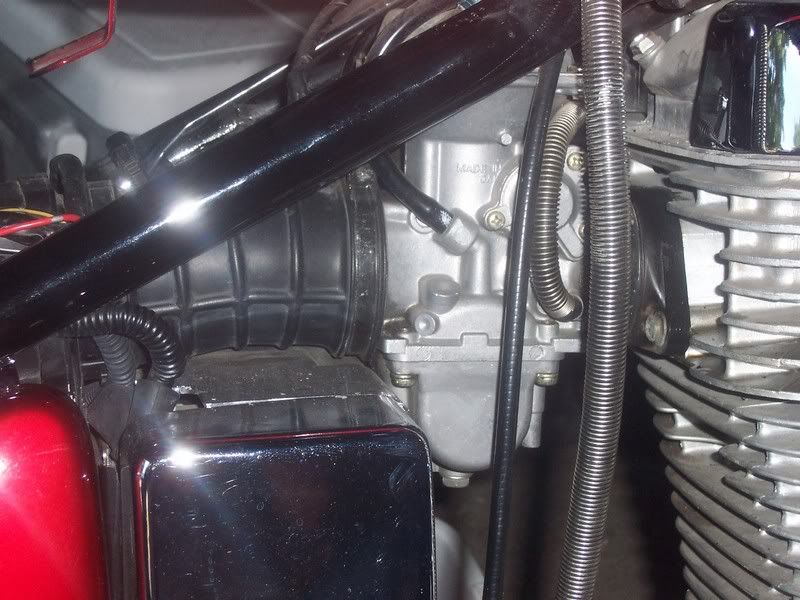
Step 5:
Loosen (remove) clamps on air vent tube behind the carb (2 clamps) and then loosen the clamp from the front of the carb holding it to the engine (1 clamp)

Step 6:
Pull air tube out (very tight squeeze, have to squash the rubber tube to get it out, but you need to get the extra room to pull the carb out.

Step 7:
Twist and pull with both hands, and a very firm grip, the body of the carb and pull it out from the engine. (in my case it was still connected to the breather hose that still refused to let go).  There will still be gas in the carb and bowl, expect about half a cup or so to spill out, so be prepared to catch it with something or you'll have a mess on your hands and your garage floor...


Some cleaning solution and screwdriver between the rubber and the carb did the work though and it came off without having the cut the tube end off.
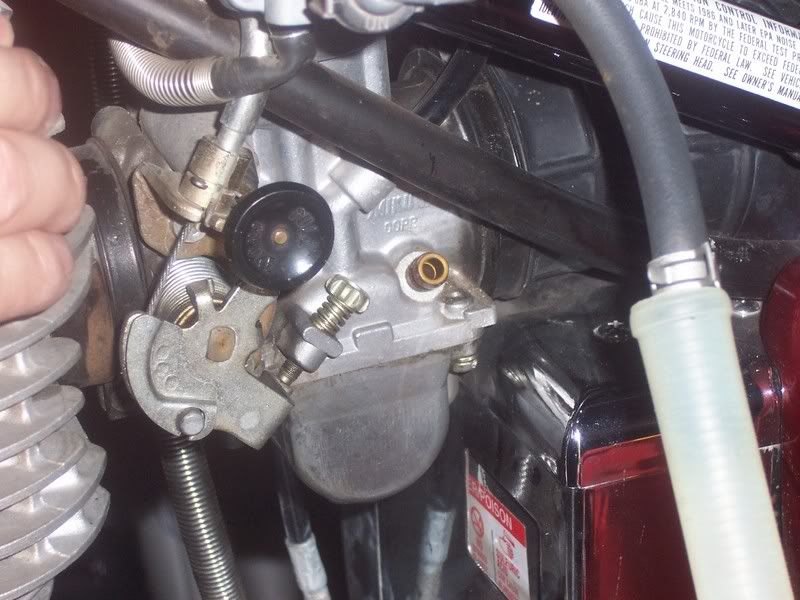
Step 8:
Clean off all parts of the carb that you can touch with carb cleaner and paper towels.  Then turn the carb upside down.
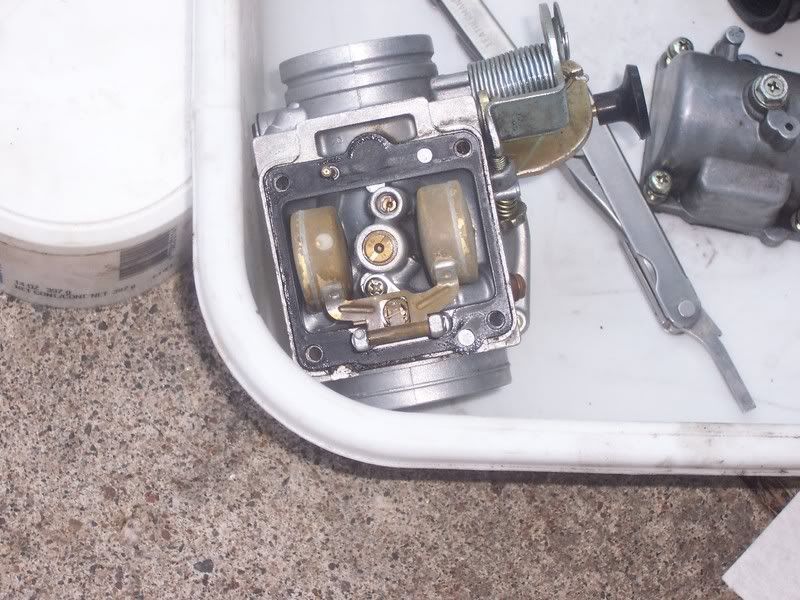


Step 9:
Remove the four screws that hold the bowl in place and place the bowl in a safe place to the side.
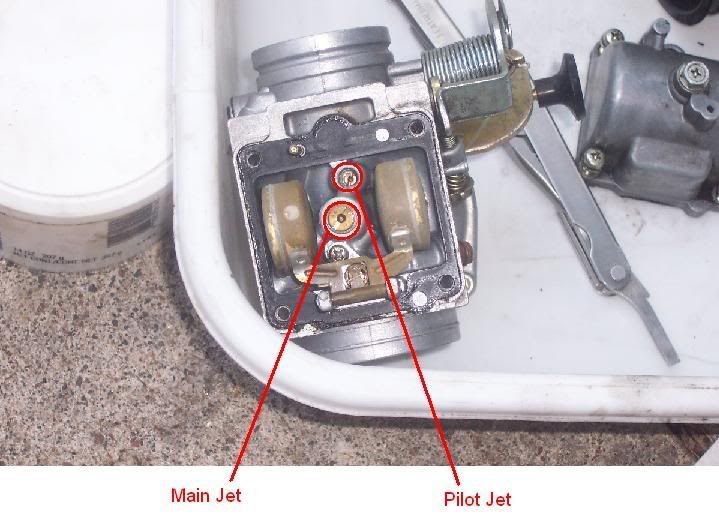


Step 10:
Remove these two jets and replace them with your new jets (screw them in firmly tight but don’t mash them in, brass will bend):


Then replace the bowl, be sure to gently screw the four screws in before tightening any of them, get them all in and then tighten them so that the seal will be good against the gasket (replace that too if you want, I didn’t, it was still in good shape)

Step 11:
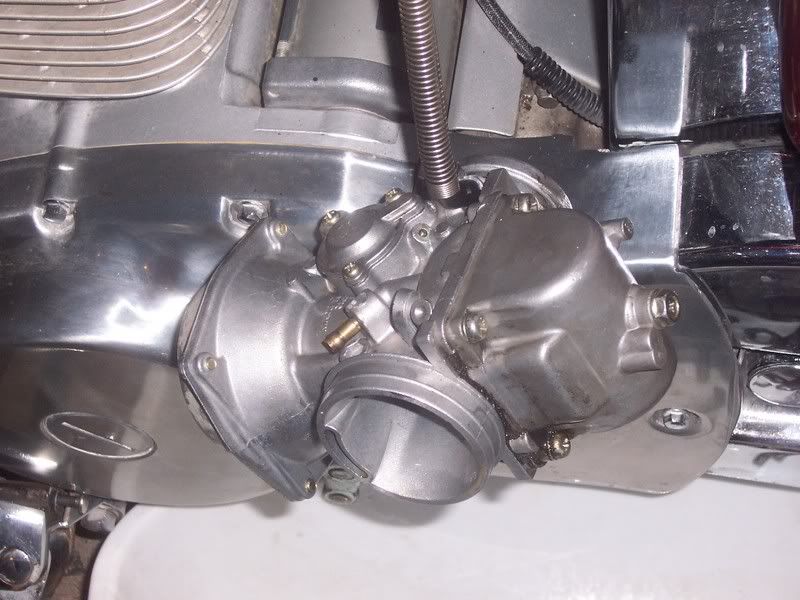
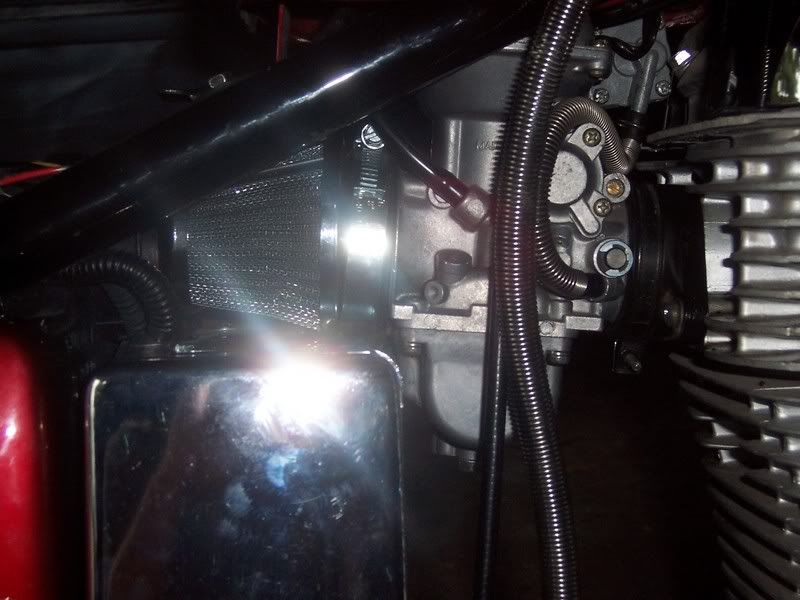
Put the cone filter into the hole for the air filter BEFORE replacing the carb onto the engine.  You don’t have much room when the carb is on the engine to put the cone in the space behind it.  It is much easier to put the cone into it’s area and then squeeze the carb back onto the engine.

Step 12:
Replace all the tubes and reconnect the throttle cable in the reverse order that you took them off, refill the tank with gas and start her up!


p.s., you might need to readjust the idle screw for your new configuration.  Additionally, I noticed that I didn’t need to use the choke at all to start it up from a dead cold.

Back to top
 
« Last Edit: 06/29/09 at 09:27:28 by Balderdash »  
  IP Logged
LANCER
Serious Thumper
Alliance Member
*****
Offline

Savage Beast
Performance Parts

Posts: 10565
Oklahoma
Gender: male
Re: 12 Step Cone Filter Mod and Re-Jet (w/pics)
Reply #1 - 07/08/07 at 15:17:11
 
No  choke needed?  If you needed the choke before the change, then you should check for a  "too rich" condition now.
Back to top
 
 
  IP Logged
Balderdash
Full Member
***
Offline


Posts: 117
Minnesota
Gender: male
Re: 12 Step Cone Filter Mod and Re-Jet (w/pics)
Reply #2 - 07/08/07 at 17:00:44
 
LANCER wrote on 12/31/69 at 16:00:07:
No  choke needed?  If you needed the choke before the change, then you should check for a  "too rich" condition now.  


It didn't need much choke before plus it was a really hot air temp here today when I was done doing the job, 96+.  

Without being able to drive it yet (still no gear shift rod yet), any idea how I should check to see if its too rich?  

I'm open to suggestions, thanks.
Back to top
 
 
  IP Logged
Balderdash
Full Member
***
Offline


Posts: 117
Minnesota
Gender: male
Re: 12 Step Cone Filter Mod and Re-Jet (w/pics)
Reply #3 - 07/08/07 at 17:10:45
 
Reelthing wrote on 12/31/69 at 16:00:07:
good pictures - I see you've pulled the brass plug over the mixture screw already - so you replaced the pilot jet because you were over 2 turns out and close to 3 on the mixture?

man you should have thrown those phillps head carb screws in the trash -  have you work over the white spacer?  


I was way out on the mixture screw before the job today (Jardine slip on), turned screw  back to somewhere between 1 1/2 and 2 now after the fact.  Idle sounds real good and I ran it that way until well past warm without a skip, but I can't test it on the street yet for power.

The phillips head screws have to go, I agree, but I didn't have replacements on hand, the ones still in there aren't stripped yet, as you can see from the pictures, I was real gentle with that in mind.

I didn't touch the spacer yet, afraid of making it too rich, like Lancer mentioned I might do, but I'll do the spacer if needed later. It did pop a little when I turned it off, to my chagrin, but again, more testing is needed.


Back to top
 
 
  IP Logged
Gary On A Savage
Serious Thumper
Alliance Member
*****
Offline

Only 15 mins riding
could save you $$$
in Dr bills

Posts: 941
Fresno, California
Gender: male
Re: 12 Step Cone Filter Mod and Re-Jet (w/pics)
Reply #4 - 11/09/07 at 10:53:06
 
I tried to put the cone filter on my bike last night, but I ran into a problem getting the carb to stay on the motor.  It doesn't seem to go in far enough and the clamp won't hold it on.  The air filter hose seemed to hold it in place snugly before, but now it just wants to pretty much fall off.  This is the 3rd time I've pulled the carb and it's always been a nightmare to get it in and out.  

Mine's a 95, is this normal?  I'm I not lining something up between the carb and motor?  I can't use the cone because the carb won't stay on.

[Edit: want to add it's a california model.  Also, the carb is backed all the way against the battery box, as it pushing against it.]
Back to top


'95 Savage with the lowered, full fender look
'96 Honda Shadow 1100 ACE
My Riding Blog: http://garyonasavage.blogspot.com/
WWW   IP Logged
verslagen1
YaBB Moderator
ModSquad
*****
Offline

Where there's a
will, I want to be
in it.

Posts: 28733
L.A. California
Gender: male
Re: 12 Step Cone Filter Mod and Re-Jet (w/pics)
Reply #5 - 11/09/07 at 11:24:03
 
I think you just need to push it in further.

Check the carb, does it have a recess around the outlet of the carb?
And does the rubber boot have a ridge on the inside?
Those two should interlock when assembled.
Back to top
 
 
WWW   IP Logged
spacepirates
Serious Thumper
*****
Offline

Igni Ferroque

Posts: 515
Pittsburgh, PA
Gender: male
Re: 12 Step Cone Filter Mod and Re-Jet (w/pics)
Reply #6 - 04/17/10 at 12:00:53
 
I'm in the middle of doing this mod now.

got my cone filter off ebay for $10 shipped. it is some oddball chinese thing. 60mm diameter (even though stock carb is 57) (it is about 75mm long, 74mm at its widest, and 51mm at the small end), "Moxi racing project" cone filter.

I have two questions about this mod:
1) what did you do with the electronics that were mounted on the left side of the air box?

2) what am i supposed to do with the air hose that comes out of the top of the engine. it used to flow into the airbox, now it just kind of... hangs around.

Back to top


--
Only a biker knows why a dog sticks his head out of a car window.
  IP Logged
EJID
Serious Thumper
*****
Offline

Work to ride and
ride to work.

Posts: 1536
Pocatello, ID
Gender: male
Re: 12 Step Cone Filter Mod and Re-Jet (w/pics)
Reply #7 - 04/18/10 at 08:48:31
 
spacepirates wrote on 04/17/10 at 12:00:53:
I'm in the middle of doing this mod now.

got my cone filter off ebay for $10 shipped. it is some oddball chinese thing. 60mm diameter (even though stock carb is 57) (it is about 75mm long, 74mm at its widest, and 51mm at the small end), "Moxi racing project" cone filter.

I have two questions about this mod:
1) what did you do with the electronics that were mounted on the left side of the air box?

2) what am i supposed to do with the air hose that comes out of the top of the engine. it used to flow into the airbox, now it just kind of... hangs around.


1 - Electronics - Many people here just find another place to tuck them in, personally mine are just sitting loose under the driver's seat.

2 - Air hose to airbox - go to autozone or whatever you have locally and pickup a small cone filter that you can attach to the same hose and zip tie it to the frame

(previous owner did both these things to my bike, I think I will change the filter to a cone as well, but just haven't got around to it yet)

Back to top
 
« Last Edit: 04/23/13 at 09:51:07 by EJID »  

05 S40 15" Memphis Slim, FXDWG Bars, Moved Rear Signals, Saddlebags, Fork Bag, Mini-Tach, Raptor, Cone Filter, Fishtail Muffler, Mix Screw Out 2.5 Turns, 4" Fwd Controls, 147.5 Main/55 Pilot @ 4500
  IP Logged
Built2Last
Serious Thumper
*****
Offline

Tempt Fate

Posts: 1447
FTF
Gender: male
Re: 12 Step Cone Filter Mod and Re-Jet (w/pics)
Reply #8 - 01/03/12 at 21:17:09
 
What size diameter cone filter would you get if doing this mod, 60mm? Is it necessary to have a crankcase breather filter with this?

Edit: roughly 57mm
Back to top
 
« Last Edit: 01/06/12 at 06:08:25 by Built2Last »  
  IP Logged
bolender6
YaBB Newbies
*
Offline


Posts: 23
virginia beach
Gender: male
Re: 12 Step Cone Filter Mod and Re-Jet (w/pics)
Reply #9 - 02/26/12 at 11:29:34
 
as a note you asked about how to check if your too rich on the high speed side the best way if you can do it is to run down the road full throttle through at least 3rd gear then kill the motor, (of course bring it to a stop) then pull the plug if its dark brown or black your too rich, white or white specs too lean, you want a nice dessert storm tan color
Back to top
 

plugreading.jpg
  IP Logged
verslagen1
YaBB Moderator
ModSquad
*****
Offline

Where there's a
will, I want to be
in it.

Posts: 28733
L.A. California
Gender: male
Re: 12 Step Cone Filter Mod and Re-Jet (w/pics)
Reply #10 - 05/29/16 at 16:31:18
 
Here's an issue with pod filters you need to be aware of...
If the filter obstructs the passageways of the intake, your bike ain't gonna run right.


http://suzukisavage.com/cgi-bin/YaBB.pl?num=1347609265
Back to top
 
 
WWW   IP Logged
madmikesmech
Full Member
***
Offline

SuzukiSavage.com
Rocks!

Posts: 227
Olean ny
Gender: male
Re: 12 Step Cone Filter Mod and Re-Jet (w/pics)
Reply #11 - 05/27/19 at 02:55:16
 
Balderdash, good post, I'm looking to do a cone filter conversion myself.
Did you leave the stock airbox in it location and just remove the rubber tube between the airbox and carb?
Back to top


1999 Savage, basically stock, except drag bars, 4"risers,Jardine turn out muffler, Raptor petcock, Verslagen modified cam chain adjuster,4" forward controls
  IP Logged
Dave
YaBB Moderator
ModSquad
*****
Online

SuzukiSavage.com
Rocks!

Posts: 17738
Camp Springs, Kentucky
Gender: male
Re: 12 Step Cone Filter Mod and Re-Jet (w/pics)
Reply #12 - 06/14/19 at 04:00:52
 
If you click on the members Icon on the left side of the posts....you can see when the member was last on the forum, and when they last made a post.

Balderdash has not been on this site since 2009.....you are not likely to get any response to your inquiry to him.

If you look closely at the photos that Balderdash posted, you can see the black plastic air box is still in place.
Back to top


Someday I will be old......But not today!

  IP Logged
ohiomoto
Serious Thumper
*****
Offline

SuzukiSavage.com
Rocks!

Posts: 2673
WTF is JOG?
Re: 12 Step Cone Filter Mod and Re-Jet (w/pics)
Reply #13 - 06/15/19 at 06:34:51
 
Just because I feel the need to beat a dead horse, this is what I don't like about doing multiple mods at once.  My OPINIONS are in red.

------------------------------------------

Balderdash wrote on 07/08/07 at 13:35:01:
First project, put on the cone filter I bought a couple of months ago, but didn’t want to put it on without rejetting the carb at the same time...


WHY NOT??  You don't now what affect that filter will have on your engine.  Why would you feel the need to rejet?


Parts I used:
Cone filter with clamp (bought on e-bay, like this one)
155 main jet (switched to 152.5 after a couple of months use to regain some lost MPG)

Which is why you should have tested the filter before you swapped out the jets.

.055 pilot jet w/ vent holes (Both jets bought on e-bay, like these)

Yeah, 155/55 combo is probably richer than most LS650s need to be.

 Additionally, I noticed that I didn’t need to use the choke at all to start it up from a dead cold.

No need to choke when your bike is jetted that rich.  Some of these pod filter are actually more restrictive and as Varsey pointed out, sometimes even block air passages.


Back to top
 
 
  IP Logged
ohiomoto
Serious Thumper
*****
Offline

SuzukiSavage.com
Rocks!

Posts: 2673
WTF is JOG?
Re: 12 Step Cone Filter Mod and Re-Jet (w/pics)
Reply #14 - 06/15/19 at 06:59:39
 
I should add, I think the OP made a nice contribution to the forum and I'm not trying to pick on him.  Just pointing out the errors or our ways.

I'll also add that the OP may have felt the need to change the jetting based on recommendations on this forum and what mods others have done.  This is perfectly understandable and almost reasonable.

I think we should offer up our opinions and experiences.  Ultimately it's up to the individual to decide what mods they want and when they want to do them.

And while I would have guessed the OPs jetting would be too rich based on my experience with my bike, under my riding conditions, based on how I wand my bike to run, it could have easily turned out that the chosen filter required the chosen jetting.  

My point is I think it's better to test one change at a time and make adjustments based on the changes that change may or may not have made.
Back to top
 
 
  IP Logged
Pages: 1
Send Topic Print


« Home

 
« Home
SuzukiSavage.com
03/28/24 at 18:03:58


General CategoryTechnical Documents/Reference › 12 Step Cone Filter Mod and Re-Jet (w/pics)


SuzukiSavage.com » Powered by YaBB 2.2!
YaBB © 2000-2007. All Rights Reserved.