Donate!
Welcome, Guest. Please Login or Register :: View Members
Pages: 1
Send Topic Print
Speedo rattle fixes, headlight rattle fixes (Read 871 times)
Oldfeller2
Senior Member
****
Offline

I love YaBB 1G -
SP1!

Posts: 323

Gender: male
Speedo rattle fixes, headlight rattle fixes
05/13/07 at 18:00:36
 
 
There are several methods shown in the archives to fix a speedometer rattle.  This isn't necessarily the best method, but it does have the advantage of completely getting rid of the springs as they really don't have enough compression strength to do much of anything useful.

The flip side is that this fix allows you to put more force on the speedometer and the mount legs.   Since the speedo is semi-flimsy plastic construction you need to be mindful of the torque you put on those little nuts -- stay at moderate finger pressure using a bare long socket extender bar, please.  A 3/8" wrench-type handle could be really too strong much much too easily.

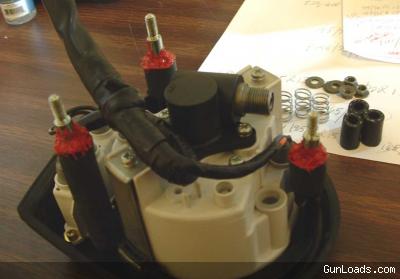
Take your tank off and take your speedo out.  Clean things up a bit so you can see the fret wear marks where the steel tank tabs wore into the steel speedo mounting legs.  These fret zones likely were the source of some of your noise, especially the one on the long unsupported steel speedo leg (you can just see that long skinny thing vibrating like a banjo string in your mind's eye).

Go to the auto parts store and get a foot or so of 3/8" heavy wall fuel line and a foot of 1/4" heavy wall fuel line.  Take your speedo with you, it will make picking things out a good bit easier.

The larger fuel line will slip over the bare steel leg, the larger supporting round plastic leg and go all the way down until it hits the bottom where the main housing starts.   The OD of my large hose was 0.630" or there-abouts (fuel hose is sized by the nipple size it goes over, so don't expect it to make a lot of sense measurement numberwise).


The smaller 1/4" fuel line measures 0.500" or thereabouts on the OD.  Note that  both hoses have the nylon reinforcment threads internal to their construction.

Now cut the larger fuel hose to a length that goes from the bottom of everything up slightly past the fret mark on the unthreaded steel shaft part of each individual leg.  You want your large hose to be taller than the fret mark.  You want the hose to compress a tad when it gets tightened up, so it has to be a little bit longer than the fret mark distance (maybe 1/16" longer or 0.060" if you like digital measurements).  Each of the three legs is different, so you will cut 3 custom leg covers out of the bigger tubing.  

I can't give you a distance, every tank has the steel tabs on the tank welded on at slightly different points.  Your fret marks tell you about your tank and the needed distances.

Now cut the smaller tubing to take up the distance between the big tubing and the start of the first thread (leaving off 1/8" for the tank tab thickeness and the washer thicknesses).   Each of the three small tubes is a different length too.  Note: you can post-tune these lengths later to jive with reality -- I had to.


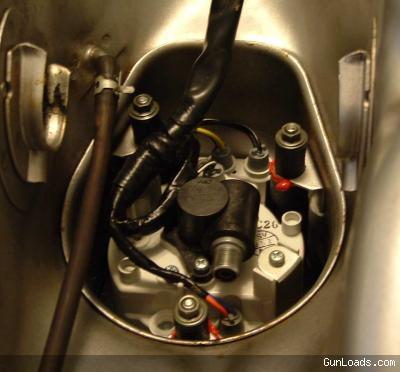
Take your silicone RTV gasket stuff and pack it into the gap between the steel shaft and the tubing until you totally fill that little shoulder space and mound up a little heap so it will flatten & squish good when you bolt her up.  Leave this sit in open air for at least 1/2 to 1 hour so the silicone will firm up some -- important step to let it firm up some.  This gel time will change according to your local temperature and humidity.


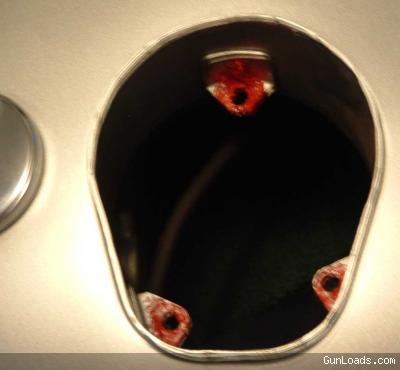
While your silicone is setting up on the speedo, prep your gas tank mounting tabs with some silicone too.  On the front tab (towards your belly when riding) remember to put a wad of silicone on the tank wall next to the tab as the large round tubing will reach all the way over to this solid wall to make up a "controlling contact point" which will greatly reduce the chances of anything moving around later on.  Give it a nice silicone bed to go to sleep in.


Long half to one hour, wasn't it?  Slide it all together, put the small tubes in place and put the washers and nuts on.  PLEASE REMEMBER TO GO EASY ON THE NUT TENSION - 2 to 3 INCH POUNDS MAX.  You actually can put force on the legs now so you can damage them if you go overboard.   Pull the nuts down until the rubber gasket on the outer flange of the speedo (the outside part you normally look at) pulls down to the tank all the way around and things firm up when pushing on the speedo from the outside (you know, like you used to do all the time to get it to shut up that hideous buzz/rattle noise).

Revisit the little nuts again after a half hour and snug them back up  (they will relax as the silicone squishes up the shafts and out the gaps).   Do it again in another half hour.  Now wait longer and come back again in another hour and snug up any more slack that has developed.   You will notice that slack isn't coming back like it used to -- time to STOP TIGHTENING THE NUTS.  

Then give it overnight or 24 hours to harden up where it is now (let the RTV seize up on the shaft real good, check the little nuts again for firmness (2-3 inch pounds) and put your tank back on the bike.

Oldfeller
Back to top
 
« Last Edit: 07/05/12 at 11:01:57 by Oldfeller--FSO »  
  IP Logged
Oldfeller2
Senior Member
****
Offline

I love YaBB 1G -
SP1!

Posts: 323

Gender: male
Re: Speedo rattle fix (silicone & tubing metho
Reply #1 - 05/14/07 at 18:08:24
 
Some after action thoughts -- my bike is back up and running again so I have time to drink a cup of coffee and clear up my work space and collect my thoughts a bit.

====================

Neat trick #1)

When you first take your tank off and flip it over to start taking off the speedo -- take a moment and sketch out the routing of of the speedometer cable itself across the inside surface of the tank and up through the little gooseneck to the cable nut/right angle drive unit.  Notice the subtle "S" routing path the cable takes, dodging into two <not obvious>  little dents in the bottom of the  tank?   Those dents are there for a pupose.

That cable positioning is enforced by how the gooseneck is oriented when you tighten the kurled sleeve down with your pliers when you put the speedo cable back together to the right angle unit.  

<not obvious at all>

If you don't get the cable routing right, you will play hell putting the tank back on the bike  (I had to reinvent the wheel on this one and it took me 2 tries to get it right).  Do yourself a favor and make yourself a sketch before you take anything apart.

====================


Neat trick #2

You are going to have to drain the gas out of your tank since it is going to spend a lot of time upside down while you work on the speedo.  You don't want to trust the gas cap to not leak at all, trust me on this one - the gas cap isn't 100% leakproof.

Plan to get the bulk of the gas out of the tank, then plan to pull your petthingy out to get the rest of the gas out of the tank.  With the petthingy out, you can roll the gas to that side and dump out all of it, carrying out all the trash and rust flakes and paint flakes with it.

Now that your petthingy is out, take some carb cleaner and spray out the fine mesh fabric screen really really good.  Mine had hardened varnish blocking off a lot of the pores on the lower 1/3 (reserve) part of the screen.  Gas flow was affected at the tag end of a tank -- I had really cobby lean running characteristics when on reserve and now I know why.

Move your selector lever to all positions and blow carb cleaner back up through the brass nipple (running the cleaner backwards up all the passages) while holding the screen side down so the trash falls to the "top" of the screen.  Once you feel you got the all passages good use your flow of cleaner to dissolve the crap and flush the fine mesh screen all nice and clean again.

You have paint that used to be under the petthingy that has peeled and blistered due to long exposure to gasoline.  Scrape it off the inside of the petthingy recess and off the oval flat place that was inside the "O" ring.   Some fine sandpaper will be needed to get the surface flat again so the "O" ring will seat good again.   Now dump the rest of the gas out of the tank, carrying away all the trash from the sanding with it.

(or if you were like me, put some more gas into the tank through the gas cap and then flush out all the sanding trash through the petthingy hole)


===============


Final Caution:  put a baggie around all your hose ends and your speedo ends and rubber band the baggies real good so the baggies don't come off on you.  You won't lose any little "o"rings and little hose clips and such that way.  

Crawling around with a flashlight looking under things for a missing little clip isn't what you want to spend your time doing.

My knees still hurt.

Oldfeller
Back to top
 
 
  IP Logged
Oldfeller2
Senior Member
****
Offline

I love YaBB 1G -
SP1!

Posts: 323

Gender: male
Re: Speedo rattle fix (silicone & tubing metho
Reply #2 - 07/05/07 at 13:25:33
 
Now that you fixed your speedo rattle, you are likely to hear some of the other rattles and knocks that were being drowned out before by the louder & more persistent speedo rattle noises that you just fixed.

====================

There is a headlight rattle -- take the two screws off on the bottom of the headlight and take the ring assembly off the hollow housing.  First, make sure all your loose wires, guts and connectors are being held down correctly by the wire ties & such and are not kicking around loose.   Tuck them in nicely and tighten those wire ties down over them to hold them properly in place.

Any remaining headlight rattle most likely comes from the single steel hook on the top side of the ring assembly where it has made itself some vibratory clearance to the single ribbed boss on the top of the plastic hollow housing.  Apply a dab of red silicone gasket sealant to the sheet metal hook so when you put it together it makes a silicone rubber buffered seal to the ribbed plastic boss.   You will be able to take this apart later, just go gently when you go about doing it as that piece of plastic is worth WAY TOO MUCH MONEY -- so please don't force it and break it.   The silicone will let go first, be patient.

Appended from another post on the subject


ridemore wrote on 07/01/12 at 15:38:44:
Thanks to the posts on head light rattle fixs in tech section.
    My fix is to line the inside of the 'hook' with one layer of electrical tape (head light ring). Then at aproximatly 120 degreas on both  sides from the hook I placed a small piece of electrical tape as well. Then made shure that the wire bundle inside the pot was snugged up with a wrap of electrical tape as well.
  Maybe I used aprox 3-4" of tape.
No more rattle and the cheepest fix I've ever done! Grin

This site rocks!


====================

Next you may still hear a hard steel on steel bang-knock sound that only takes place under hard throttle acceleration (same sort of acceleration things that gave you your headlight rattle).  It is your main motor mounts that have loosened up on you a bit banging against your through bolts and frame holes.   These big arsed through bolts are the two BIG bolt/acorn nuts that also hold up your steel foot peg castings on either side of your scoot.  Get out your big wrenches and sockets and tighten those two suckers back up nice and tight again.

====================

Your engine can make a VERY LOUD hard knock sound of its own if you are lugging it too low RPM-wise and hitting the throttle too hard causing a gigantic piston/explosion/spark knock sound.

Stop doing that -- let your engine rev up freely before hitting the throttle back all the way.  Your motor will thank you for doing this and NOT causing that destructive hard motor knock sound.   You also shake things to pieces when you do that -- see the list of things you just had to fix if you don't believe me.

Think what it's doing to your cam chain and your other internal parts .....

=======================

That's all the noises I've heard so far.  If there are more that show up later I'll add them to this list.

Oldfeller

Back to top
 
« Last Edit: 07/05/12 at 11:00:21 by Oldfeller--FSO »  
  IP Logged
Digger
Serious Thumper
2005 No Login
*****
Offline

Ya gotta be tough to
ride singles!

Posts: 1604
Colorado Springs, CO
Gender: male
Re: Speedo rattle fix (silicone & tubing metho
Reply #3 - 07/27/09 at 21:12:48
 
HERE IS SORT OF A HYBRID METHOD:


pmanntex wrote on 09/12/06 at 10:14:54:
Excerpt from my earlier message on a different thread


Rubber grommets 9/32" size from Home Depot (available in the specialty drawers that they have for 72 cents each).  
 
Insert  into the holes on the three brackets attached to the gas tank. Apply a little spit first as it will help you get the  grommet to seat easier along with pressure from your thumb.

Apply a light coating of a lubricant preferably compatible with rubber on the little steel rods that hold the speedometer housing, then add small plastic O-ring washer (also from  Home Depot available in the plumbing section or the little specialty drawers in the hardware section) placed between the spring and the grommet, and wah la----no more squeaking noise.  

Follow up:

I have put about 1800 miles on the bike since adding the grommets---held out so far.  Plan to add the shrink wrapping in combo with the grommets the next time the tank comes off, just for good measure.


I thought this idea looked interesting, so I used it as the basis of my quest to stop the infernal speedo vibration.

I was unable to find 9/32" ID rubber grommets @ Lowe's, so I picked up some 1/4" ID rubber grommets:


I would not recommend these for anyone else, as getting the speedometer mounting studs through them was a struggle....I thought I was in danger of cracking the speedo housing!  I ended up chamfering the edges of the stud shoulders a tiny bit and lubed things up with silicone grease to get the three studs to cooperate.

To keep the springs from contacting the rubber grommets, I used some nylon washers:


These were a good size to use, I think.

Next, I wanted to keep the springs from ever coming into contact with the studs, so I shoved a short length of 3/16" ID, 9/32" OD clear tubing over the studs.  Here is what the tubing looked like before I started cutting:


The tubing was a tight fit, so I softened it by dunking it in boiling water before I shoved each little piece over a stud.

Here is what two of the studs looked like before I put the springs on:


You can see the "stack" consisting of the rubber grommet, the nylon washer, and the short length of tubing.

Then, I put on the OEM springs (they were a tight fit around the tubing, but I sort of "screwed" the springs into place.  I topped off each of the three speedometer mounting studs with the OEM cone washer and the OEM nut.  On two of the studs, the spring started to coil bind before the cone washer was set against the shoulder of the stud.  So, I backed off the nuts that were associated with coil bound springs and double-nutted each stud, using blue Loctite.

If the vibes don't stop now, at least nothing I've done isn't irreversible.

Thanks,  pmanntex, wherever you are!
Back to top
 
« Last Edit: 03/06/10 at 18:06:20 by Digger »  

Digger
2001, Metallic Glacial Blue, Raptor Petcock, Verslavy (first hole) (otherwise, mechanically, the bike is stock), 13,xxx miles
I don't own a cage.
www.astronautbiker.com
WWW   IP Logged
Oldfeller--FSO
Serious Thumper
ModSquad
*****
Offline

Hobby is now
"concentrated
neuropany"

Posts: 12627
Fayetteville, NC
Gender: male
Re: Speedo rattle fix (silicone & tubing method)
Reply #4 - 07/27/09 at 23:27:09
 
Digger,

You bought all that stuff to go under, on top of and inside the stock steel speedo springs?

Are the steel springs still trying to hold the speedo in place by their very weak compressive force as you go over the bumps?  Is the speedo still able to move the rods up and down, up and down in the tab slots?  Can the edges of the steel tank tab slots still contact the steel rods?

(we had identified the very low force springs as a persistent "weak link" and had removed them from the mounting system accordingly.  We finally figured out the steel tank tab slots contacting the steel rods as the root cause of the rattle noise)

Have you proven out this new method over a period of time before listing it in the Tech Section or is this a new method you just put together just recently?

===============

I was going to reference you back to the rather long developement discussions on the tubing method's development, but heck, SEARCH can't find the original base thread any more.  It seems to be gone.  And I remember the silicone and rubber method post being a good bit longer when originally done, too with a lot more pictures.  

Key point about the tubing method is it gets rid of the steel springs completely and it does not allow the steel rods to move relative to the steel tank tabs (which is where we all thought the rattle really originated from).  People also tried wrapping the steel rods in tape, but the tab edge cut right through every sort of tape that was tried.

How does your method keep tank tab slot edges from contacting the speedo steel rods?    
Back to top


Former Savage Owner
  IP Logged
Digger
Serious Thumper
2005 No Login
*****
Offline

Ya gotta be tough to
ride singles!

Posts: 1604
Colorado Springs, CO
Gender: male
Re: Speedo rattle fix (silicone & tubing method)
Reply #5 - 07/28/09 at 21:09:23
 
Oldfeller--FSO wrote on 07/27/09 at 23:27:09:
Digger,

You bought all that stuff to go under, on top of and inside the stock steel speedo springs?

Are the steel springs still trying to hold the speedo in place by their very weak compressive force as you go over the bumps?  Is the speedo still able to move the rods up and down, up and down in the tab slots?  Can the edges of the steel tank tab slots still contact the steel rods?

(we had identified the very low force springs as a persistent "weak link" and had removed them from the mounting system accordingly.  We finally figured out the steel tank tab slots contacting the steel rods as the root cause of the rattle noise)

Have you proven out this new method over a period of time before listing it in the Tech Section or is this a new method you just put together just recently?

===============

I was going to reference you back to the rather long developement discussions on the tubing method's development, but heck, SEARCH can't find the original base thread any more.  It seems to be gone.  And I remember the silicone and rubber method post being a good bit longer when originally done, too with a lot more pictures.  

Key point about the tubing method is it gets rid of the steel springs completely and it does not allow the steel rods to move relative to the steel tank tabs (which is where we all thought the rattle really originated from).  People also tried wrapping the steel rods in tape, but the tab edge cut right through every sort of tape that was tried.

How does your method keep tank tab slot edges from contacting the speedo steel rods?    


Old,

Valid questions all.

I spent $1.75 on the grommets and the nylon washers.  I already had the tubing, but I'd guess you could get a foot of this stuff for less than a buck (you'll use well less than 2 inches of it).

Yes, the speedo is still being held in place by the wimpy springs...however, I don't see that to be a problem.  The steel rods are a very tight fit in the rubber grommets and the springs are just about squashed to the point of coil binding.

Yes, the steel rods can still move up and down through the metal tabs, but they are held in place quite snugly by the rubber grommets.

No, the edges of the steel tabs cannot contact the steel rods.  The grommets I have in place in the tabs are quite thick and will most likely never wear through.  I used a bit of silicone grease to get the rods through the grommets, thus decreasing any possibility of a wear-through.

I agree, the most likely source of the annoying "speedo vibe noise" is the steel rods rubbing against the steel tabs.  Those two components cannot make contact with the rubber grommets in place.

No, this method is not proven, as I've still got my bike on the lift.  However, I'm relatively certain it will work.  If it does not, I'll pull, retract, or modify the write-up as needed.

Finally, the answer to your last question is that the rubber grommets keep the tank tab slot edges from contacting the speedo steel rods.

FYI:  The reason I installed the short tubing sections was to keep the spring from vibrating against the sides of the steel rods.  The nylon washers are to protect the rubber grommets from being worn by the ends of the springs.

If my method does not work, I'll buy you a beer the next time we meet!

Smiley

Keep the questions coming....it's how we improve the breed!
Back to top


Digger
2001, Metallic Glacial Blue, Raptor Petcock, Verslavy (first hole) (otherwise, mechanically, the bike is stock), 13,xxx miles
I don't own a cage.
www.astronautbiker.com
WWW   IP Logged
Oldfeller--FSO
Serious Thumper
ModSquad
*****
Offline

Hobby is now
"concentrated
neuropany"

Posts: 12627
Fayetteville, NC
Gender: male
Re: Speedo rattle fix (silicone & tubing metho
Reply #6 - 07/28/09 at 22:35:12
 
Digger, your method likely is just fine but it sorta bugs me not to be able to locate the base "detailed" discussions behind the silicone & tubing method vs its predecessors.  This is another issue with the site getting older and relatively "large" compared to the Yabb BBS system's limits.  

We seem to be losing the ability to search/find some of our "history" due to lack of something .....  such is life.

Soon enough our tech stuff will appear to just sit out there with no pics and no background discussion to wade through to see "the rest of the story".

============

Here is what I like about your method, should it prove out to be long term durable and all.  
You can take it back apart very easily.

All previous "long term effective" methods to the rubber tube & silicone method involved copious amounts of silicone glopped around the existing steel spring.  These methods sometimes failed over the long haul, but they and the earlier tube methods were somewhat messy to take apart.

Even the tube & rubber method (although cleaner than the other methods) required slicing the silicone at the tab joint to get the unit back apart.

The only plus to be said for the old tube method is it works flawlessly over 2 plus years on multiple multiple bikes and nobody has had to take it apart that I know of yet.

============

Another difference between now and back then is Savage Rob used to go though these tech post about every other month and clean up any "discussion" that had crept into them.   The site had a rule back then that limited all discussion to Rubber Side down and Cafe and he would move things accordingly.  He would also tune up your postings sometimes to make it clearer and more concise.

Things are easier now, which is good since the "discussion" part on a tech thread that was forced back then to be separate on a different part of the board has now been lost due to time.

There are some sorts of limits that the site has for both time and content that are based on the overall board "size" that the site has leased off the server farm.  Savage Rob used to prune things in Tech Section selectively and he would edit/condense if he could rather than just cut things off based on age.

============

I betcha the details behind the original improved cam chain deal have been lost to history then too.   Savage Greg's stuff is mostly gone now, even when you can find the discussion the pics are gone off to neverland with the exception of some pics that have been rehosted by other people to preserve them.

The search engine is really not able to deal with a search for all boards for all time very well any more --

============

To contradict the thought of a total pruning, you can hit Rubber Side Down and hit the very earliest posting available and it goes back to October of 1994.  The stuff is still there, but Search isn't pulling from it very well.

Go figure ...... ??     It's all way over my head.

Now you see why I now try to put a link to the background discussion on any tech posting that was the result of a Rubber Side Down discussion.  And why I don't talk about anything technical in The Cafe at all as it can drop stuff off the face of the earth in as soon as 30 days.
Back to top


Former Savage Owner
  IP Logged
Oldfeller--FSO
Serious Thumper
ModSquad
*****
Offline

Hobby is now
"concentrated
neuropany"

Posts: 12627
Fayetteville, NC
Gender: male
Re: Speedo rattle fix (silicone & tubing method)
Reply #7 - 07/05/12 at 09:14:33
 
Appended from another post on the subject


ridemore wrote on 07/01/12 at 15:38:44:
Thanks to the posts on head light rattle fixs in tech section.
    My fix is to line the inside of the 'hook' with one layer of electrical tape (head light ring). Then at aproximatly 120 degreas on both  sides from the hook I placed a small piece of electrical tape as well. Then made shure that the wire bundle inside the pot was snugged up with a wrap of electrical tape as well.
  Maybe I used aprox 3-4" of tape.
No more rattle and the cheepest fix I've ever done! Grin

This site rocks!
Back to top


Former Savage Owner
  IP Logged
Oldfeller--FSO
Serious Thumper
ModSquad
*****
Offline

Hobby is now
"concentrated
neuropany"

Posts: 12627
Fayetteville, NC
Gender: male
Re: Speedo rattle fixes, headlight rattle fixes
Reply #8 - 08/03/12 at 09:25:15
 

This link is to the ongoing discussion on this topic in Rubber Side Down.  


http://suzukisavage.com/cgi-bin/YaBB.pl?num=1343967897/0#0


This thread is locked.


Back to top


Former Savage Owner
  IP Logged
Pages: 1
Send Topic Print


« Home

 
« Home
SuzukiSavage.com
03/28/24 at 02:35:16


General CategoryTechnical Documents/Reference › Speedo rattle fixes, headlight rattle fixes


SuzukiSavage.com » Powered by YaBB 2.2!
YaBB © 2000-2007. All Rights Reserved.