Since there seems to be some interest I'll share a few tips.
First you need to know if you are trying to shorten the overall length of the fork, shorten the travel, or both.
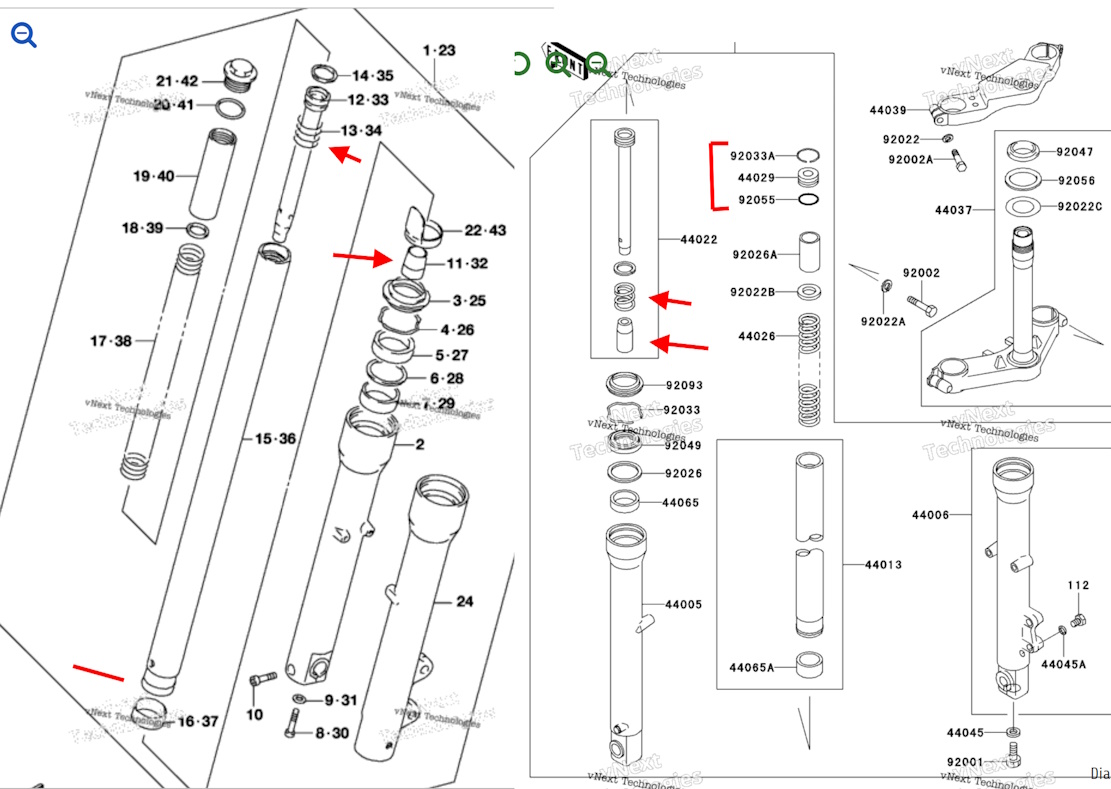
I'll refer to some parts fiche images, the left side is an S40 and the right a Kawasaki EX250. Yes, the image is quite large in size, but I want you to be able to clearly see the parts:
If you want to shorten the overall length, it is helpful that you have access to a lathe and know how to use it. The 17x33 MS850G Mori Seiki that I recently downsized in a trade for a 12x24 hobby lathe had a 51-52mm spindle bore so it was easy to put a fork tube in and hold it with a chuck to part off. It was a super nice lathe but it weighed 4000 pounds and took up a lot of floor space.
If your lathe has a spindle bore smaller than the tube you'll need to hold one end in a chuck and the other in a steady rest. Some small lathes will have beds too short to let you work on the far end of the tube when held like that.
Let's say you want a 50mm reduction in overall length. Disassemble the fork and put the fork tube/stanchion tube/fork pipe (15-36 on the S40 diagram) in the chuck and part off the top 50mm where the 21-42 fork cap screws in. The fork is now 50mm shorter. As a friend says, "Simples".

Next you have two choices for retaining the fork oil and spring in your shorter fork tube. If you are good at single point threading, or happen to have the exact fine thread metric tap needed, recreate the threads in the tube and you can screw the original fork cap in. If you aren't so keen on threading, then look at the Kawasaki diagram at the three items with a bracket next to them. This is a cylinder/plug with an o-ring on it and the top item is a wire circlip. Make a plug that is a sliding fit into the tube, put a groove on it for the o-ring, and then cut a circlip groove in the tube ID near the end of the tube. Instead of screwing in a cap you now push the plug in and insert the circlip to keep the plug from coming back out. Think of the plug as a piston wrist pin and the tube the piston, with a circlip keeping the wrist pin from being removed. Like the wrist pin, you'll want a small chamfer on the top edge of the plug to help keep the circlip in the groove.
Now the Kawasaki way is easy until you start trying to compress the plug enough to remove the circlip (or reinstall it). With my EX250 I ended up grabbing the top triple clamp with a 3-leg puller and then compressed the plug with that vs the Suzuki method of putting a socket on a handle and bearing down on the socket to compress the fork spring while you screw the top cap into the fork tube. Functionally, there is no difference in which method you use as either the threaded cap or the plug do the job. Either way can be a PITA to install/remove.
The next method is to shorten the tube at the bottom end. I don't know if this is true for the Savage but many damper rod forks have an aluminum or steel sleeve inserted into a counterbore at the bottom, and that is then held in place with a circlip. Do as with the Kawasaki option above and part off the bottom 50mm of the tube, make a new counterbore in the bottom of the tube to accept the sleeve and cut a new circlip groove to retain it. No thread cutting is needed as you've retained the original Suzuki threads. Be sure you put a smooth radius on the outside corner where you shortened the tube so you don't slice the fork seal when you install the tube in the slider.
I'll note here that when I installed the K-Tech cartridges in my Ninja 400 forks I had to remove that sleeve from the fork tube. I was surprised to find that Kawasaki had decided to save on the expense of a circlip and instead after inserting the sleeve in the tube they swaged the end of the tube inwards to permanently capture the sleeve. This required me to chuck the tube in the lathe and turn off that reduced section until the sleeve was free to come out of the tube.
The next way to shorten (several) things is actually shown in both of those diagrams, though it is not being used to shorten the fork. Look at 13-34 and the similar spring in the EX250 diagram. The spring goes on before the damper rod is dropped into the tube. The purpose of it is to offer some cushion when the fork rockets to full extension, as it probably does when you powershift and the massive torque of the Savage yanks the front wheel off the ground.
But if you put a spacer there in addition to the spring, or a longer spring (use one of similar stiffness, I've used an appropriately sized valve spring) you'll increase the engagement between the tube and slider, holding the tube farther in the slider. The overall length is now shorter because the fork is compressed more than was before and is not allowed to extend upwards. Be sure to look for bleed holes in that area of the damping rod and don't block them off. This can be an advantage of using a longer spring instead of a spacer.
But keep in mind that a spacer under the head of the damping rod reduces the available fork travel which doesn't happen by shortening the fork tube.
Also, shortening the bottom of the damper rod will do the same thing as the spacer, but you need to keep the end square and reinstall any damping orifices in the proper location. Make sure the wall thickness of the rod is enough that you can extend/install new threads for the bolt that comes in from the underside of the slider and holds the fork together!
While the forks are disassembled let's look at another item, the bottoming cone. That is 11-32 on the Suzuki and below the damper rod spring on the EX250 diagram. Remember that cylindrical sleeve in the bottom of the fork tube? The ID is just a bit larger than the OD of the bottoming cone. Normally the cones have a straight cylindrical section at the bottom and then taper inwards. The cone doesn't move, it is trapped under the damper rod. As the fork compresses the tube with sleeve approaches the cone. As it starts to slide over the cone the oil is being forced out but the farther the sleeve moves the more oil is trapped under it and unable to escape through the narrowing gap, until the gap is closed and hydraulic lock happens. This prevents the fork tube from clanking into the metal of the slider at full bump travel.
Now the proportions of the cone can vary. Some have a short taper and a long cylinder. What this does is start the hydraulic lock sooner, and the fork stops moving. You only need a short section of cylinder to form the lock, so if you've got a part with a long cylinder chuck it in the lathe, set the top slide to an appropriate angle, and cut a new, more shallow taper. You'll still have the "clanking" protection, but the hydraulic lock will happen more gradually and you might pick up a few more mm of fork bump travel.
It pays to compare the cones and the damping rods in both forks. On my EX250 I found that someone at the factory had gotten a much longer cone in their parts box, and it was long enough that it blocked off the orifice at the bottom of the damping rod. I had wondered why the front end was so stiff!

I machined it to match the shorter one and fixed that problem.
Speaking of problems, if you shorten the fork tube/stanchion/pipe or increase the engagement with a damper rod spacer, shorten any preload spacers by a matching amount. If your spacer is shorter than the amount you took off the tube you now have an unadjustable preload spacer compressing the fork spring. If that prevents you from setting your sag correctly you'll need to start looking for a different fork spring of the same rate but shorter length. It looks like the S40 may have a pretty long preload spacer so there may not be a problem like that, but you always need to inspect/measure/verify as you go with modifications like this.
Another nice thing about using a spacer under the head of the damper rod (besides it being simple) is that it increases the overlap in the slider and tube which makes life on the bushings much easier, and it can decrease fore/aft rock between the tube and slider if things are getting a bit loose on the clearances.
I think that covers things, but let me know if you have questions or if I wasn't clear enough.
cheers,
Michael
(edited to add some more information/clarity)

 Pages: 1

