Donate!
Welcome, Guest. Please Login or Register :: View Members
Pages: 1 2 3 ... 6
Send Topic Print
Gary in NJ's RYCA CS-1 Build (Read 2092 times)
Gary_in_NJ
Serious Thumper
*****
Offline

LS650 Cafe Racer

Posts: 2625
Amongst the Twisty Roads
Gary in NJ's RYCA CS-1 Build
03/13/15 at 09:53:25
 
Builder’s log, star date 68666.9…sorry, wrong fantasy.

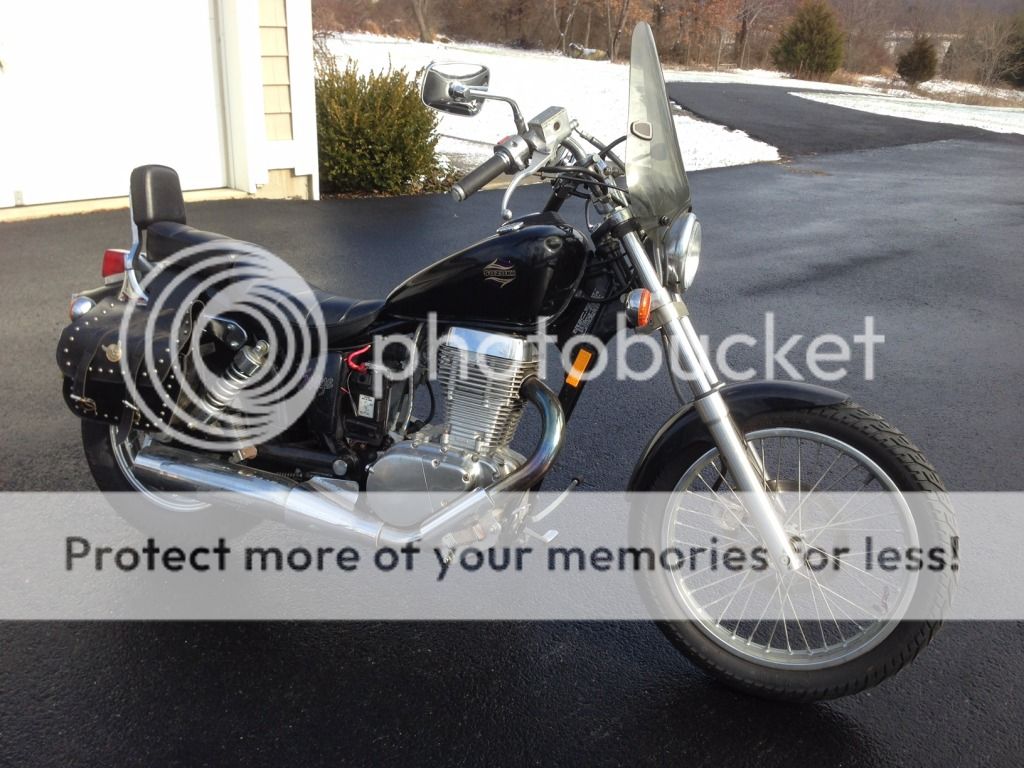
During the spring of 2014 I was traveling for business and as I always do I purchased a stack of car/motorcycle/mechanical magazines to kill time during air travel. I came across an article “Should You Build Your Own Café Racer” in Popular Mechanics and stopped dead in my tracks. I tore out the small article of the RYCA Café Racer as it promised an LS-650 based custom for less than $5,000.  When I visited the RYCA website I was impressed with the number of completed motorcycles and the variety of design. I’ve always wanted to build a Tracker and a Café Racer…and RYCA had both. I was hooked. I immediately started looking for an LS-650 donor bike. My goal was a low-mileage rat bike; an unloved and unattractive bike that would come in at $500. It took me about 5 months to find a ’95 model with just 2,300 miles. The bike had lived its life in a wooden shed with a dirt-floor down at the Jersey Shore. While the bike was stored “inside”, the damp salt air took its toll on the entirety of the exterior surfaces. Every piece of chrome was pitted and all of the clear coat on the aluminum pieces was cracked and damaged. It also had a nice dent in the fuel tank. Perfect. The bike started right up and settled into a smooth idle. Everything checked out and worked, so I handed five clean $100 bills to its original owner and became the second owner.


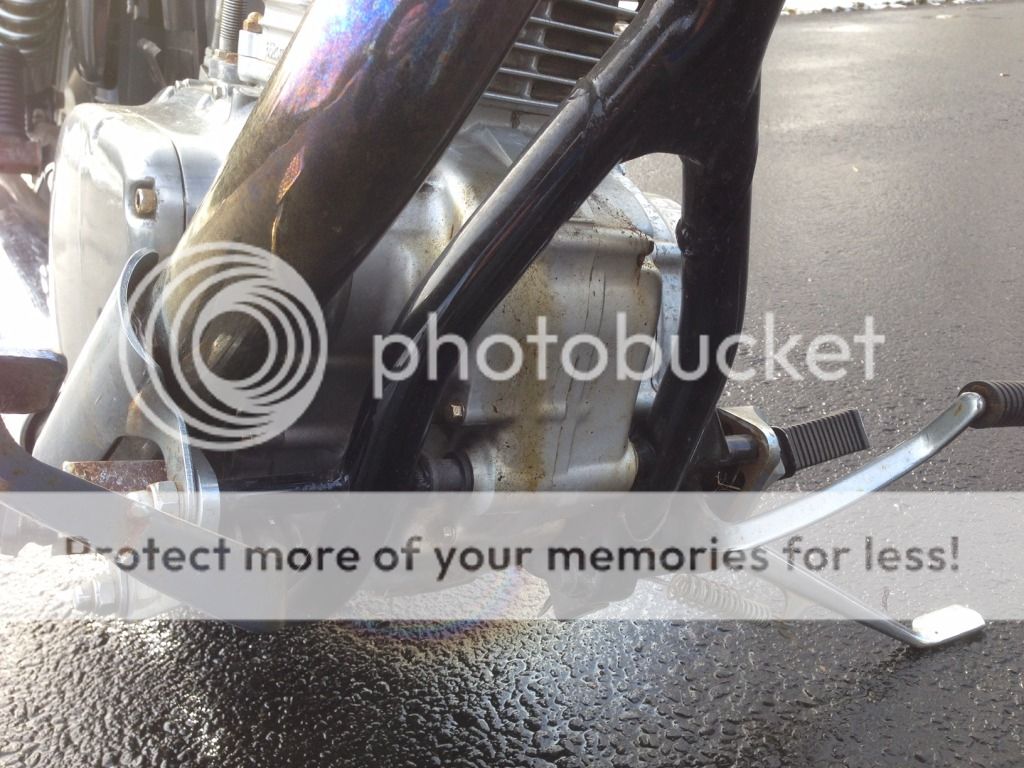
Within minutes of getting it home it was up on my bike bench getting torn apart. Beyond the aforementioned corrosion, everything looked good…it was exactly what I was looking for...and had I known better I would have run for the hills. Here’s the deal, I don’t like polishing parts. It never occurred to me that the clear coated aluminum parts would resist simple cleaning. Looking back I’d gladly trade an extra $1,000 (or more) for clean bike that didn’t require 100+ hours of grinder/air-tool/buffing/hand-polishing work that this bike required. Every part had to be taken down to bare metal and brought back up to shine. That sucked.


With the bike completely disassembled and inventoried I ordered my RYCA Café Racer kit. I spent the down time waiting for the kit studying the documents and watching the videos (a dozen times). It occurred to me that the RYCA fork solution was not going to work for a sporting street bike. I started to plan how to improve the front suspension. The results of my fork solution are well documented here --> http://suzukisavage.com/cgi-bin/YaBB.pl?num=1421689358.

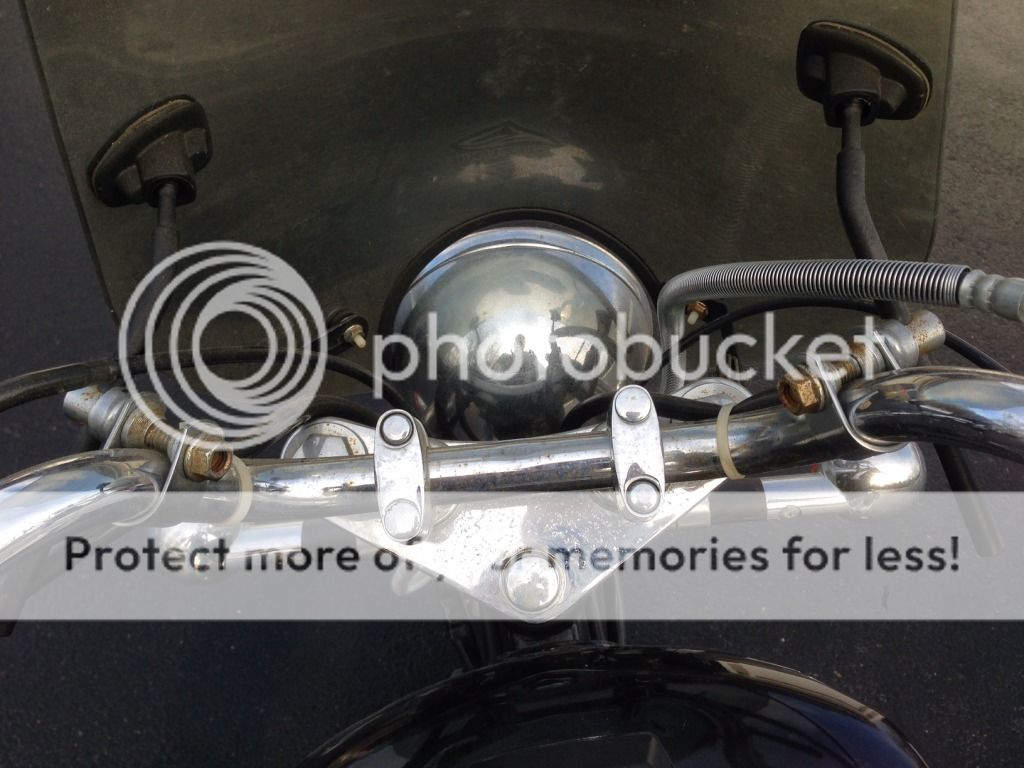
I do need to relay this story. When I had my fork plan mostly worked out in my head I figured I’d touch base with Ryan and ask a few questions. Ryan didn’t have experience with RaceTech components and wished me well on my project. After making contact with RaceTech and discussing possible solutions for an LS-650 based café racer I again contacted Ryan to get some feedback. Me to Ryan – “I've got the forks worked out with the folks at RaceTech. I'll be modifying the damper rods, adding cartridge emulators, using adjustable pre-load caps and running straight-rate springs. Rather than reduce the fork travel by two inches I'll raise the forks in the triple clamps.” Ryan to Me – “Sounds pretty intense. Sounds like you’ll need a custom triple tree as well since the Suzuki does not slide. Anyways, can’t wait to see.” In other words – YOU DON’T KNOW WHAT YOU’RE DOING, BUT GOOD LUCK. What? I’ve been wrenching on bikes for years. I’ve never seen forks that couldn’t slide in the triple clamps.

But he was obviously right. In my haste to disassemble the bike I never bothered to look at how the forks functioned in the clamps. I love being told that something can’t be done, it inspires me. So I started to think about how to modify the upper triple clamp so I could raise the forks. One night with all of the pieces in my hand I had a “eureka moment” when it occurred to me that I might be able to use a lower triple clamp as an upper. I took measurements looking to see if there was any offset built in (luckily there isn’t) and how things could line up. Convinced it could be done I got on ebay and was happy to see dozens of t-clamps available. I ordered a lower assembly for $25. Two days later it arrived and one hour later it was an upper triple clamp.


It was during the process of waiting for RYCA parts to show up and designing my suspension that I joined this forum. I found the café racers in the builders section to be inspirational and began to think of other ways I’d like to complete my bike. The goal of this builders log is not how to build a RYCA café racer - that’s already well documented in many places - but how I implemented my ideas and the ideas of others into my bike. I did all of my custom fabrication and fitting during initial assembly. This log is being written and photographed during stage 1 final assembly, so there won’t be a many tails of my trials and tribulations, just results and suggestions. I hope to complete the documentation through stage 2 final assembly, the point where everything is painted and powder-coated and the engine has been modified.

Right now I’m just days away from riding the bike, and I don’t know what I’ll think of it. I never rode it as a Savage so I know nothing of its power delivery or other characteristics. At this point I’m wondering if I’ve spent too much money on a dream. I don’t know. But what I do know is that this has been a very enjoyable project. I’m also floored by the technical knowledge of the forum members.
Back to top
 
« Last Edit: 03/24/15 at 13:33:53 by Gary_in_NJ »  

A life-time student of motorcycling.
LS650 Cafe, DRZ400SM, FZ6N, SV650S, CB900C, Ducati ST2, CB550F-SS
My LS650=> http://suzukisavage.com/yabb2.2/Attachments/Left.JPG
  IP Logged
Gary_in_NJ
Serious Thumper
*****
Offline

LS650 Cafe Racer

Posts: 2625
Amongst the Twisty Roads
Re: Gary in NJ's RYCA CS-1 Build
Reply #1 - 03/13/15 at 09:56:10
 
Seat Pan Rivnuts
I made a slight mod to how the rubber rivnuts get installed. I thought they needed a bit more support so I grabbed seven 5/16” washers and put them between the seat pan and the rivnuts. This should give a lot more support than just the fiberglass seat pan. Also, I couldn’t get the 1/2” long or the 5/8” long 8-32 screws to start. I couldn’t even get the 5/8” long screws to start where the 1/2” screws were supposed to be used – and my rivnuts are closer to the seat pan as a result of the washers under the rivnuts.

Clearly these screws are not properly spec’d. As a result I went out and purchased 1-inch long 8-32 stainless screws. They started with no problem and as hard as I try, I can not feel them anywhere near the vinyl seat cover.

Back to top
 
« Last Edit: 03/13/15 at 11:11:55 by Gary_in_NJ »  

A life-time student of motorcycling.
LS650 Cafe, DRZ400SM, FZ6N, SV650S, CB900C, Ducati ST2, CB550F-SS
My LS650=> http://suzukisavage.com/yabb2.2/Attachments/Left.JPG
  IP Logged
Dave
YaBB Moderator
ModSquad
*****
Offline

SuzukiSavage.com
Rocks!

Posts: 17784
Camp Springs, Kentucky
Gender: male
Re: Gary in NJ's RYCA CS-1 Build
Reply #2 - 03/13/15 at 10:15:48
 
Gary:

You will only be sorry about the Savage...if you are a horsepower addict.  Several times when I have been riding my bike and having a great time.....I wonder why anyone really needs more HP.  On the rural and mountain roads - the Savage engine is a real treat and the available torque and low gearing is a real plus.  If you do a lot of interstate riding the low power and gearing could be a bit of a turn-off....however some engine and gearing changes can fix that. The Cafe' bike is really gets lots of thumbs up when I ride....however there always will be the hardcore V-Twin crowd that just doesn't understand that it is a "real" motorcycle.

I am anxious to see how your suspension mods work out.  I agree that installing spacers to limit fork travel is not a good solution.  I made some changes to allow me to drop the forks like you did and the ride is good.  I will be adding emulators and springs once you confirm the spring rate is the correct one.

It appears you have become our resident suspension expert! Grin

Dave


Back to top


Someday I will be old......But not today!

  IP Logged
Gerry
Full Member
***
Offline

SuzukiSavage.com
Rocks!

Posts: 121
Southwest Michigan
Gender: male
Re: Gary in NJ's RYCA CS-1 Build
Reply #3 - 03/14/15 at 05:08:08
 
I gotta say that your top clamp solution is brilliant.  It's so simple and obvious route to take that I'm amazed no one else has thought of it.  

Can't wait to read about your front suspension mods and how they ride.

I was a little disappointed in lack of power on my bike after a couple of hours of accumulated ride time.  I thought it would be quicker.  But it is fun to ride and the handling is nice on the curvy roads around my area.
I'm looking forward to some nice warm rains to wash the salt and surface crap off the roads around here so I can get the bikes out again and get more seat time on the Ryca.

One thing about the Ryca is that although it was a kit I still enjoyed my time working on the project and adding my own mods to the project to make it more of my own.  and when you pull into a gas station or go a ride out to dinner with a group you always get one or two fellas who walk up and ask you about the bike and I don't know if it's ego or what but that always feels good too  Smiley  It is definitely a conversation starter and I like talking about bikes any time  Wink.

Have fun,
Gerry
Back to top


This message was posted using Google Chrome on a system using Linux Mint 17 Mate
  IP Logged
Gary in NJ
YaBB Newbies
*
Offline

SuzukiSavage.com
Rocks!

Posts: 44

Re: Gary in NJ's RYCA CS-1 Build
Reply #4 - 03/14/15 at 18:35:02
 
Well Gerry, since you've joined the conversation, I feel good about showing off your contribution to my bike.

When I decided to modify a lower triple clamp into an upper I also at the same moment resigned myself to finding my own solution to attach the speedo and tach to the bike. I fabricated an approach out 6061 bar stock that worked just fine, but I had always admired Gerry’s custom instrument cluster. I noticed one day Gerry volunteered in his builder’s log that’d he’d be happy to build upper triple clamps for members…so I thought “I wonder if he’d be willing to build another instrument cluster”. So I asked – and he did.


This is just outstanding workmanship. It really completes the look of my bike. After my fork improvements it’s my favorite “custom” element of the bike.

And as long as I'm showing off Gerry's work, I might as well show off an idea I stole from him (and there are others too). I liked how Gerry implemented the key switch at the former location of the airbox. He wasn't the first to do it, but he gave enough details with his photos that I was able to develop a solution.


The problem I had with making this was the diameter of the switch housing. It's 1-13/64 inches - and I don't have that size drill bit. The largest I have for cutting metal is 7/8", so I used a technique that I learned from building aircraft.

The first step is to trace the shape onto a bracket (the bracket is made of 0.125 2024, 2.00 x 1.50). I also wanted to trace the shape of the switch housing itself to ensure I left enough room for full coverage. I than drilled a centering hole.


I then used a 3/8" drill to drill out the circumference of the circle.


Once drilled and removed I used a Dremill tool to remove the remaining material.


I then used a die grinder with a 1" Scotchbite wheel to polish the surface.


And here's the finished result in place.

Back to top


A life long student of motorcycling
  IP Logged
haylo
YaBB Newbies
*
Offline

SuzukiSavage.com
Rocks!

Posts: 11

Re: Gary in NJ's RYCA CS-1 Build
Reply #5 - 03/15/15 at 10:05:35
 
I too am impressed with your solution to the RYCA loss of 2" in the front suspension. Thanks a mil. Now just a few questions.
Why did you choose the blue over the yellow for the Emulator spring?
Why the decision to drill the 2 extra holes in the plate valve?
The instructions included with the parts did not cover these two questions to my satisfaction so...I'll go to our resident expert...and that's you!
I'm in the 175 to 180 lb range and went with the 80 RT spring. Thanks again for your time...greatly appreciated. Haylo
Back to top
 
 
  IP Logged
Gary in NJ
YaBB Newbies
*
Offline

SuzukiSavage.com
Rocks!

Posts: 44

Re: Gary in NJ's RYCA CS-1 Build
Reply #6 - 03/15/15 at 14:53:37
 
haylo wrote on 03/15/15 at 10:05:35:
I too am impressed with your solution to the RYCA loss of 2" in the front suspension. Thanks a mil. Now just a few questions.
Why did you choose the blue over the yellow for the Emulator spring?
Why the decision to drill the 2 extra holes in the plate valve?
The instructions included with the parts did not cover these two questions to my satisfaction so...I'll go to our resident expert...and that's you!
I'm in the 175 to 180 lb range and went with the 80 RT spring. Thanks again for your time...greatly appreciated. Haylo


Good questions. There are 3 springs available for the Gold Valve Emulator (GVE); the Yellow spring has a 64# rate, the Blue spring has a 40# rate and the Silver spring has a 26# rate. The spring rate determines where in the stroke the valve will open and the rate at which oil will flow. Within each spring rate there is adjustability from 2 to 5 turns.

If you start with the Blue spring and find yourself at 5 turns and still needing additional compression damping (because you're blowing through the stroke), then its time to move up to the Yellow spring (5 turns on the blue is equal to 2 turns on the Yellow). Conversely, if you are at 2 turns on the Blue and the ride is too jarring (like it's hydrolocked) it's time to move to the Silver sping at 4.5 turns (1.5 to 20 turns on the Blue is equal to 5 on the Silver).

Given the weight of our bikes (300 to 375 pounds) the Blue spring is the "Goldilocks"  spring. Heavier bikes tend to use the Yellow and lighter bikes tend to use the Silver. There is crossover due to type of riding (motocross and off roading vs. street riding).

I set my initial setting with the Blue spring at 2.5 turns. I'm thinking this should work well, and RaceTech agrees. I may need to tweek it.

Regarding the two extra holes in the valve plate, that's something that is common on vintage race bikes. It's covered on RaceTech's supplemental instructions for vintage racers (it's well hidden). The cafe conversions are very (very!) similar to vintage racers, so the mod most definitely applies, even for street riding. It works best on lightweight road/street bikes. It allows for dual-rate valving, where the initial (dampened) stroke is plush and faster strokes are controlled fully by the valve. Its a well-proven mod. Go ahead and drill those extra holes...and thank me later.

Back to top
 
« Last Edit: 03/15/15 at 15:53:41 by Gary in NJ »  

A life long student of motorcycling
  IP Logged
Gary in NJ
YaBB Newbies
*
Offline

SuzukiSavage.com
Rocks!

Posts: 44

Re: Gary in NJ's RYCA CS-1 Build
Reply #7 - 03/15/15 at 14:57:31
 
Busy weekend.

I got the bike off the stand and on the road...or at least the driveway. My fun was cut short due to fuel coming out of the head breather. I've never experienced this before. I've seen where a maladjusted float will cause fuel to run out of the carb overflow, but I've never seen this. I guess I'm running VERY rich.

BTW, as part of my build I replaced the OEM fuel valve with a Rapter unit. The prior OE unit was leaking. I didn't do an oil change during my build (waiting for filter to arrive from Ron Ayers) and I'm thinking that the fuel could have been sitting in the crankcase for years.  At this point there's really no way to know.

Other then a leaking fuel valve, what else would send fuel into the crackcase or cause it to run from the breather?

I updated my suspension thread to reflect my thoughts on the fork improvements.
Back to top


A life long student of motorcycling
  IP Logged
Gary_in_NJ
Serious Thumper
*****
Offline

LS650 Cafe Racer

Posts: 2625
Amongst the Twisty Roads
Re: Gary in NJ's RYCA CS-1 Build
Reply #8 - 03/16/15 at 05:41:41
 
Haylo,

He's a link to RT's Vintage Tuning Guide.

http://racetech.com/download/IP%20FEGV%20SETUP-TUNE%20VINTAGE.pdf
Back to top


A life-time student of motorcycling.
LS650 Cafe, DRZ400SM, FZ6N, SV650S, CB900C, Ducati ST2, CB550F-SS
My LS650=> http://suzukisavage.com/yabb2.2/Attachments/Left.JPG
  IP Logged
Dave
YaBB Moderator
ModSquad
*****
Offline

SuzukiSavage.com
Rocks!

Posts: 17784
Camp Springs, Kentucky
Gender: male
Re: Gary in NJ's RYCA CS-1 Build
Reply #9 - 03/16/15 at 06:31:00
 
Gary:

Did you check the oil level through the window?  It is not uncommon that when the vacuum petcock goes bad, it allows fuel to flow down the vacuum line and to the front of the carb, and the fuel then goes past the valves and dilutes the oil.  This is the most common cause of the oil/fuel spray coming out the vent tube.  (The other common one is that that when someone had the head cover off....they took out the mesh screen that works to separate the oil from the air before it goes out the vent).
Back to top


Someday I will be old......But not today!

  IP Logged
Gary_in_NJ
Serious Thumper
*****
Offline

LS650 Cafe Racer

Posts: 2625
Amongst the Twisty Roads
Re: Gary in NJ's RYCA CS-1 Build
Reply #10 - 03/16/15 at 06:58:33
 
Dave,

I'm quite sure that I have fuel diluted oil. When I picked up the bike it was leaking fuel from just about everywhere. I'm going to do an oil change this week. I'm fully expecting to get some type of oil/fuel solution.

Dave, I looked at the micro-fiche for the head and didn't see a mesh screen. Can you give a better description? As far as I know the head has never been off this bike. I can't think of any other way that fuel can make it to the crankcase other then leaking past the rings due to a continuous flow while shut-down.

The bike was cranky on start-up - long crank time and it didn't want to idle. So I have a lot of carb adjusting in my future. I'll get it dialed in "close enough" for now. There no sense in getting it right in 40 degree weather, as I never ride in those conditions. As soon as I get a nice day in the 75-80 degree range I'll start looking at carb tuning seriously.
Back to top
 
« Last Edit: 03/16/15 at 13:30:56 by Gary_in_NJ »  

A life-time student of motorcycling.
LS650 Cafe, DRZ400SM, FZ6N, SV650S, CB900C, Ducati ST2, CB550F-SS
My LS650=> http://suzukisavage.com/yabb2.2/Attachments/Left.JPG
  IP Logged
Dave
YaBB Moderator
ModSquad
*****
Offline

SuzukiSavage.com
Rocks!

Posts: 17784
Camp Springs, Kentucky
Gender: male
Re: Gary in NJ's RYCA CS-1 Build
Reply #11 - 03/16/15 at 07:17:00
 
Gary:

It is hard be believe the fuel can somehow get past the valves, past the piston and rings, and go into the crankcase - but it does.  On some bikes it goes to the air cleaner and fills up the air box, on others it goes into the crankcase.  Not sure if the angle of the place the bike is parked makes the difference - or if the intake valves being open or closed makes the difference.

The little screen sits in a pocket in the head cover, and can be accessed when the head cover is off.  Part number 41 in this diagram.....

http://www.hondaofflorence.com/fiche_section_detail.asp?section=432111&catego...

If your head cover has never been off - it will still be there.

It looks like this sitting in the cylinder head cover.  Metal scrubby looking thing sitting in the lower right corner.

Back to top
 

LS650-S40_0492.jpg

Someday I will be old......But not today!

  IP Logged
Gary_in_NJ
Serious Thumper
*****
Offline

LS650 Cafe Racer

Posts: 2625
Amongst the Twisty Roads
Re: Gary in NJ's RYCA CS-1 Build
Reply #12 - 03/16/15 at 07:39:26
 
Excellent description Dave.

I can't say with 100% certainty that the head has never been off this bike. While the odo says 2300 miles, my Spidy-Sense says it's more. For example, the inside of the exhaust is coated in carbon. I wouldn't expect that on a 2300 mile bike (it was female owned and I'm sure never ridden hard). The exhaust o-ring was missing, yet the bike wore its original exhaust. Why would the exhaust come off a new bike? Given how badly it leaked I can't imagine someone would operate it that way for 2300 miles.

Yet the tires (while badly dry-rotted) show normal wear for a 2300 miles bike. And the wiring harness was very clean. Even the brake fluid wasn't disgusting.

I'll never know...and I really don't care. Almost everything on the bike has been replaced with something new and in time the engine will be modified and brought up to my standards. It's all part of the mystery of an 20 year-old neglected basket case.
Back to top
 
« Last Edit: 03/24/15 at 13:44:32 by Gary_in_NJ »  

A life-time student of motorcycling.
LS650 Cafe, DRZ400SM, FZ6N, SV650S, CB900C, Ducati ST2, CB550F-SS
My LS650=> http://suzukisavage.com/yabb2.2/Attachments/Left.JPG
  IP Logged
Dave
YaBB Moderator
ModSquad
*****
Offline

SuzukiSavage.com
Rocks!

Posts: 17784
Camp Springs, Kentucky
Gender: male
Re: Gary in NJ's RYCA CS-1 Build
Reply #13 - 03/16/15 at 08:35:01
 
If the original owner liked to start the bike and let it warm up at idle with the fuel enrichment knob on while she put on her helmet, gloves, jacket, glasses.....the darn thing could have been carboned up in a very short time.  Same thing if they would start the bike and let it idle during the off season to charge the battery and keep the bike "limber".

Me....I start the bike, let it run for 30 seconds to a minute...then ride off and take it easy for a bit until the engine warms up.  Several members have commented that their clutch slips when cold - but works fine when warm...that makes sense as the thick oil doesn't squeeze out from between the plates as easy when thick.

By the way...nice job on the ignition mount.  I don't have a milling machine and had to do similar thing with my drill press.
Back to top


Someday I will be old......But not today!

  IP Logged
Gary_in_NJ
Serious Thumper
*****
Offline

LS650 Cafe Racer

Posts: 2625
Amongst the Twisty Roads
Re: Gary in NJ's RYCA CS-1 Build
Reply #14 - 03/16/15 at 09:07:45
 
I bet you are right about the long warm-up or the battery charging. Makes me feel as bit better.

Dave wrote on 03/16/15 at 08:35:01:
By the way...nice job on the ignition mount.  I don't have a milling machine and had to do similar thing with my drill press.


I have a fly cutter that I could have used, but my drill press has a minimum speed of 600 rpm and fly cutter likes to turn at 500rpm or less. At 600 rpm it's good for holes above 2 inches at 600 rpm (and can go up to 8"), but scares the crap out of me for smaller holes.
Back to top


A life-time student of motorcycling.
LS650 Cafe, DRZ400SM, FZ6N, SV650S, CB900C, Ducati ST2, CB550F-SS
My LS650=> http://suzukisavage.com/yabb2.2/Attachments/Left.JPG
  IP Logged
Pages: 1 2 3 ... 6
Send Topic Print


« Home

 
« Home
SuzukiSavage.com
04/19/24 at 01:32:19


General CategoryRubber Side Down! › Gary in NJ's RYCA CS-1 Build


SuzukiSavage.com » Powered by YaBB 2.2!
YaBB © 2000-2007. All Rights Reserved.