Donate!
Welcome, Guest. Please Login or Register :: View Members
Pages: 1
Send Topic Print
Head bolt tightening sequence (Read 106 times)
polloloco83
YaBB Newbies
*
Offline

I love YaBB 1G -
SP1!

Posts: 17

Head bolt tightening sequence
01/25/13 at 19:05:25
 
The Clymer manual states "tighten the bolts in a crisscross patter, starting with the center bolts (surround the camshaft) and working outward" but provides no dummy-proof picture for me. I remember my Jeep service manual gave me a picture showing a clockwise spiral from the center outward for the cylinder head. Can someone provide me a picture of the tightening sequence? I plan to fix my leaking plug tomorrow.

Table 2 also lists the torque for Cylinder head nuts, but I thought that I remove bolts to do this job.
Back to top
 
 
  IP Logged
Digger
Serious Thumper
2005 No Login
*****
Offline

Ya gotta be tough to
ride singles!

Posts: 1604
Colorado Springs, CO
Gender: male
Re: Head bolt tightening sequence
Reply #1 - 01/25/13 at 19:35:24
 
Pol,

Well, the 4 topmost head bolts are easy - it's a simple criss-cross pattern.

If you are referring to the head cover bolts, you are right, the FSM does not specifically call out a certain pattern.  I threw one out there a few years ago and nobody here has crapped on it (yet):


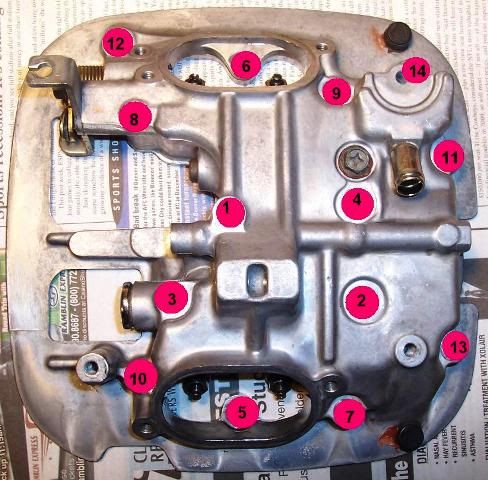
You will find that location #12 presents an elevated challenge.  That is because that hole is used for the bolt that serves to also fasten the forward-port corner of the chrome decorative head cover into place.  However, you really can't put said cover into place until you are have torqued all of the head cover bolts, since said cover, when installed, prevents access to some of said bolts.  And, if you think you can just install the bolt that corresponds to location #12 later, you may find yourself faced with an oil leak, as the head cover sealant may set up a little too thick in that particular location (DAMHIK!).

Here is what I used to take the place of the decorative head cover - a stack of washers:


I just placed a bunch of washers on the bolt.  This allowed me to torque the bolt down properly.

After the gasket sealant used on the head cover was cured, I removed the washers and installed the left decorative chrome head cover.

If anybody can improve on this, please take this opportunity to speak your piece now.....I welcome it!

IHTH!

Back to top


Digger
2001, Metallic Glacial Blue, Raptor Petcock, Verslavy (first hole) (otherwise, mechanically, the bike is stock), 13,xxx miles
I don't own a cage.
www.astronautbiker.com
WWW   IP Logged
polloloco83
YaBB Newbies
*
Offline

I love YaBB 1G -
SP1!

Posts: 17

Re: Head bolt tightening sequence
Reply #2 - 01/26/13 at 09:24:42
 
Yes, I do mean head cover bolts, and that picture helps a lot. I'm used to a block, cylinder head, and valve covers as on my Jeep, this engine is built a bit differently. Am I reading correct that I tighten to only 21-24 lt-lbs?
Back to top
 
 
  IP Logged
justin_o_guy2
Serious Thumper
*****
Offline

What happened?

Posts: 55279
East Texas, 1/2 dallas/la.
Re: Head bolt tightening sequence
Reply #3 - 01/26/13 at 10:51:25
 
Digger said


However, you really can't put said cover into place until you are have torqued all of the head cover bolts, since said cover, when installed, prevents access to some of said bolts.


& he said a lot.
Back to top


The people never give up their liberties but under some delusion.- Edmund Burke.
  IP Logged
trisuz
YaBB Newbies
*
Offline

SuzukiSavage.com
Rocks!

Posts: 1

Re: Head bolt tightening sequence
Reply #4 - 01/26/13 at 15:22:19
 
The torque spec for the Cylinder head cover bolts is 6-8.5 ft.-lb.
Page 147 table 2 in clymers.  If you use 21-24 ft.-lb. you'll most likely break ever one.  Also be sure you are at tdc on the combustion stroke before you remove the bolts.  There are some great threads on this procedure, I highly recomend you read them all.  It's not really difficult if your mechanically inclined but there are a few details to look out for.
Good luck.

Terry
Back to top
 
 
  IP Logged
cafecarl
Junior Member
**
Offline

I love old
motorcycles

Posts: 58
Maine
Gender: male
Re: Head bolt tightening sequence
Reply #5 - 02/01/13 at 07:55:18
 
Hey, I'm not trying to hijack this thread, but I'm also putting my head cover on and digger posted such a great photo of the cover and the sequence it will help me explain my problem.
I have an '86, the chrome covers will not be going back on.
I'm all good with the challenge marked 12 in the sequence, I have a stud ready to go in that spot. My question is over where the hole marked 14 is located. this hole doesn't pass through the breather so I'm thinking it isn't part of the squeezing action, but mine has another hole (that I don't see on his) just north of what he has marked as #14. It passes down through the cooling fins of the head but doesn't have any threads. The book shows it on the length chart as 115 mm. Any ideas what's going on?    Polloloco, sorry to jump in, hope you're getting along OK.
 
Back to top
 
 
  IP Logged
verslagen1
YaBB Moderator
ModSquad
*****
Offline

Where there's a
will, I want to be
in it.

Posts: 28886
L.A. California
Gender: male
Re: Head bolt tightening sequence
Reply #6 - 02/01/13 at 08:04:01
 
the 14 spot is mis located, should be on the bolt above it.

where it's currently at is a chrome cover mounting hole, which is a blind hole.
Back to top
 
 
WWW   IP Logged
cafecarl
Junior Member
**
Offline

I love old
motorcycles

Posts: 58
Maine
Gender: male
Re: Head bolt tightening sequence
Reply #7 - 02/01/13 at 10:37:59
 
Thanks Versy, I now see that a PO broke that bolt off down close to the jug. Thats why I couldn't get the new bolt theads to catch.  Undecided
Back to top
 
 
  IP Logged
Digger
Serious Thumper
2005 No Login
*****
Offline

Ya gotta be tough to
ride singles!

Posts: 1604
Colorado Springs, CO
Gender: male
Re: Head bolt tightening sequence
Reply #8 - 02/01/13 at 18:57:50
 
verslagen1 wrote on 02/01/13 at 08:04:01:
the 14 spot is mis located, should be on the bolt above it.

where it's currently at is a chrome cover mounting hole, which is a blind hole.


Actually spot 14 is in the right location.

I placed the spot 14 magenta circle right over where the associated head cover bolt hole is.

The following "raw" photo shows this more clearly:


As you can see, hole #14 was somewhat obscured due to the angle of the camera when I took the shot.  Note that the bolt hole just below and to the left of hole #14 is, indeed, a blind hole used to mount the decorative chrome cover.

IHTH!
Back to top


Digger
2001, Metallic Glacial Blue, Raptor Petcock, Verslavy (first hole) (otherwise, mechanically, the bike is stock), 13,xxx miles
I don't own a cage.
www.astronautbiker.com
WWW   IP Logged
Pages: 1
Send Topic Print


« Home

 
« Home
SuzukiSavage.com
09/29/24 at 01:24:09


General CategoryRubber Side Down! › Head bolt tightening sequence


SuzukiSavage.com » Powered by YaBB 2.2!
YaBB © 2000-2007. All Rights Reserved.