Ok. So I get home, amped up to try out the 185 jet, add some fuel, choke on, bike fires up, falls on it's face. I go to start the bike again and fuel is puking out of the overflow. Infact, fuel is puking out of the overflow about as fast as I can fill it.
I let it drain down.
I try to fire it up to see if anything was in the bowl. It visibly back fires out the carb. I don't catch on fire this time because I took necessary precautions and safe guards.
I add fuel and again it dumps out almost as fast as I can put it in.
I don't get it. I'm about to just throw the stock carb on just so I can ride.
EDIT: Been reading. I've heard needle, I've heard seat spring, I've heard floats, I've heard it's time for a rebuild
Going to check the book and then float levels.
EDIT x2: Took the bowl off. "Inspected" everything. Put it back together. It doesn't puke out anymore. It won't fire up without the choke, once running I can get one rev before it falls on it's face again. I'm beginning to suspect I might need the .010 pilot jet as noted above.
Edit x3:
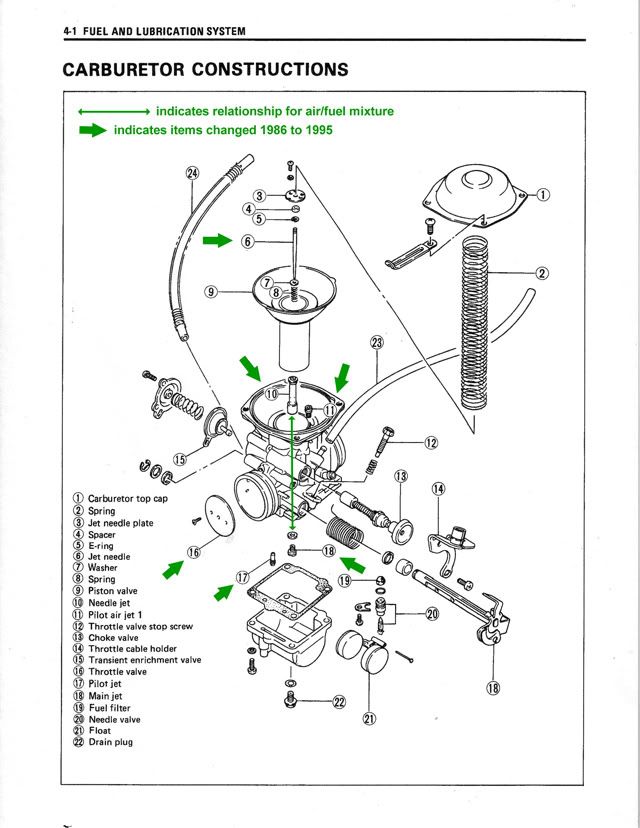
On my stock carb:
#4 has been removed
#10 there says 230
#11 says 45
From my Dynojet kit:
#18 says 144
and my needle is on the 4th slot
I'm not sure about #17 but it doesn't look like it's giving up without a fight. With my factory carb I can idle and rev.
From this thread:
http://suzukisavage.com/cgi-bin/YaBB.pl?num=1173814414 Quote:most folks end up running a mikuni 155 or so on the main with an open pipe and good intake. looks like the 144 DJ wil be about a Mikuni 135... way too small...
Edit x4: I found my Dynojet box. I can't believe it was that easy.
There is a screw and drill bit (I assume it was from drilling out the brass plug), 2 stickers, and brand new in the bags 138, 140, 142, 144 (bag is empty. this jet is in my carb), 146 jets. There is a dirty, old, discolored jet I assume is the stock one I saved because I'm a packrat. It says 145.
There is also a small washer in there I now realize was probably supposed to replace the white spacer but never made it in.
Edit x5: With the stock carb, all settings mentioned above, the bike fired right up. It just idled and rev'd for about 20 minutes. With the adjustment screw all the way screwed in (clockwise for lean) the bike was idling around 12.7 to 13.2 The bike actually felt between ~3/4-1 turn out of the adjustment screw which kept my idle AFRs between 12.7 and 13.2 and dropping to 10.9 when I crack the throttle about halfway. Still a bit rich for my tastes.
I put my dynojet 142 jet in the bike. Brought the screw all the way in. The wideband started acting up and was saying I was idling between 16-17.7 with a throttle blip bringing it down to high 14's. Figured I'd give that one a try to so I can say I rode the bike.
Went down the street and the bike stalled at the first stop sign. Popped and crackled on decel. I think it was better with the Dynojet 144.
IF I were keeping this carb I'd say bigger jets all around.
Now my task is to use this page:
http://suzukisavage.com/cgi-bin/YaBB.pl?board=tech;action=display;num=1104263751to translate what works into what jets to install in the VM36. I don't get it. Statistically even the blind squirrel should've found a nut.
--Steve

 Pages: 1

