Pondog wrote on 11/20/10 at 05:41:06:I was riding in to work yesterday; it was a beautiful morning and everything was perfect. My ride was purring and even though the traffic was heavy all the stop signs and traffic lights didn't matter. Every stop was nice and smooth, like a feather hitting the ground. I thought, "Man, I'm hitting on all cylinders.... hold it, I only have one!" hahahaha.
At 22k I figure it's time to retorque the head bolts. I was wondering, from those who've already done it, is there anything I need to watch out for? Any hidden surprises or springs jumping out? I know there's a post in here somewhere detailing what needs to be done; I'll find it and download it as well.
Thanks,
Pondog
I do it according to Suzuki's recommended maintenance intervals.
Pretty straightforward job, if a bit tedious. I use
Permatex® Ultra Grey® Rigid High-Torque RTV Silicone Gasket Maker on the head cover, and
Permatex® Ultra Rubber Gasket Sealant & Dressing on the o-rings and the camshaft end cap.
While it is true that many here never torque the head bolts, you have to ask yourself, "Do you feel lucky?"
Below is a copy-and-paste of a post I made a while back concerning this subject:
I think the choice of sealant here is fairly important. Since the job is such a PITA, you don't want to go back in there a few miles later for an oil leak.
I used to use Permatex® Ultra Copper® Maximum Temperature RTV Silicone Gasket Maker with fairly good luck. I'd just have some minor seepage starting after about 4000 miles.
The last time I did this job, I used Permatex® Ultra Grey® Rigid High-Torque RTV Silicone Gasket Maker. I got a leak after about 600 miles (under the front, port-side corner of the head cover), but I think that was my fault due to a faulty torque protocol (keep in mind that the Ultra Grey sets up pretty rigid):*********************************************************
When installing the cylinder head cover, the FSM says to tighten the cylinder head bolts "diagonally." Clymers says the same thing, but adds to tighten the bolts in the middle of the cylinder head cover first.
With this vague guidance in mind, here is the bolt tightening order I've arrived at after removing and installing the cylinder head cover a few times (loosening order (e.g. when removing the cylinder head) will be the reverse of the tightening order):
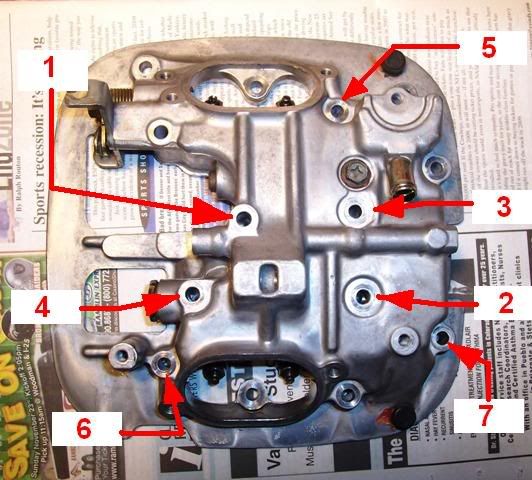
My methodology was to start with the inner-most bolts and move diagonally as much as possible. This is just the pattern I have been using. Your way most likely will be better, please share if so.
I torque these bolts using a 0-200 in-lb beam torque wrench in three stages (snug, half-torque, full-torque).*****************************************************
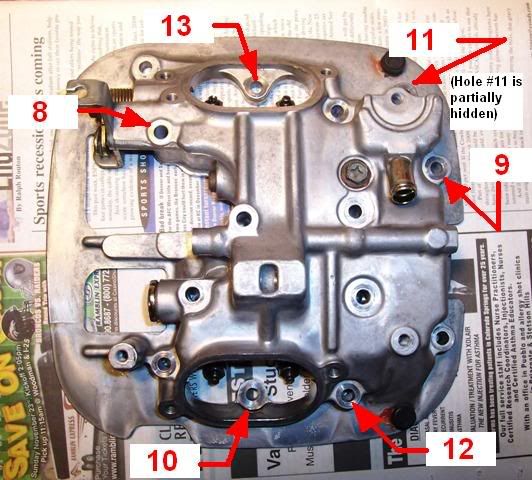
So, off the head cover came again. This time, I did things a little different:**********************************************************
You may have noticed that, in the above post, I did not consider torquing the bolt that goes in the top left hole in the pictures.
This is because that bolt is also used to secure the left decorative chrome head cover. With that cover in place, some of the other head cover bolts would be hard to access.
However, if you don't mind going through a little extra trouble, you can torque the head cover in a more complete fashion.
Here is what I used to take the place of the decorative head cover - a stack of washers:

I just placed a bunch of washers on the bolt. This allowed me to torque the bolt down properly.
After the gasket sealant used on the head cover was cured, I removed the washers and installed the left decorative chrome head cover.
Here is the torque order I used with the extra bolt in play: 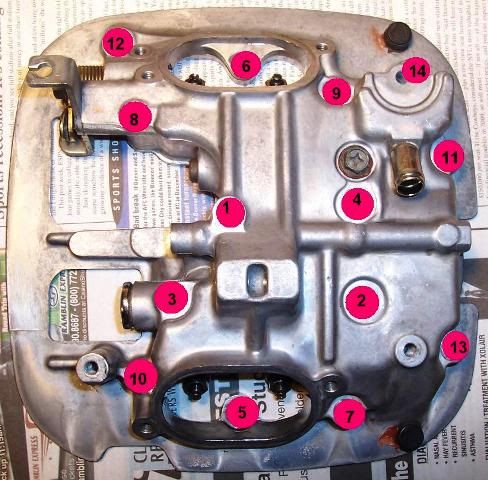
**********************************************************
No leaks yet.....I hope it works this time!
BTW, this stuff seems to be working well on the rubber plug, along with the rubber camshaft end cap: Permatex® Ultra Rubber Gasket Sealant & Dressing.
IHTH someone!

 Pages: 1

