Donate!
Welcome, Guest. Please Login or Register :: View Members
Pages: 1 2 3 4 5 6 ... 8
Send Topic Print
Savage "Plug/Cap" Leak (Read 14314 times)
Digger
Serious Thumper
2005 No Login
*****
Offline

Ya gotta be tough to
ride singles!

Posts: 1604
Colorado Springs, CO
Gender: male
Re: Savage "Plug/Cap" Leak
Reply #45 - 07/16/09 at 19:15:57
 
When installing the cylinder head cover, the FSM says to tighten the cylinder head bolts "diagonally."  Clymers says the same thing, but adds to tighten the bolts in the middle of the cylinder head cover first.

With this vague guidance in mind, here is the bolt tightening order I've arrived at after removing and installing the cylinder head cover a few times (loosening order (e.g. when removing the cylinder head) will be the reverse of the tightening order):


My methodology was to start with the inner-most bolts and move diagonally as much as possible.  This is just the pattern I have been using.  Your way most likely will be better, please share if so.

I torque these bolts using a 0-200 in-lb beam torque wrench in three stages (snug, half-torque, full-torque).

IHTH!
Back to top


Digger
2001, Metallic Glacial Blue, Raptor Petcock, Verslavy (first hole) (otherwise, mechanically, the bike is stock), 13,xxx miles
I don't own a cage.
www.astronautbiker.com
WWW   IP Logged
Digger
Serious Thumper
2005 No Login
*****
Offline

Ya gotta be tough to
ride singles!

Posts: 1604
Colorado Springs, CO
Gender: male
A Variation on Head Cover Bolt Torque Order
Reply #46 - 05/15/10 at 17:18:48
 
You may have noticed that, in the above post, I did not consider torquing the bolt that goes in the top left hole in the pictures.

This is because that bolt is also used to secure the left decorative chrome head cover.  With that cover in place, some of the other head cover bolts would be hard to access.

However, if you don't mind going through a little extra trouble, you can torque the head cover in a more complete fashion.

Here is what I used to take the place of the decorative head cover - a stack of washers:


I just placed a bunch of washers on the bolt.  This allowed me to torque the bolt down properly.

After the gasket sealant used on the head cover was cured, I removed the washers and installed the left decorative chrome head cover.


Here is the torque order I used with the extra bolt in play:
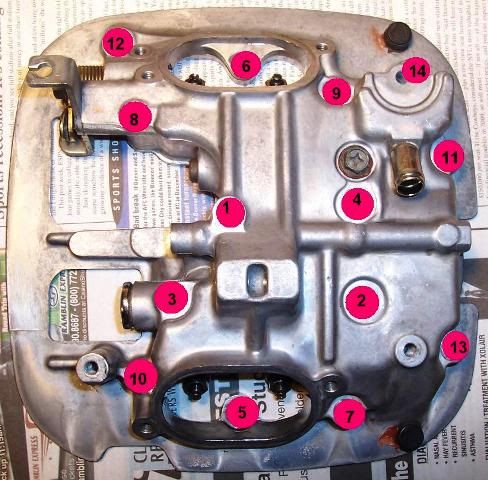


IHTH someone!
Back to top
 
« Last Edit: 05/15/10 at 18:35:48 by Digger »  

Digger
2001, Metallic Glacial Blue, Raptor Petcock, Verslavy (first hole) (otherwise, mechanically, the bike is stock), 13,xxx miles
I don't own a cage.
www.astronautbiker.com
WWW   IP Logged
verslagen1
YaBB Moderator
ModSquad
*****
Offline

Where there's a
will, I want to be
in it.

Posts: 28754
L.A. California
Gender: male
Re: Savage "Plug/Cap" Leak
Reply #47 - 09/12/10 at 18:39:37
 
the number refers to the length
"C"  are for the chrome covers, install later.
l65+nut is the one that's installed upside down
* gets a rubberized sealing washer.
the L70 gets installed before putting the cover on if you're installing in the frame.

Back to top
 
 
WWW   IP Logged
Digger
Serious Thumper
2005 No Login
*****
Offline

Ya gotta be tough to
ride singles!

Posts: 1604
Colorado Springs, CO
Gender: male
Re: Savage "Plug/Cap" Leak
Reply #48 - 10/16/10 at 20:40:49
 
verslagen1 wrote on 09/12/10 at 18:39:37:
the number refers to the length
"C"  are for the chrome covers, install later.
l65+nut is the one that's installed upside down
* gets a rubberized sealing washer.
the L70 gets installed before putting the cover on if you're installing in the frame.
http://suzukisavage.com/images/uploaded/HeadPattern01web.jpg


Ver,

Re that diagram:  I've always wondered what they mean by "Yellow bolt" in the text on the right.

Also, in that same text area, is "L75 : Chroming bolt."  Try as I might, I can't find a 75mm-long bolt in the diagram.

Ideas?
Back to top


Digger
2001, Metallic Glacial Blue, Raptor Petcock, Verslavy (first hole) (otherwise, mechanically, the bike is stock), 13,xxx miles
I don't own a cage.
www.astronautbiker.com
WWW   IP Logged
verslagen1
YaBB Moderator
ModSquad
*****
Offline

Where there's a
will, I want to be
in it.

Posts: 28754
L.A. California
Gender: male
Re: Savage "Plug/Cap" Leak
Reply #49 - 10/16/10 at 21:15:24
 
The only clue I see to chroming bolt is as I said, for attaching the chrome covers later.  Which are 3 sizes, 20,25 & 65.  so I assume it's a typo.

Yellow bolt may be a special bolt to match thermal growth in that location.
Back to top
 
 
WWW   IP Logged
Rocket
YaBB Newbies
*
Offline

SuzukiSavage.com
Rocks!

Posts: 13

Re: Savage "Plug/Cap" Leak
Reply #50 - 01/18/13 at 06:40:27
 
I am trying to renew the head gasket and the gaskets under the head cover as well as this plug cap to stop leakage down the left cylinder fins.  

Was hoping to be able to do without taking entire engine out of the frame, but am having trouble getting the head cover off the head due to low frame clearance.  I'm thinking that if I loosen and remove the bottom front three frame bots, that might allow me to let the engine swing down and inch or so between the frame,and give me the extra inch I need to slide the head cover off the valve train.  Anyone tried this as an alternative to pulling the engine?  (By the way, my frame is more basic, as this is a Ryca Cafe conversion)

Undecided
Back to top
 
 
  IP Logged
verslagen1
YaBB Moderator
ModSquad
*****
Offline

Where there's a
will, I want to be
in it.

Posts: 28754
L.A. California
Gender: male
Re: Savage "Plug/Cap" Leak
Reply #51 - 01/18/13 at 06:57:32
 
If you're gonna take the head off... bite the bullet and take the engine out.
Back to top
 
 
WWW   IP Logged
Rocket
YaBB Newbies
*
Offline

SuzukiSavage.com
Rocks!

Posts: 13

Re: Savage "Plug/Cap" Leak
Reply #52 - 01/18/13 at 08:50:39
 
Thanks for the frank advice.  You know I didn't want to hear that!  The engine has been out before, when I did the Ryca conversion.  It is hard to get out of the frame without scraping the frame, and that is my primary reason for not wanting to remove it, I have a nice new paint job on the frame.  Second, I find it really annoying that they'd make a single cylinder motorcycle that wont'd allow the head to come off without pulling the engine.   Rocket
Back to top
 
 
  IP Logged
Rocket
YaBB Newbies
*
Offline

SuzukiSavage.com
Rocks!

Posts: 13

Re: Savage "Plug/Cap" Leak
Reply #53 - 03/07/13 at 09:07:42
 
I'm doing a head gasket and replacing the cap.  With a new head gasket, at what milage will the head need to be retorqued?  (Pain in the you-know-what, as most of the work is in gettting down to and removing that head cover!)

Advice appreciated.
Back to top
 
 
  IP Logged
Dave
YaBB Moderator
ModSquad
*****
Offline

SuzukiSavage.com
Rocks!

Posts: 17799
Camp Springs, Kentucky
Gender: male
Re: Savage "Plug/Cap" Leak
Reply #54 - 08/27/13 at 13:17:50
 
Off topic replies have been moved to this thread.
Back to top


Someday I will be old......But not today!

  IP Logged
terpfan1980
Full Member
***
Offline

SuzukiSavage.com
Rocks!

Posts: 130
Near DC
Gender: male
Re: Savage "Plug/Cap" Leak
Reply #55 - 10/06/13 at 17:23:05
 
Possibly stupid question, but hopefully not.  My 1998 LS650 continues to have this issue.  I'd like to get it fixed once and for all and probably can with some help from my dad, but it requires getting all of the right parts, etc.

In the picture of the head cover that is held up by the spousal unit (above), it appears that there's a gasket under the head cover.  I can't seem to figure out what part that is when looking over the diagrams.  Suggestions/recommendations on what that part is called or is it even an orderable part?
Back to top
 
 
  IP Logged
Dave
YaBB Moderator
ModSquad
*****
Offline

SuzukiSavage.com
Rocks!

Posts: 17799
Camp Springs, Kentucky
Gender: male
Re: Savage "Plug/Cap" Leak
Reply #56 - 10/08/13 at 08:04:39
 
terpfan1980 wrote on 10/06/13 at 17:23:05:
In the picture of the head cover that is held up by the spousal unit (above), it appears that there's a gasket under the head cover.  I can't seem to figure out what part that is when looking over the diagrams.  Suggestions/recommendations on what that part is called or is it even an orderable part?


That red color is the sealant that has not yet been cleaned off after the head cover was removed.  The sealer needs to be removed, the parts cleaned, and new sealler applied before assembly.  I recommend you buy the correct Suzukibond...but others have used RTV gasket products succesfully and saved a few bucks.
Back to top


Someday I will be old......But not today!

  IP Logged
terpfan1980
Full Member
***
Offline

SuzukiSavage.com
Rocks!

Posts: 130
Near DC
Gender: male
Re: Savage "Plug/Cap" Leak
Reply #57 - 10/08/13 at 15:34:21
 
Dave wrote on 10/08/13 at 08:04:39:
terpfan1980 wrote on 10/06/13 at 17:23:05:
In the picture of the head cover that is held up by the spousal unit (above), it appears that there's a gasket under the head cover.  I can't seem to figure out what part that is when looking over the diagrams.  Suggestions/recommendations on what that part is called or is it even an orderable part?


That red color is the sealant that has not yet been cleaned off after the head cover was removed.  The sealer needs to be removed, the parts cleaned, and new sealler applied before assembly.  I recommend you buy the correct Suzukibond...but others have used RTV gasket products succesfully and saved a few bucks.

Thanks for the clarification. One last clarification, I assume that when it's being applied it just needs to have a bead around the same places it was previously (or as seen in the picture).  In other words, don't be stupid when applying it, just use enough to do the job and no more  (asking from the point of view of someone that was never good at soldering because well, more is always better, right? Wink )
Back to top
 
 
  IP Logged
Dave
YaBB Moderator
ModSquad
*****
Offline

SuzukiSavage.com
Rocks!

Posts: 17799
Camp Springs, Kentucky
Gender: male
Re: Savage "Plug/Cap" Leak
Reply #58 - 10/09/13 at 05:30:51
 
A very thin bead is all that is required.  If you looked at the factory job, you saw very little had squeezed out.  The sealing is done by the mating of the surfaces.....not by the goo that squeezes out.  You put in too much sealer and you can also squeeze out stuff into the internal oil passages that feed oil to the cam......and then it will fail.

Nothing screams....."I have been worked on by an amateur" as much as a glob of orange or blue goo sticking out of the seams does.  Don't do this:
Back to top
 

headsealplug-032.jpg

Someday I will be old......But not today!

  IP Logged
Dave
YaBB Moderator
ModSquad
*****
Offline

SuzukiSavage.com
Rocks!

Posts: 17799
Camp Springs, Kentucky
Gender: male
Re: Savage "Plug/Cap" Leak
Reply #59 - 10/09/13 at 05:36:45
 
When applying the sealant you can't do a good job squeezing a bulky tube.  I squeeze the sealant into a plastic disposable syringe, then use the syringe to applly a nice thin bead about the size of a pencil lead.  You can get the syringe at any drug store or medical supply place.  You want one about the size of a cigarette - the barrel should be about the size of the spout on the tube so you can squeeze the sealant in easily.

Back to top
 

syringe.jpg

Someday I will be old......But not today!

  IP Logged
Pages: 1 2 3 4 5 6 ... 8
Send Topic Print


« Home

 
« Home
SuzukiSavage.com
04/23/24 at 23:46:04


General CategoryTechnical Documents/Reference › Savage "Plug/Cap" Leak


SuzukiSavage.com » Powered by YaBB 2.2!
YaBB © 2000-2007. All Rights Reserved.